Mapsted Mobile SDK
Mapsted Mobile SDK
Current versions: iOS v26.7.1 (latest) · Android v26.7.1 · React Native v26.7.2 (wrapper on native 26.7.1) · Flutter v26.7.1 · Ionic/Cordova v26.7.1.
New to a release? See the Release Notes (current + Past Releases) and the migration guides for iOS, Android, React Native, Flutter, and Ionic / Cordova.
Introduction
What is the Mapsted Maps Mobile Framework?
The Mapsted Maps mobile framework is a cross-platform development toolkit which allows you to quickly integrate Mapsted's core location technology into your own applications. The framework is organized into many modules for easy integration.
Foundational SDKs
The three foundational SDKs are a very common starting point for integrating the Mapsted SDK. The collection of three SDKs forms a solid basis to build upon, as they provide the core functionality (core-sdk), the core map (map-sdk), and the prebuilt map-related UI (map-ui-sdk). Note that, if desired, one could develop their own map and/or map UI instead of using all the foundational SDKs.
core-sdk: This module contains Mapsted's core location positioning technology, analytics data collection, and various data retrieval and wayfinding logic functionality.
map-sdk: This module contains the interactive map, and includes built-in functionality for plotting floorplans, blue-dot, wayfinding routes, etc.
map-ui-sdk: This module builds on the map-sdk by adding various prebuilt map-related UI/UX, including views for the map, itinerary management, route previews, turn-by-turn navigation, and more.
Additional SDKs
ui-components-sdk: A collection of beautiful, modern prebuilt UI/UX components, which are optimized for, and include, built-in integration with the Mapsted Maps mobile framework. You can import these components directly for use in your own application.
geofence-sdk: This module provides the ability to setup programmatic hyperlocal geofences which can be triggered based on a combination of various criteria (e.g., vicinity to a point of interest), direction (e.g., on enter, on exit), as well as other factors (e.g., trigger immediately, trigger on dwell for some timespan). These geofences can be programmatically created and a callback is received if the combinations of conditions trigger simultaneously. Note that these geofences require the mobile sdk to be given location permissions and be running in either the foreground or background.
geofence-offline-sdk: This module provides the ability to trigger push notifcations when the user enters the vicitiny of a given property/venue when the app is currently closed. Note that this module requires that the mapsted-sdk has been previously initialized and also requires the necessary background location permissions.
inapp-notification-sdk: This module provides various prebuilt UI/UX components for displaying in-app notifications (e.g., based on geofence, alert, or location marketing triggers).
loc-marketing-sdk: This module provides direct integration with the Mapsted Notify CMS to handle various geofence-based triggers and display the corresponding events using the inapp-notification-sdk UI/UX.
alerts-sdk: This module provides direct integration with the Scheduled and Emergency Alerts which are configured via the Mapsted Manage CMS. The alerts-sdk provides various built-in UI/UX but also incorporates the inapp-notification-sdk UI/UX.
loc-share-sdk: This module provides to quickly share user’s current location to anyone when they are inside a Property premises.
topbar-notification-sdk: This module enables the display of notifications at the top of the screen. It is designed to inform users about issues such as no internet connection, Bluetooth unavailability, or permission problems. Additionally, it can provide general notifications, like location sharing in progress or property downloads etc.
Application Templates
In addition to the mobile-sdk which can be integrated into your applications, Mapsted also offers an app-template module which offers a complete out-of-the-box application that integrate seamlessly with the mobile-sdk. Note that our app-template offers various degrees of customization (e.g., colour-scheme, branding, bottom navigation bar). If additional customization is desired, please contact sales.
app-template: The app-template module provides core functionality and utilities, serving as an out-of-the-box application template. It enables the rapid setup of applications, offering customization options such as programatically selecting the bottom navigation bar options, as well as adding custom tab bar options which can link your own views. The app-template will dynamically handle the display optimization for single- and multi-building properties. The app-template also supports adding your own custom branding (e.g., colour schemes, logos).
Mapsted Key Terms
This section will go over some key terminology that is unique to our products, to make it easier for you to get started with the Mapsted Maps Mobile Framework.
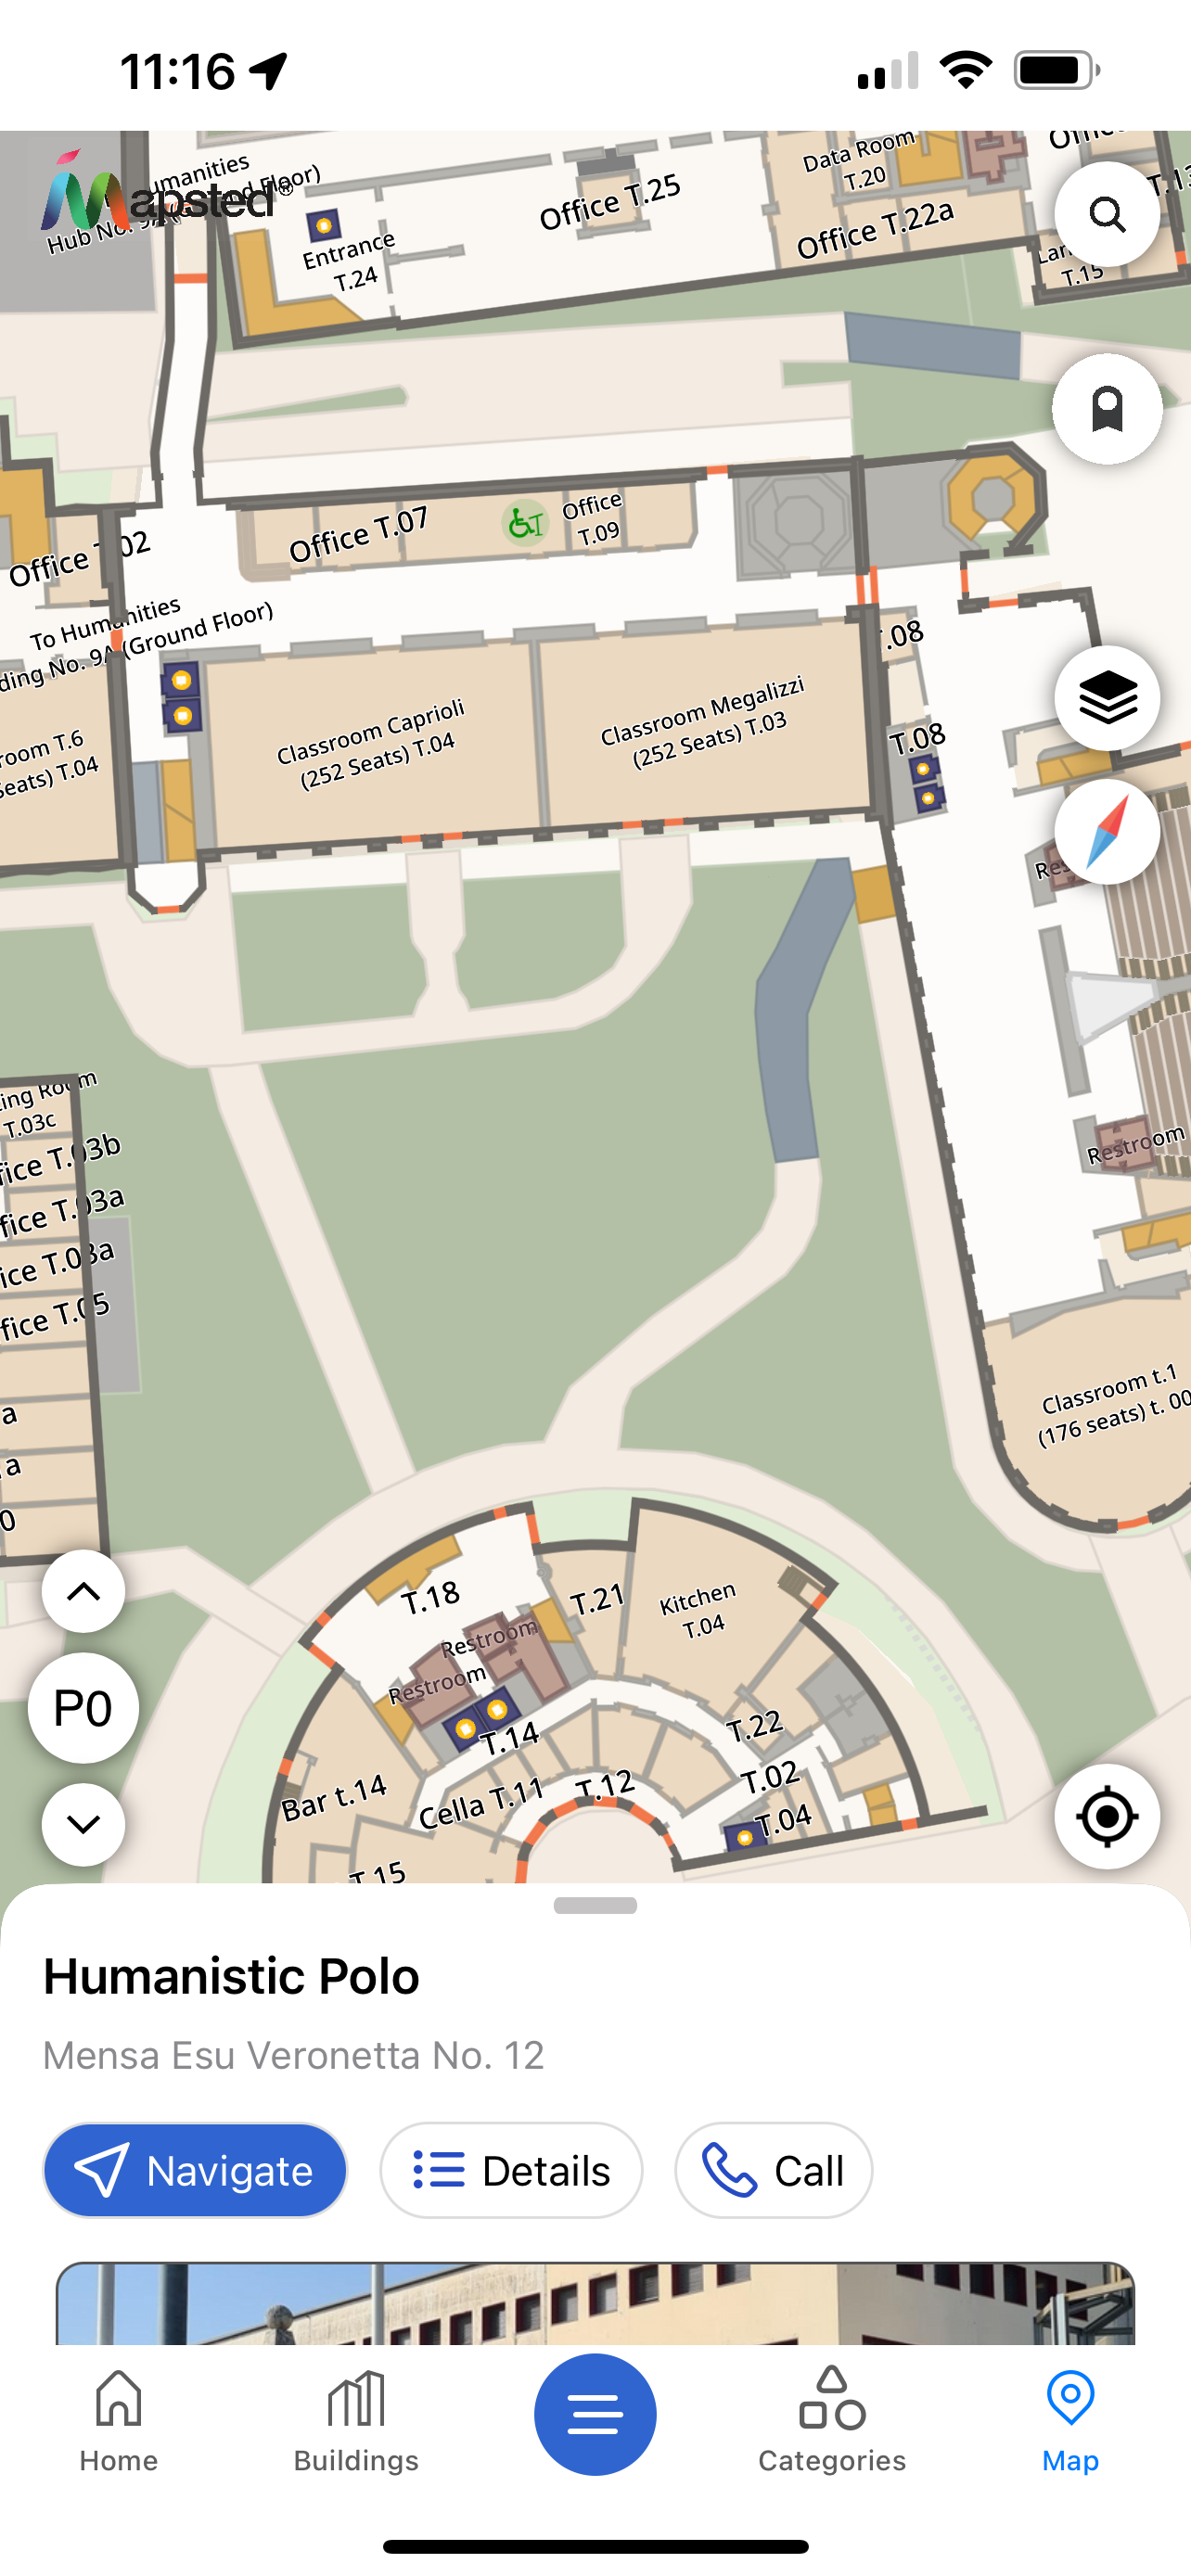
Properties, Buildings, and Floors
Each venue is referred to as a Property, which consists of one or more Building structures. Each of these Building structures contains one or more Floor structures. The Property establishes a relationship between related buildings. For reference, a visualization of the Property, Building, and Floor structures can be seen in the Figure below.
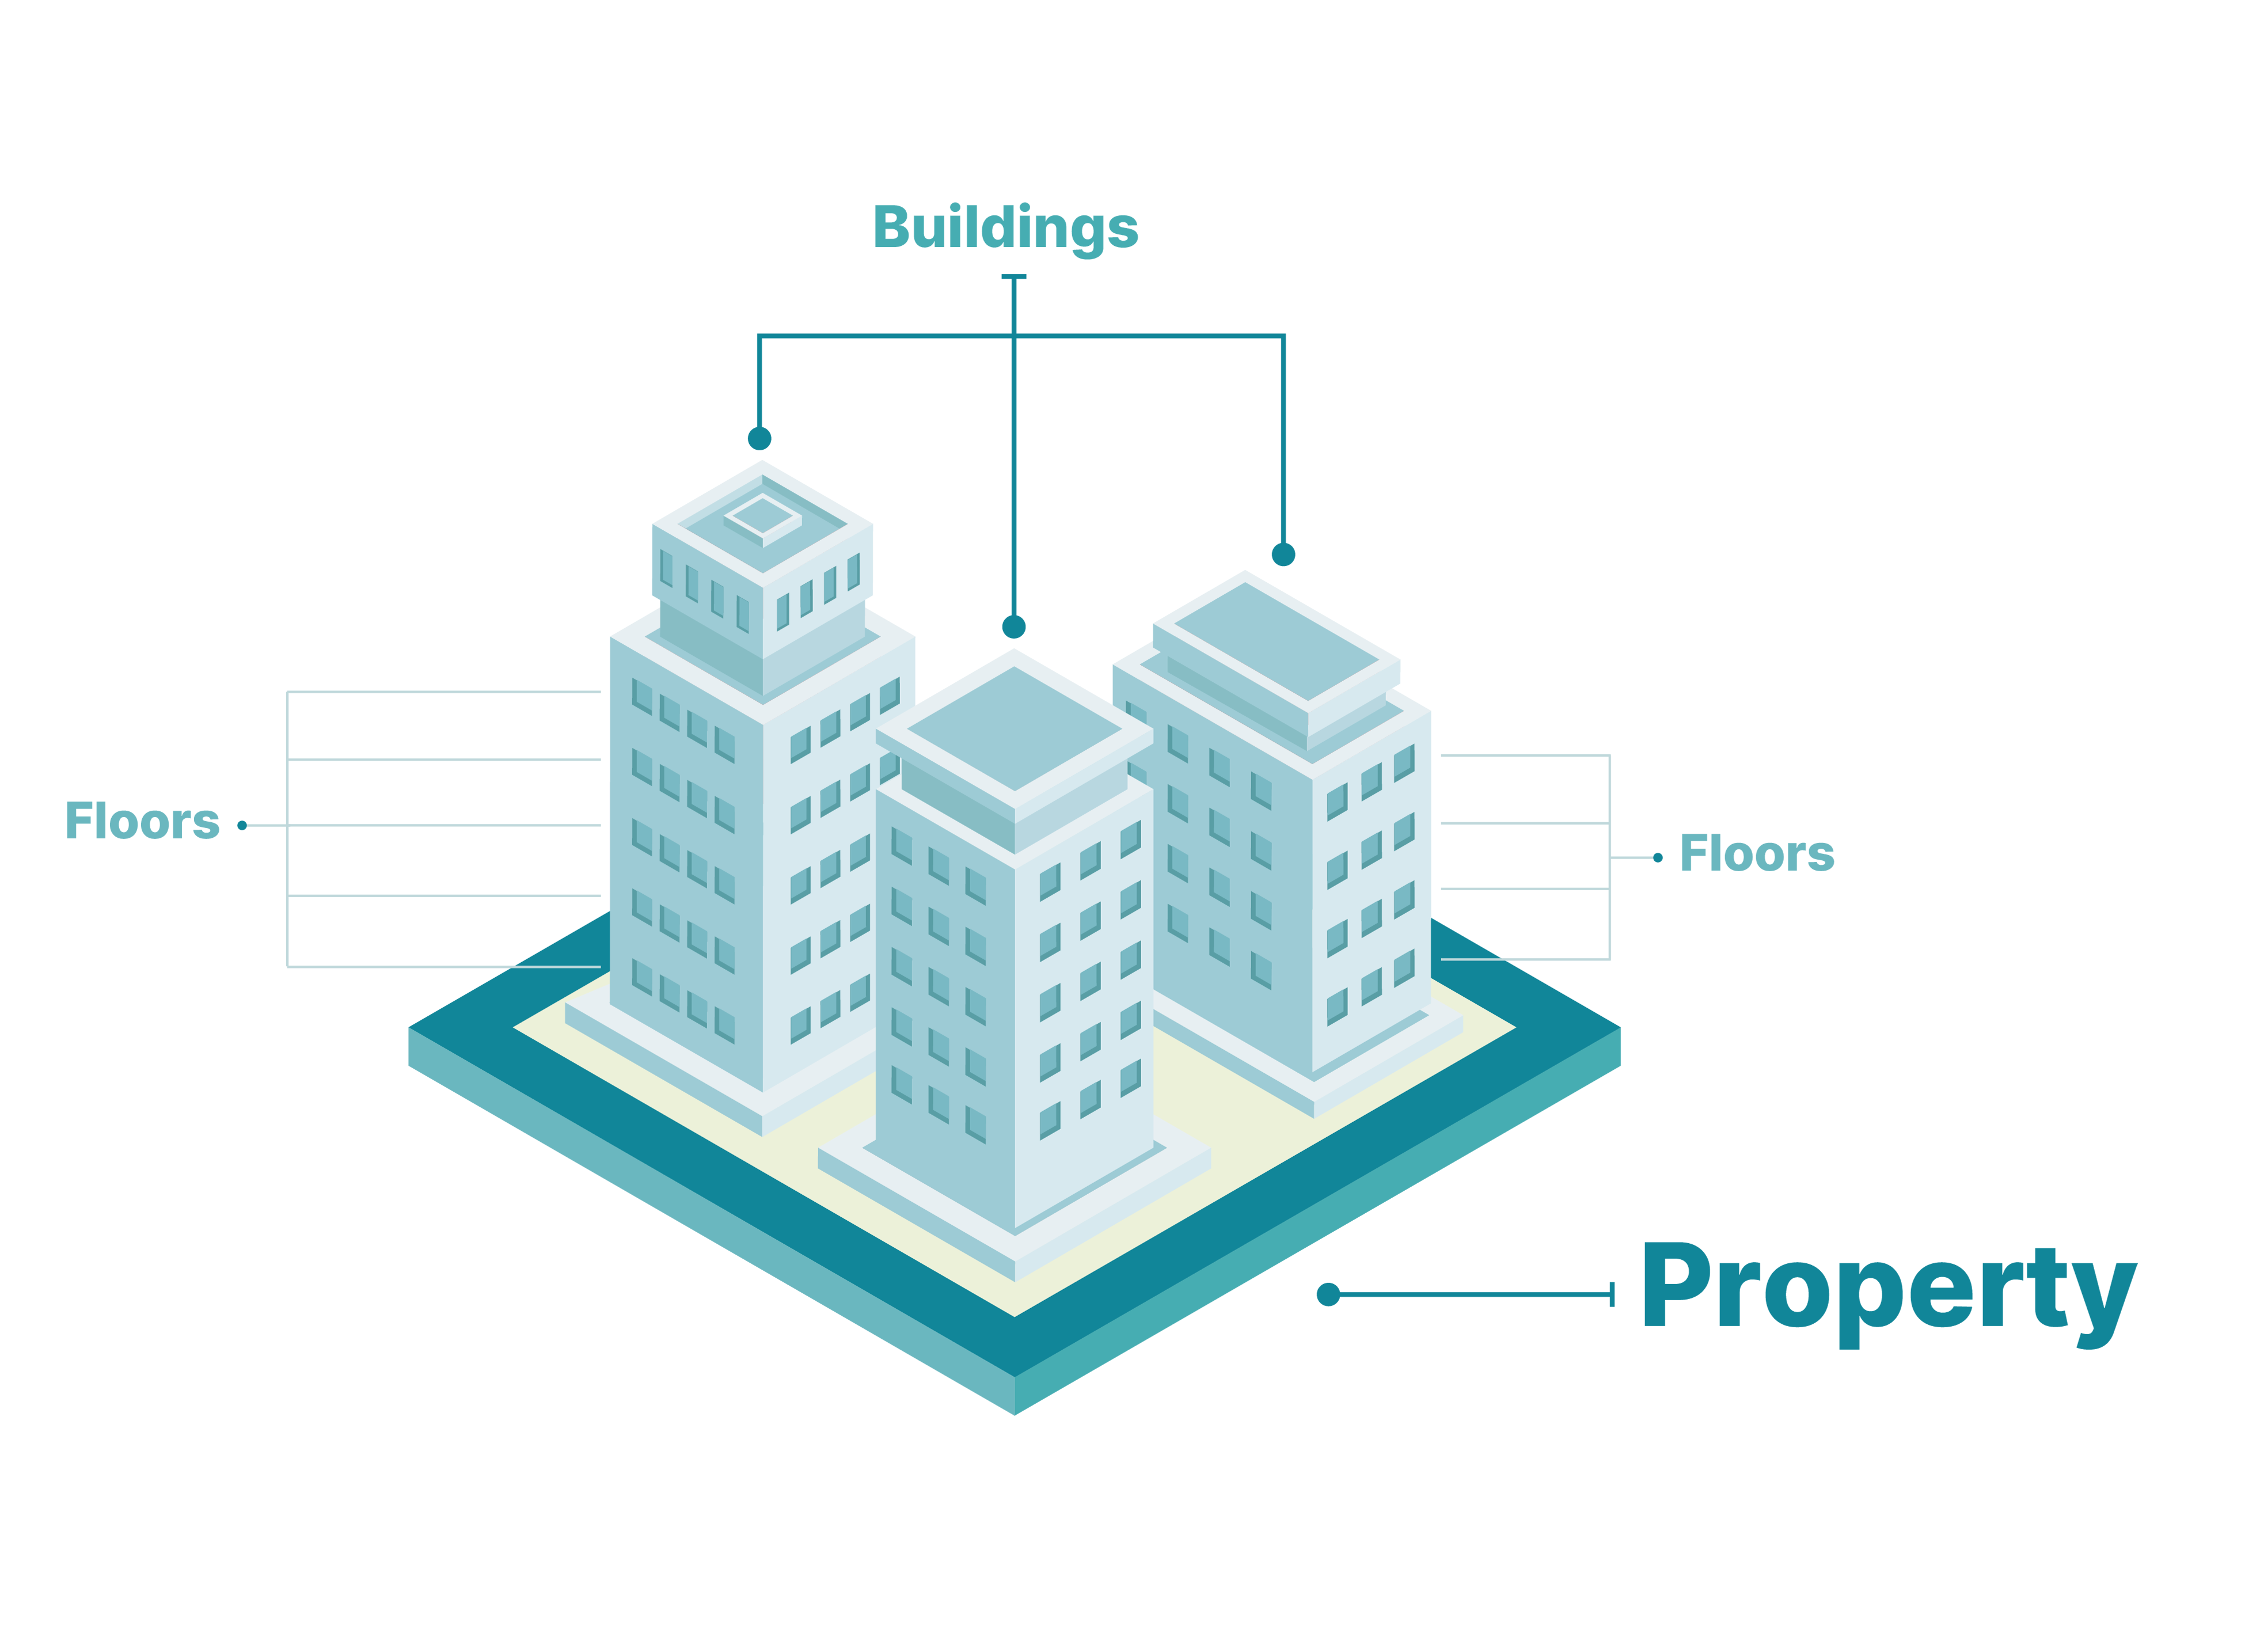
Each Property is identified by a PropertyId, each Building is identified by a BuildingId, and each Floor is identified by a FloorId. The PropertyId, BuildingId, and FloorId are unique across the Mapsted system.
Entities
An Entity is a fundamental element within a Property or Building. An Entity consists of a geometry type (i.e., MapPolygon, MapPolyline, MapPoint), a physical interpretation (e.g., Structure-Building, Structure-Room, or Obstacle-Wall), and at least one Category (e.g., Restaurant). One Entity can be associated with multiple categories, but each Entity will have one main Category.
Please see the figure below for a visualization of the Entity structure. Note that an Entity which is on the property-level (e.g., a building, parking garage, park, pond) is found in the PropertyEntities, and an Entity which is on the building-level (e.g., a room, elevator, wall) is found in the BuildingEntities.
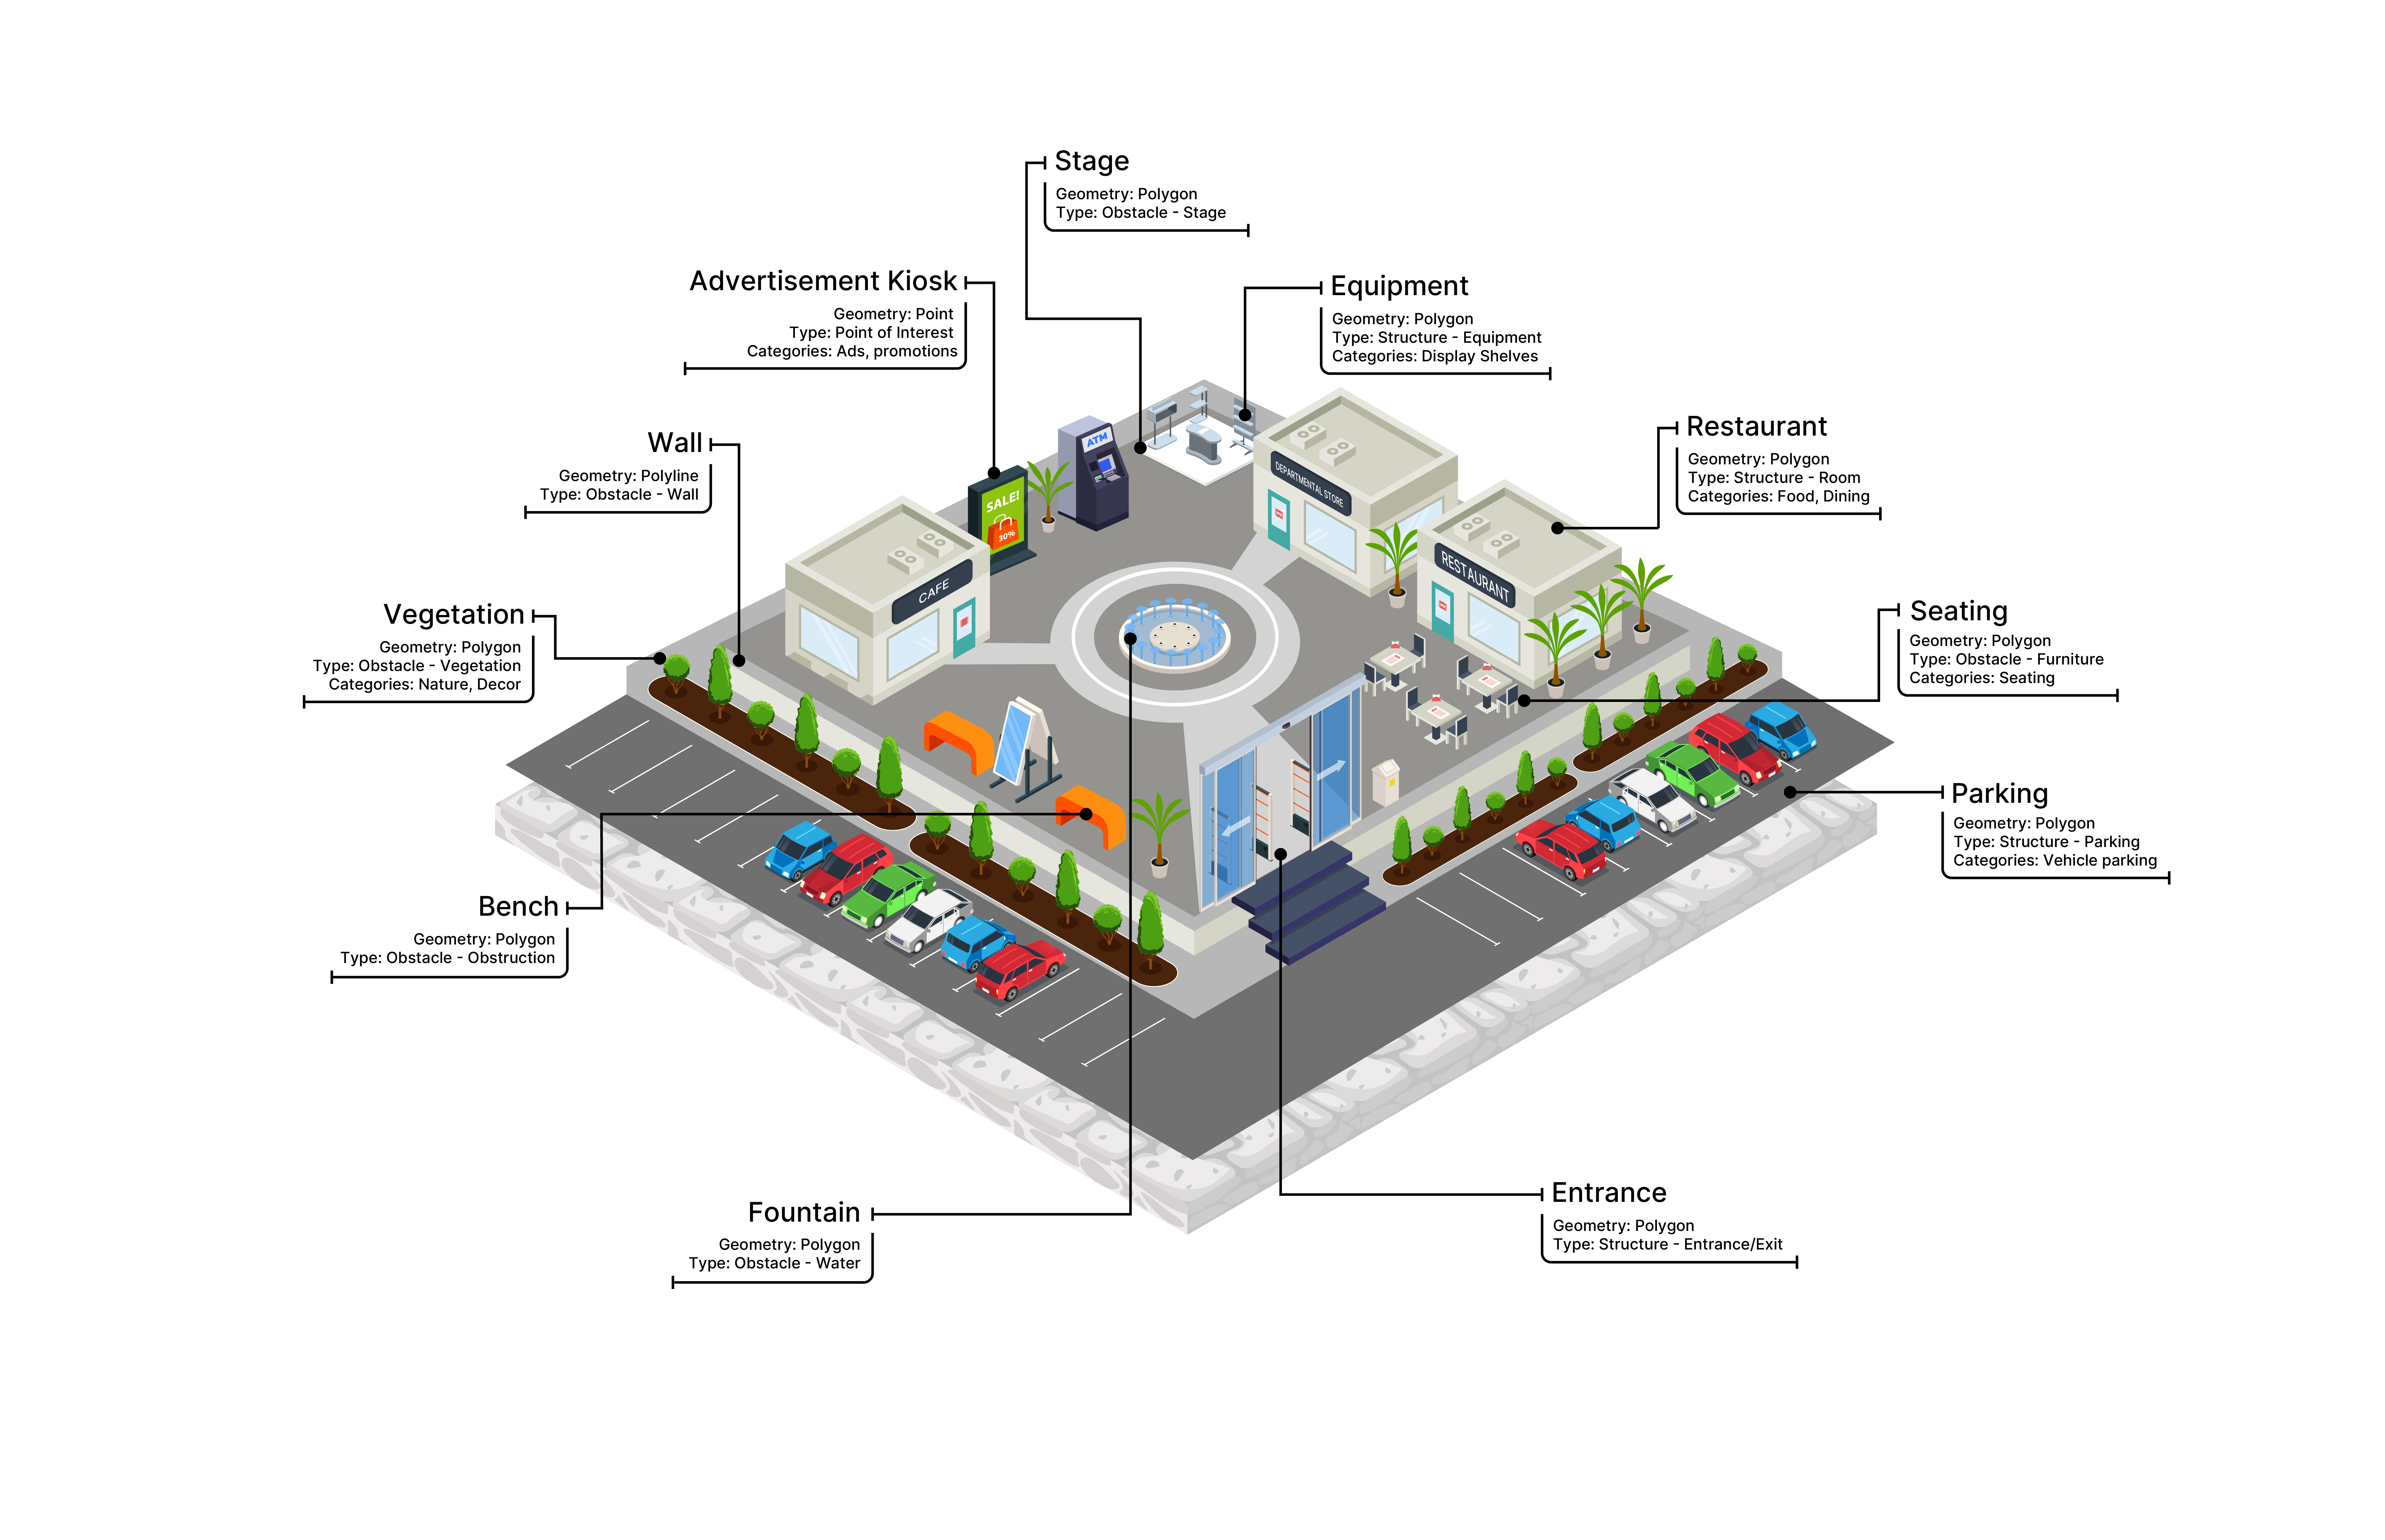
Each Entity is identified by an EntityId, and depending on the geometry type, will have an associated PolygonId, PolylineLineId, or PointId. Note that EntityId and corresponding geometry type id are only unique within their scope. This means that for PropertyEntities, the EntityId will be unique to that particular Property. In the case of BuildingEntities, the EntityId will be unique to that Building.
Interactive Map
Map interactions are a fundamental component of Mapsted's mobile map SDK. This section will demonstrate some sample usages.
Map Interactions
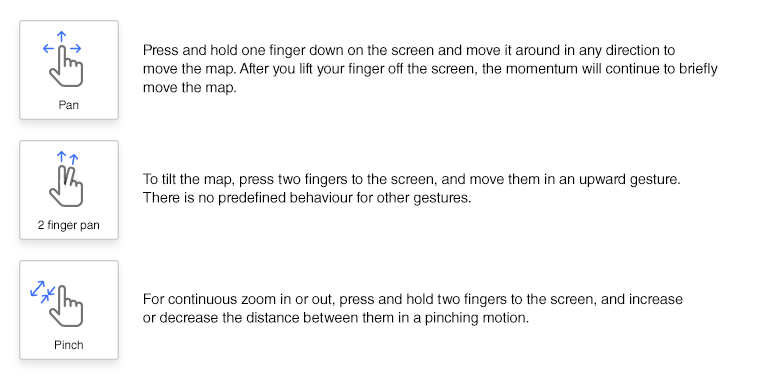
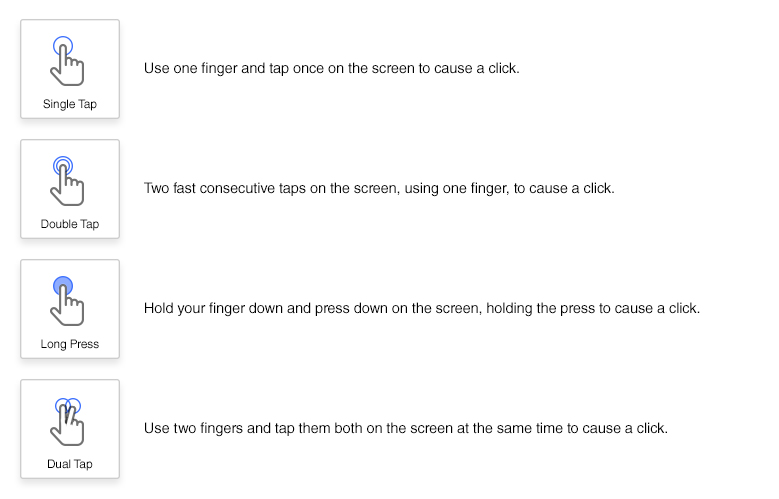
The map view supports two types of map interactions, map gestures and map clicks. Map gestures allow for pan, zoom, tilt, and rotations, while map clicks allow for customizable actions (e.g., selection of entities).
Map Gestures
All common map gestures are supported by default. Learn more about the available map gestures and their effects below.
A Map Event listener can be registered to be notified when the map state changes. There are three types of map event notifications available.
- Idle Map: A user is notified when the map view is finished rendering
- Stable Map: A notification is sent out when all map animations have finished, and the user has lifted their fingers off the screen
- Map Moved: This type of notification occurs when a map gesture is in progress, such as when a map is being panned, rotated, tilted, or zoomed
Below is some sample code to register a listener to be notified of map state changes.
// Handle Map's event types
MapApi.MapEventListener mapEventListener = new MapApi.MapEventListener() {
    @Override
    public void onMapEvent(MapEvent event) {
        switch (mapEvent.getEventType()) {
            case MapEvent.MAP_IDLE:
                // handle idle event
                break;
            case MapEvent.MAP_STABLE:
                // handle stable event
                break;
            case MapEvent.MAP_MOVED:
                // handle map moved event
                break;
        }
    }
};

// Register listener
mapApi.mapView().addMapEventListener(mapEventListener);

// Unregister listener
mapApi.mapView().removeMapEventListener(mapEventListener);
extension YourViewController: MapEventListener {
    func onMapEvent(event: MapstedMap.MapEvent) {
        if event == .MAP_IDLE {
            //Handle the map idle state
        }
        else if event == .MAP_MOVED {
            //Handle the map moved state
        }
        else if event == .MAP_STABLE {
            //Handle the map stable state
        }
        else if event == .MAP_INTERACTION {
            //Handle the map interaction
        }
    }
}

//Here mapViewController is an object of MNMapViewController

// Register listener
mapViewController.addMapEventListenerDelegate(delegate: self)

// Unregister listener
mapViewController.removeMapEventListenerDelegate(delegate: self)
Map Clicks
Map click events indicate when the user has clicked on the map. A map click event consists of a click type, a click location, and a click entity. See below for definitions of the various types of clicks, including Single Tap, Double Tap, Long Press, and Dual Tap.
MapApi.MapClickListener mapClickListener = new MapApi.MapClickListener() {
    @Override
    public void onMapClickEvent(MapClickEvent mapClickEvent) {
        ClickType clickType = mapClickEvent.getClickType();
        MercatorZone clickLocation = mapClickEvent.getClickLocation();
        Entity clickEntity = mapClickEvent.getClickEntity();

        // Handle event
    }
};

// Register listener
mapApi.mapView().addMapClickListener(mapEventListener);

// Unregister listener
mapApi.mapView().removeMapClickListener(mapEventListener);
var previousClickEvent: MapClickEvent? = nil

extension MapViewController: MapClickListener {
    func onMapClicked(event: MapstedMap.MapClickEvent) {

        if MapstedMapCustomParameters.shared.enableAutomatedClickProcessing == false || event == previousClickEvent {
            return
        }

        //If ClickType is Single
        if event.getClickType() == .SINGLE {

            //If Entity is clicked
            if let clickedEntity = event.getClickEntity() {
                //Further process entity...
            }
            //If Overlay is clicked
            else if let mapOverlay = event.getClickOverlay(), mapOverlay.toolTipName != "" {
                //Further process overlay...
            }
        }
        else {
            //Process things like tap outside or tap on walkway, Long press, etc.
        }

        self.previousClickEvent = event;
    }
}

//Here mapViewController is an object of MNMapViewController

// Register listener
mapViewController.addMapClickListernerDelegate(delegate: self)

// Unregister listener
mapViewController.removeMapClickListenerDelegate(delegate: self)
Automatic Map Actions
The below code sample demonstrates how to enable or disable automatic pan, zoom, tilt, and rotation functionalities. These actions are controlled automatically in Mapsted’s UI SDK.
// Disable auto-follow
mapApi.mapView().camera().setCameraFollowUser(false);

// Enable auto-follow
mapApi.mapView().camera().setCameraFollowUser(true);

// Check auto-follow Status
boolean isCameraFollowUser = mapApi.mapView().camera().isCameraFollowUser();
// Disable auto-follow
MapstedMapApi.shared.setCameraAutofollow(enabled: false)

// Enable auto-follow
MapstedMapApi.shared.setCameraAutofollow(enabled: true)

// Check auto-follow Status
let isAutoFollow = MapstedMapApi.shared.isCameraAutoFollowEnabled()
Programmatic Map Actions
You can also programmatically adjust the map to control zoom, tilt, and rotation actions.
/*
Add custom parameters for map view events like zoom, tilt and rotate.
Create a list of UpdateMapEvent.
Add individual map view events with the necessary values.
Set the map view events on UpdateMapEvent object.
Call onUpdateMapEvent passing updateMapEvent object
*/

ArrayList<UpdateMapViewEvent> updateMapViewEvents = new ArrayList<>();
// Add the required map view events
// Specify the type of event, value for that event and the speed at which you want the event to occur
updateMapViewEvents.add(new UpdateMapViewEvent(UpdateMapViewEvent.TILT, 45.0f, 1.0f));
updateMapViewEvents.add(new UpdateMapViewEvent(UpdateMapViewEvent.ZOOM, 20.0f, 0.5f));
updateMapViewEvents.add(new UpdateMapViewEvent(UpdateMapViewEvent.RECENTER, 0f, 0.5f));
updateMapViewEvents.add(new UpdateMapViewEvent(UpdateMapViewEvent.ROTATE, 0f, 0.5f));

UpdateMapEvent updateMapEvent = new UpdateMapEvent();
updateMapEvent.setUpdateMapViewEvents(updateMapViewEvents);

mapApi.mapView().camera().onUpdateMapEvent(updateMapEvent);
//To simply center the map at a specific location at existing zoom, use:
MapstedMapApi.shared.mapView()?.moveToLocation(mercator: <MNMercator>)

//To center and update zoom use:
MapstedMapApi.shared.mapView()?.moveToLocation(mercator: <MNMercator>, zoom: <Float>, duration: <Float>)

//To rotate map, use:
MapstedMapApi.shared.mapView()?.setRotation(<Float>, durationSeconds: <Float>)

//To tilt map, use:
MapstedMapApi.shared.mapView()?.tiltMap(angle: <Float>, duration: <Float>)
Offline Maps
All downloaded map data is automatically stored in a local database and available for use offline. The SDK will automatically download map data, as needed, based on what is nearby. Map data downloads can also be managed programmatically, triggered by UI interactions. See below for sample code.
// start downloading map data for a given propertyId
coreApi.properties().startDownload(propertyId, new PropertyDownloadManager.Listener() {
    @Override
    public void onComplete(int propertyId) {
        //oncomplete
    }

    @Override
    void onFail(int propertyId, Exception e){
        //onfail
    }

    @Override
    public void onProgress(int propertyId, int current, int total) {
        //onprogress
    }
});

// When using the Map SDK, you can select and draw the property on the map
// Note that this will internally trigger a map download if it has not previously been downloaded
mapApi.data().selectPropertyAndDrawIfNeeded(propertyId, new MapApi.PropertyPlotListener() {
        @Override
        public void onCached(boolean isSuccess) {
            // If successful, property data has been loaded into memory and property is selected
        }

        @Override
        public void onPlotted(boolean isSuccess) {
            // If successful, property has completed being drawn on the map
        }

        @Override
        public void onPlottedBuilding(int buildingId, boolean isSuccess) {
        }

        @Override
        public void onPlottedBuildingsComplete(java.util.Set<Integer> plotted, java.util.Set<Integer> failed) {
        }
    });

// Properties can also be undrawn from the map as follows:
mapApi.data().removePropertyFromMap(propertyId);
let myPropertyId = 504

//Get the property manager from CoreApi
let propertyManager = CoreApi.PropertyManager

// To download property data, provide a delegate to
propertyManager.startDownload(propertyId: myPropertyId, propertyDownloadListener: self)

extension MyViewController: PropertyDownloadListener {
    public func onSuccess(propertyId: Int) {

    }
    public func onFailureWithProperty(propertyId: Int) {

    }

    public func onProgress(propertyId: Int, percentage: Float) {

    }
}

// To check the download status of a property
let downloadStatus = propertyManager.getDownloadStatus(propertyId: myPropertyId)

// You can retrieve property data using the property identifier
let propertyData = propertyManager.getCached(propertyId: myPropertyId)

// When using the Map SDK, you can select and draw the property on the map
let selected: Bool = true
MapstedMapApi.shared.drawProperty(isSelected: selected, propertyData: propertyData)

// To delete downloaded property data
propertyManager.delete(propertyId: myPropertyId, listener: self)

// To undraw a property from the map using MapSDK
MapstedMapApi.shared.removeProperty(propertyId: myPropertyId)
Prebuilt Map View
You have the option to customize the Prebuilt Map View in a variety of different ways. A few examples are detailed below.
// Set custom params prior to initializing the Mapsted SDK
CustomParams params = CustomParams.newBuilder(context)
                .setBaseMapStyle(BaseMapStyle.DARK) // Set theme to dark
                .setMapPanType(MapPanType.RESTRICT_TO_SELECTED_PROPERTY) // restrict map panning to property
                .setMapZoomRange(new MapstedMapRange(6.0f, 24.0f)) // restrict map zoom range
                .build();

// ...

// Note: For runtime map parameter adjustments, use the following api
mapApi.mapView().camera().setCameraFollowUser(false);
//Set the map theme to dark
MapstedMapApi.shared.setBaseMapStyle(style: .DARK)

//Set map panning to restricted which limits panning to a region around the property
MapstedMapApi.shared.setMapPanType(type: MapstedMapMeta.MapPanType.eRestrictToProperty)
Custom Map View
You can power your application using our position location technology, while using your own MapView. The Location Positioning Technology guide shows you how to access user location information. Mapsted uses Open Street Maps as the georefence for user locations, buildings, and other map elements. If your system uses a basemap such as Google maps or Apple maps, please contact us, so we can make sure that our user locations, buildings, and other map elements are appropriately georeferenced for your basemap.
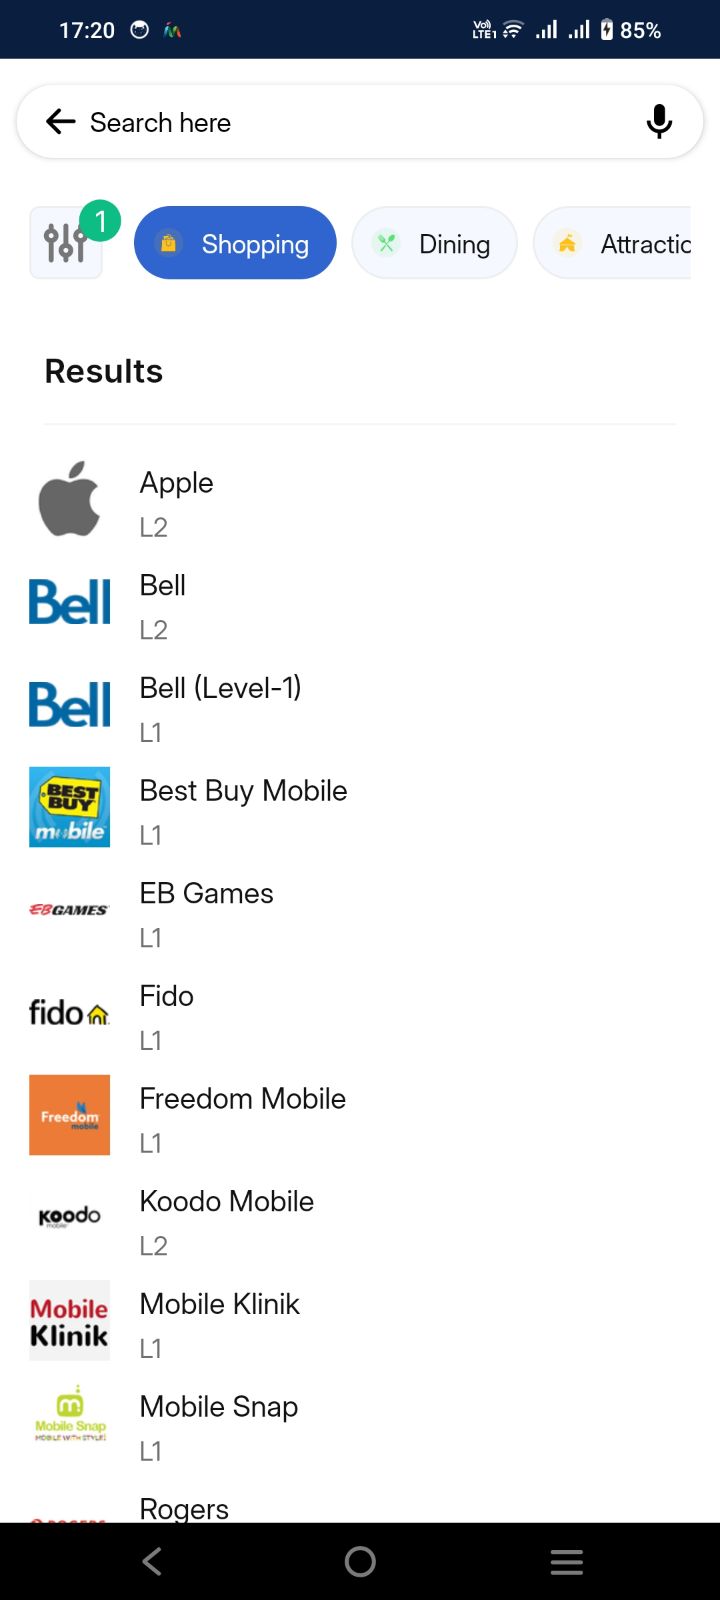
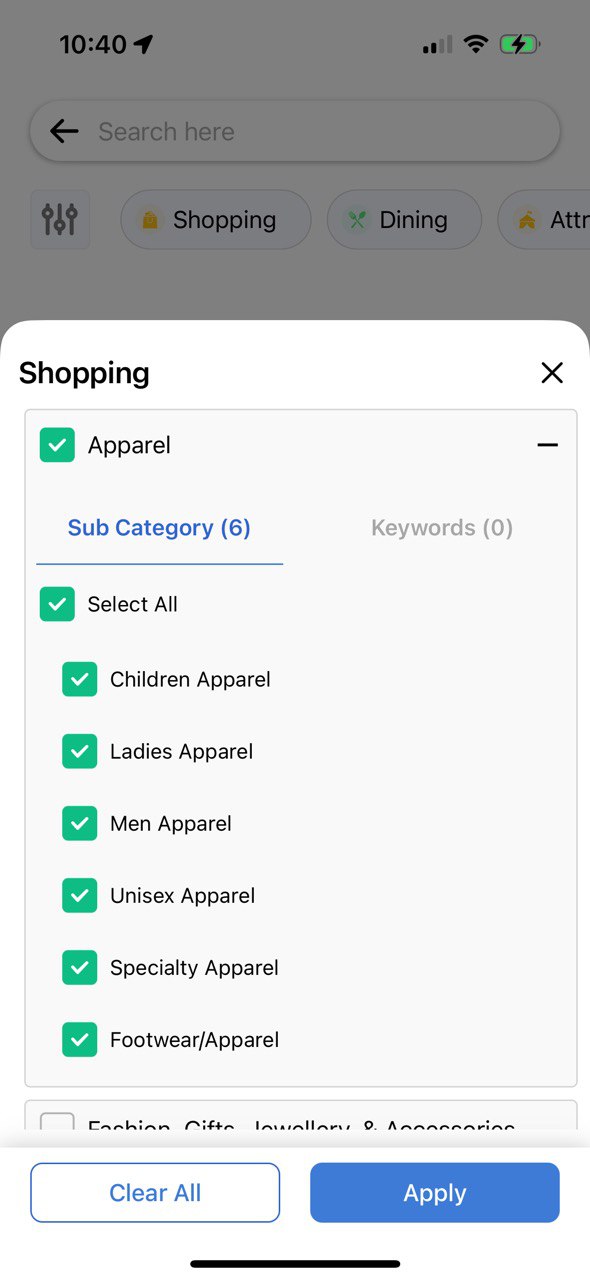
Intelligent Search
Mapsted's prebuilt UI/UX includes intelligent search. This type of search offers comprehensive filtering options and shows recent Searches, finds matches based on names, and keywords or categories. Additionally, the interface provides a seamless navigation experience through collapsible filter panels, ensuring an intuitive and efficient search process.
Prebuilt UI/UX
Prebuilt UI/UX automatically uses the intelligent search functionality.
Search via Categories and filter
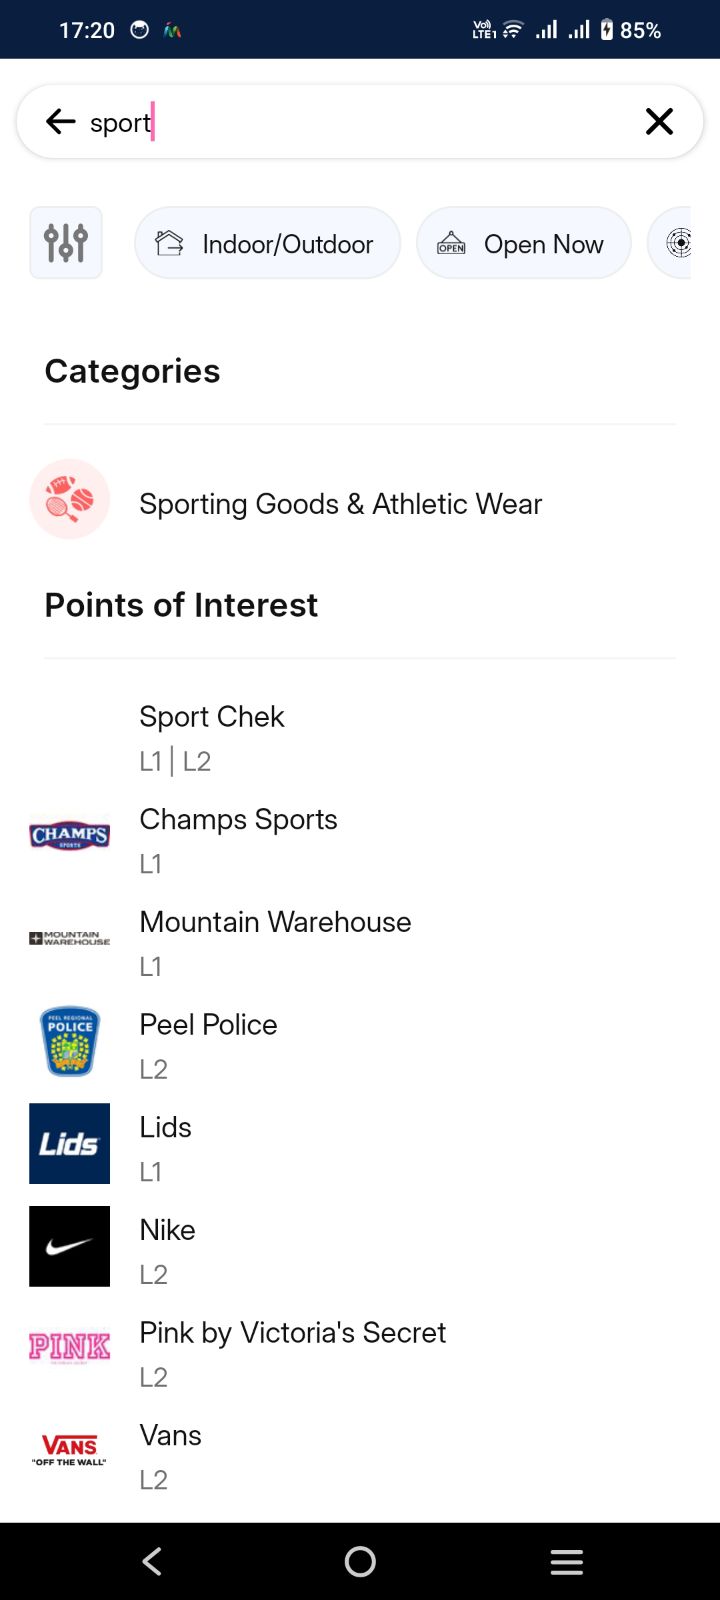
Advanced Refinement
Refine your search results by narrowing down with categories, subcategories, and keywords for greater accuracy.
Search via Reverse Geocoding (Coming Soon)
Reverse geocoding is supported within properties and buildings. Using reverse geocoding, a MercatorZone object, like a ClickLocation from a ClickEvent, can be passed in and an Entity object will be returned. If the specified MercatorZone corresponds to a specific Entity, that entity will be returned, otherwise it will return null.
Customizable UI/UX
If Mapsted's prebuilt UI/UX is not used, the intelligent search functionality can also be programmatically accessed, as shown in the sample code in the section named "Points of Interest".
Points of Interest
Mapsted's SDK provides several ways to searching for, selecting and navigating to points of interest
Find and Sort Searchables
If Mapsted's prebuilt UI/UX is not used, the intelligent search functionality can also be programmatically accessed, as shown in the sample code below.
 int propertyId = 504

// Get a list of searchables for the property
coreApi.properties().getSearchEntityListByPropertyId(propertyId, searchEntities -> {

    // Apply filter and sort based on input string query (e.g., query = "ga" would provide a good match for "Gap")
    // filterAndSortSearchables method will filter and re-order searchEntities
    List<ISearchable> filteredResult = coreApi.utilities().filterAndSortSearchables("ga", searchEntities);

    // When complete, UI can now be updated with filteredResult
});
let myPropertyId = 512
// Get a list of searchables for the property
let searchables = CoreApi.PropertyManager.getSearchEntities(propertyId: myPropertyId)
if searchables.isEmpty {
    //No matches found.
    return;
}

//Sort list of searchables based on intelligent search
let entities = CoreApi.UtilsManager.filterAndSortSearchables(input: "shoe", listOfSearchables: searchables)

for entity in entities {
    //Print display name
    print(entity.displayName)

    //Find matching word and category
    let matchWord = entity.matchWord
}
Filters for Points of Interest
To narrow down points of interest by floor, building, category, etc, you can make use of PoiFilters. A PoiFilter is composed of any number of PoiIntersectionFilter constructs.
Each PoiIntersectionFilter will look for items that match a combination of floors, buildings, and categories.
PoiFilter will then combine these to filter items that match ANY of the PoiIntersection filters provided to return the final result.
PoiFilter poiFilter = new PoiFilter.Builder()
    .addFilter(new PoiFilter.PoiIntersectionFilter.Builder()
        .addFloor(941)
        .addCategory("5ff5e93aa950eb2320f177ac") // e.g., Fast Food
        .build())
    .addFilter(new PoiFilter.PoiIntersectionFilter.Builder()
        .addBuilding(504)
        .addCategory("5ff5e937a950eb2320f1778d") // e.g., Department Stores
        .build())
    .build();

coreApi.properties().searchPoi(propertyId, poiFilter, iSearchables -> {
    // ...
});
let poiFilter = PoiFilter.Builder()
        .addFilter( //Filter #1. Floor 123 and CategoryId "abc1123""
            PoiIntersectionFilter
            .Builder()
            .addFloor(id: 123)
            .addCategory(id: "abc1123")
            .build()
        )
        .addFilter( //Filter #2. Floors 456 or 789, AND CategoryId "def923"
            PoiIntersectionFilter
            .Builder()
            .addFloor(id: 456)
            .addFloor(id: 789)
            .addCategory(id:  "def923")
            .build()
        )
        /*
        .addFilter( ... ) //You can add more filters
        */
        .build()

let myPropertyId = 512
CoreApi.PropertyManager.searchPOIs(filter: poiFilter, propertyId: myPropertyId, completion: { (searchables: [ISearchable] ) in
        for searchable in searchables {
            print("#SearchPOI: Found \(searchable.entityId) = \(searchable.displayName) - Floor: \(searchable.floorId)")
        }
})
Get nearby entities
When the user is at the property venue and his position is initialized by the sdk, you can get a list of near by entities using following api.
//once the sdk is initialized and user is at a location, you can use `getNearByEntities` to get nearby entities.
//you can use `coreApi.locations().getLastKnownPosition()` to be sure user position is resolved before calling this method.
if(coreApi.locations().getLastKnownPosition() != null) {
    coreApi.locations().getNearByEntities(nearbyEntities -> {
        // nearbyEntities is a list of `EntityZoneDistance` which contain entity zone and its distance from the user.
        // This list is already sorted with nearest first, farthest last.
    });
}
    CoreApi.LocationManager.getNearbyEntities { listOfEntityZoneDistance in
        // listOfEntityZoneDistance is a list of `EntityZoneDistance` which contain entity zone and its distance from the user.
        for entityZoneDistance in listOfEntityZoneDistance {
            if let entity = entityZoneDistance.getEntity() {
                print("Found \(entity.entityId) - \(entity.displayName)")
            }
        }
    }
Search Entity
In many venues, there are repeated points of interest (e.g., Washroom entities). As such, Entity objects with the same name are grouped into SearchEntity objects. A SearchEntity is an ISearchable, so it can be used for finding POIs or for wayfinding. In general, a SearchEntity describes the scenario where navigating to any of a list of Entity objects would be equivalent.
In some cases, a user may want to select a specific Entity from a SearchEntity object (e.g., for selecting on the map or for navigating to). If you are using the prebuilt UI/UX, for such scenarios, a dialog UI view is generated which allows the user to select a specific Entity, or alternatively, they can request the closest Entity. Please find the example below.
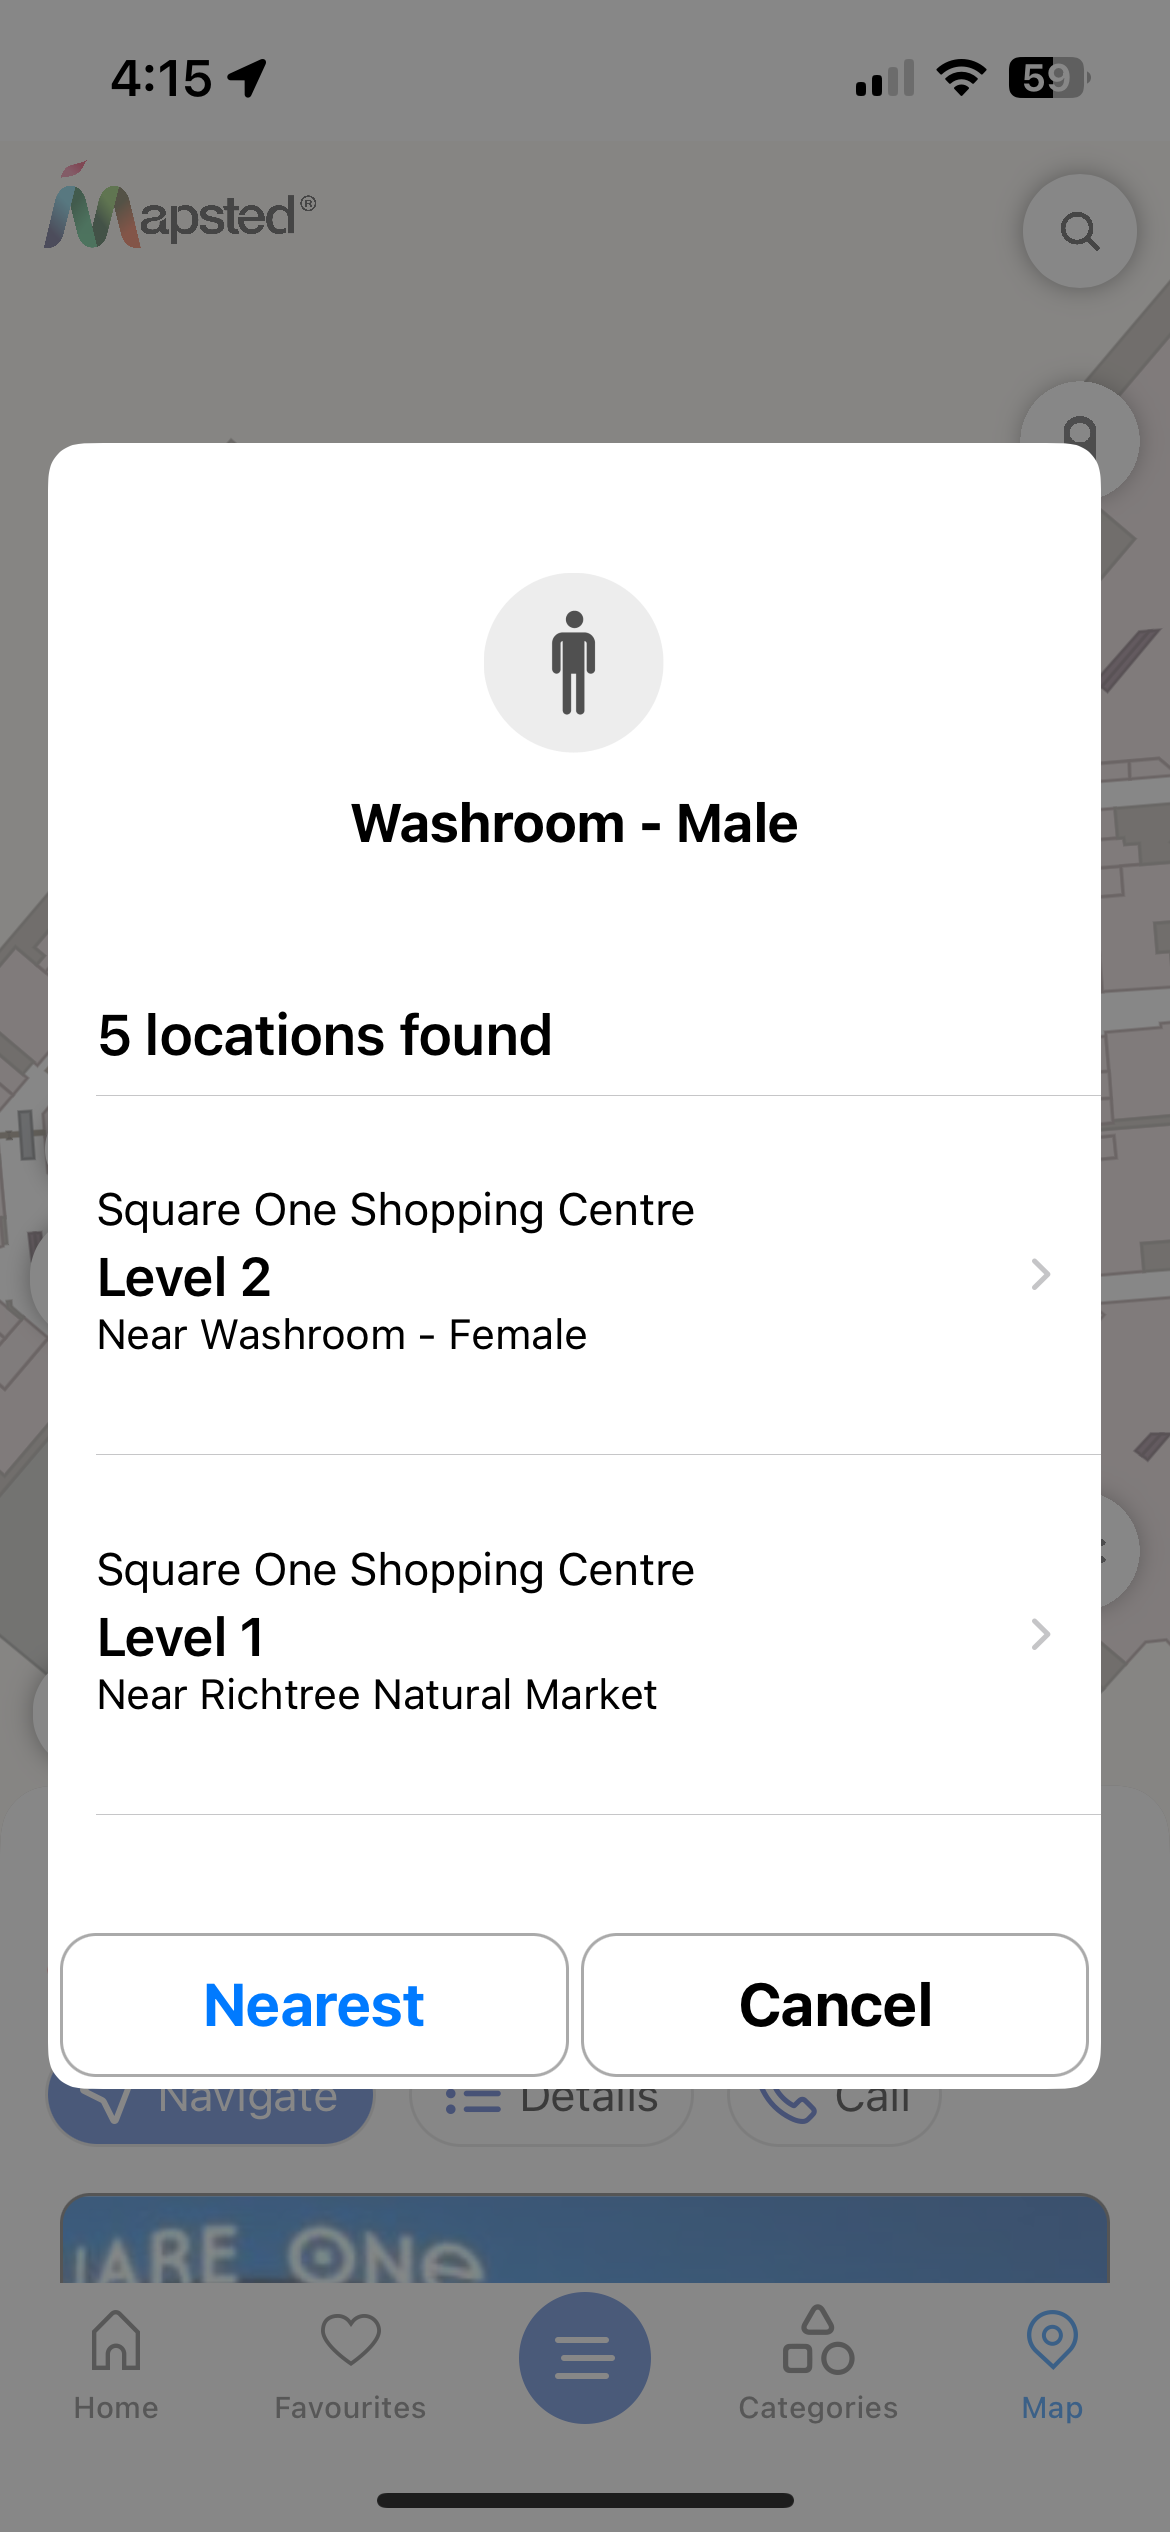
If you are not using the prebuild UI/UX, you can create your own UI and access the data as follows:
int propertyId = 504; // Square One, sample app property

coreApi.properties().getSearchEntityListByPropertyId(propertyId, searchEntities -> {
    for (SearchEntity se : searchEntities){
        EntityZoneVector entityZones = se.getEntityZones();
        // A searchEntity may have multiple entityZones. To retrieve entities use properties().
        for (EntityZone ez : entityZones) {
            Entity entity  = coreApi.properties().getCachedEntity(ez);
            // ...
        }
    }
});
//Get grouped search entities
let propertyId = 504

//Variable to collect groups of search entities having common name
var result: [SearchEntity] = []

//Get propertyInfo
guard let propertyInfo = PropertyInfo(propertyId: propertyId) else {
    return
}

//Make sure property data exists
guard let propertyData = CoreApi.PropertyManager.getCached(propertyId: propertyId) else {
     return
}

// Add property's entities
if let entities = propertyData.searchEntities()?.searchEntitiesGrouped() {
    result = result + entities
}

//Loop through all buildings to get the building's entities
for building in propertyInfo.getBuildingInfos() {
    if let buildingData = CoreApi.BuildingManager.getCached(buildingId: building.getBuildingId()) {
        // Add building's entities
        if let entities = buildingData.searchEntities()?.searchEntitiesGrouped() {
            result = result + entities
        }
    }
}

//Iterate through each group
for group in result {
    print(group.groupName)

    //Find entities in the group that share the same name
    for entity in group.entities {
        //Use propertyId, buildingId, etc
    }
}
Find Entities by Name
If Mapsted's prebuilt UI/UX is not used, the intelligent search functionality can also be programmatically accessed, as shown in the sample code below. Note that this feature is heavier, with a O(N) complexity, as it is required to do a linear search. This can be useful for various integration purposes; however, whenever possible, please fetch items by Ids, which would have a O(1) complexity.
coreApi.properties().findEntityByName(name, propertyId, searchEntities -> {
    // use searchEntities (empty if no matches found)
});
let myPropertyId = 512
let nameOfEntity = "Shoe Vendor"
// Get a matching list by name of searchables for the property (empty if no matches found)
let searchables = CoreApi.PropertyManager.findEntityByName(name: nameOfEntity, propertyId: myPropertyId)
Select and Deselect Entity
To select or deselect entities on map ...
Entity entity = ... // can use coreApi.properties() to get Entity
mapApi.data().selectEntity(entity);

// To clear selected Entity
mapApi.data().deselectEntity();
let myEntity = ... //(Any of those entities you obtained by search)
//Select entity on map
MapstedMapApi.shared.selectEntity(entity: myEntity)

//Deselect map
MapstedMapApi.shared.deselectEntity()
Distance or Time estimate to an entity
You can get distance between entities or user & entity or between two mercator zones using the following api methods. Check the callback for the result DistanceTime object.
DistanceTime contains the distance in meters and time to reach the destination in minutes.
// Distance time between user and searchEntity
SearchEntity searchEntity = ...;
RoutingOptions routeOptions = null; // uses default

coreApi.routing().getDistanceTimeEstimate(searchEntity, routeOptions, distanceTime -> {
    if (distanceTime == null) { return; }

    float distanceMeters = distanceTime.getDistanceMeters();
    double timeMinutes = distanceTime.getTimeMinutes();

    // ...
});

// Distance time between user and a mercator zone
MercatorZone mercatorZone = ...;
RoutingOptions routeOptions = null; // uses default

coreApi.routing().getDistanceTimeEstimate(mercatorZone, routeOptions, distanceTime -> {
    // ...
});

// Distance time between two mercator zones
MercatorZone startMercatorZone = ...;
MercatorZone toMercatorZone = ...;
RoutingOptions routeOptions = null; // uses default

coreApi.routing().getDistanceTimeEstimate(startMercatorZone, toMercatorZone, routeOptions, distanceTime -> {
    // ...
});
//distance from current user to some destination entity
let destination: MNSearchEntity = ...
let routeOptions: MNRouteOptions = ....
CoreApi.RoutingManager.requestEstimateFromCurrentLocation(destination: destination, routeOptions: routeOptions, completion: { distTime in
    if let distanceTime = distTime {
        print("Estimated distance is \(distanceTime.distanceInMeters)")
        print("Estimated time is \(distanceTime.timeInMinutes)")
    }
})

//distance from one entity to another entity
let from: MNSearchEntity = ...
let to: MNSearchEntity = ...
let routeOptions: MNRouteOptions = ....

CoreApi.RoutingManager.requestEstimate(start: from, destination: to, routeOptions: routeOptions, completion: { distTime in
    if let distanceTime = distTime {
        print("Estimated distance is \(distanceTime.distanceInMeters)")
        print("Estimated time is \(distanceTime.timeInMinutes)")
    }
})
Categories
Property-level Entities or those inside a Building can have a category associated with them. A category has a unique identifier (UID), name, and associated icon. A category can also have child categories such that the category becomes their parent. Currently there are upto three levels of hierarchies in the system. Root Categories are at the top level, Each root category can have any number of child categories which make the second level. And each of those categories can have any number of child categories which comprise the third level.
You can get all categories associated with a property using coreApi.properties(). The CategoriesResult object has multiple methods to provide the categories as hierarchical or as flattened list.
int propertyId = 504;
coreApi.properties().getCategories(propertyId, categoriesResult -> {
    // get all categories in flat list
    List<Category> allCategories = categoriesResult.getAllCategories();

    // get tree-based root categories
    List<Category> rootCategories = categoriesResult.getRootCategories();
});
let myPropertyId =  123

CoreApi.PropertyManager.getCategories(propertyId: myPropertyId, callback: { result in
    guard let result = result else {
        return
    }
    //All available categories
    let allCategories = result.getAllCategories()
    self.doSomethingWithCategories(categories: allCategories)

    //Find categories by id
    let wantedCategoryId = "abc123"
    if let category = result.findById(uuid: wantedCategoryId) {
        //Found category by its id
    }

    //Try to find by name
    let name = "room"
    let categoriesWithName = result.findByName(name: name)
    for match in categoriesWithName {
        print("#Category.findByName(\"\(name)\") matched by \(match.id) = \(match.name)")
    }
}

func doSomethingWithCategories(categories: [iCategory]) {

    //Get information about the category
    for category in categories {
        //Get name and id
        print("Category \(category.id) = \(category.name)")

        //Check if it's a root category
        let isRoot = (category.type == .Root)

        //Get child categories, if any
        for child in category.getChildCategories() { //Level 2 categories
            //Get name
            print("Category \(child.name)")

            //Check if it's a root category. Always false except for the first level
            let isRoot = (category.type == .Root)

            for grandChild in child.getChildCategories() {
                //Print information
                print("Category Level 3: \(grandChild.name)")
            }
        }
    }
}
Location Positioning Technology
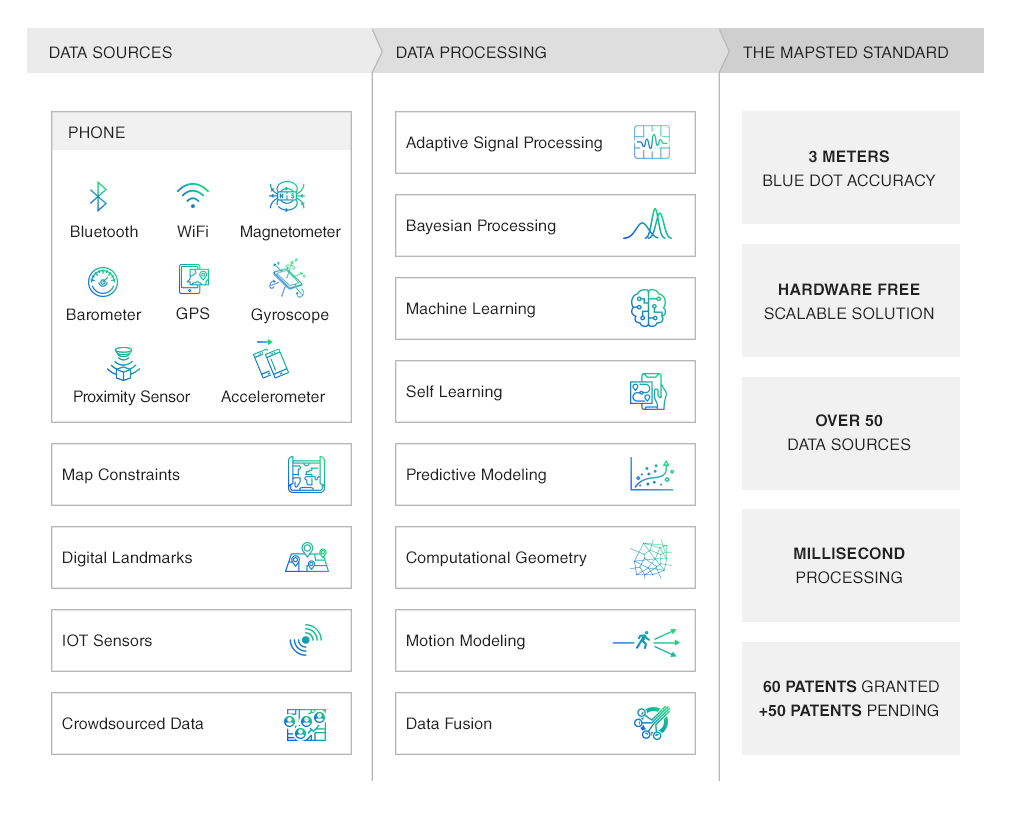
Our Location positioning technology allows for user position updates in location-enabled indoor venues and outdoor spaces. Mapsted's technology relies on innovative, adaptive, data-fusion, and self-learning algorithms to deliver accurate, scalable indoor and outdoor positioning technology using any off-the-shelf smart-phone. The technology is forward-thinking in nature. It learns from naturally occurring signals in the environment to determine location, converting ambient information in the surroundings into accurate, reliable positioning. The Figure below will give you a high-level overview of how this location positioning technology works.
User Positioning
A user's position is defined by a Position object. The Position object includes the user's IZone, which includes a propertyId, buildingId, and floorId, representing where the user is located. If any of these Ids show a value of -1, then it means they are not available. Some examples are detailed below.
Outdoor Positioning
The location positioning technology engine is seamless. It uses the same mechanism to return positions whether the user is indoors or outdoors. Based on the returned Position object, you can determine whether a user is outdoors, for example.
propertyId = -1means the user is not on any premises,propertyId > 0andbuildingId = -1means the user is on the premises of the specified propertyId, but not inside any of its buildings.
Indoor Positioning
Similarly to outdoor positioning, when the user is indoors, this can be identified based on the returned Position object, as follows.
propertyId > 0,buildingId > 0, andfloorId > 0means that the user is on the propertyId within the buildingId, and on the floorId.
Programmatically Handling User Positions
There are two types of Position events that you can register as a listener for. The first type is a standard Position event. Position events are continuously updated by the positioning SDK, depending on the user's current activity and the type of data sources available. The second event type is PositionAnimation, which occurs when the user is in motion. PositionAnimation events dynamically update the user position at 30 frames per second, creating a smooth UI/UX experience when the user marker is in motion.
The Position event listener should be used for business logic processing based on a position update, and the PositionAnimation event listener should be used for displaying the user marker on a map UI to ensure the best user experience. The Position event listener is typically updated roughly every second, when the user is in motion. The PositionAnimation event listener is updated approximately 30 times per second when the user is in motion, to ensure smooth animation for enhanced UI/UX.
// Position Changes:
// -----------------
// Updated roughly every 1 second
// This should be used for core processing/logic based on loca
PositionChangeListener positionChangeListener = position -> {
    int propertyId = position.getPropertyId();
    int buildingId = position.getBuildingId();
    int floorId = position.getFloorId();
    double x = position.getX();
    double y = position.getY();
};

coreApi.locations().addPositionChangeListener(positionChangeListener);
//...
//when no longer needed, remove the listener
coreApi.locations().removePositionChangeListener(positionChangeListener);

// Position Animation Changes:
// -----------------
// Updated roughly 30x per seconds (30 fps) when user is in motion
// This provides a smooth animation for updating UI
PositionAnimationListener positionAnimationListener = position -> {
    int propertyId = position.getPropertyId();
    int buildingId = position.getBuildingId();
    int floorId = position.getFloorId();
    double x = position.getX();
    double y = position.getY();
};

coreApi.locations().addPositionAnimationListener(positionAnimationListener);
//...
//when no longer needed, remove the listener
coreApi.locations().removePositionAnimationListener(positionAnimationListener);
// Observe Position change events
// Updated roughly every 1 second
//Your viewcontroller needs to register for position updates as follows:
CoreApi.LocationManager.addPositionChangeListener(listener: self)

//You can satisfy the protocol requirements by implementing the required method
extension YourViewController: PositionChangeListener {

    // Updated roughly every 1 second
    public func onPositionChange(position: MNPosition) {
        let propertyId = position.zone().propertyId()
        let buildingId = position.zone().buildingId()
        let floorId = position.zone().floorId()
        let x = position.loc.x
        let y = position.loc.y
    }

}

/ Observe Position Animation change events
// Updated roughly 30 fps when user is in motion
//Your viewcontroller needs to register for position animation updates as follows:
CoreApi.LocationManager.addPositionAnimationListener(listener: self)

//You can satisfy the protocol requirements by implementing the required method
extension YourViewController: PositionAnimationListener {
    func onPositionAnimation(position: MNPosition, animationBegins: Bool) {
        //process new position
    }
}
Phone/User Heading
The Heading is a float which represents the direction that the user is currently facing. Bearing is specified in radians clockwise from North. This listener is only called when the user is on the premises of a property. Note that the heading change listeners are called roughly every 100 ms, but they only report change events if the heading change has differed by more than 1 degree.
// PhoneHeading tracks the heading of the device itself
CoreApi.PhoneHeadingChangeListener phoneHeadingChangeListener = headingRad -> {
    // headingRad is specified in radians clockwise from North
    // E.g., conver to degrees, if required
    float headingDeg = headingRad * 180.0F / Math.PI;
};

// UserHeading tracks the heading of the user (independent of device orientation)
CoreApi.UserHeadingChangeListener userHeadingChangeListener = headingRad -> {
    // ...
};

// FusedHeading tracks both phone and user heading and alternatives depending on the scenario.
// When the user is mostly stationary, it will provide phone heading (e.g., user turning and looking around)
// When the user is in motion, it will provide user heading (e.g., identifying direction of travel)
CoreApi.FusedUserHeadingChangeListener fusedHeadingChangeListener = headingRad -> {
    // ...
};

// Register listeners, as desired
coreApi.locations().heading().addPhoneHeadingChangeListener(phoneHeadingChangeListener);
coreApi.locations().heading().addUserHeadingChangeListener(userHeadingChangeListener);
coreApi.locations().heading().addFusedUserHeadingChangeListener(fusedHeadingChangeListener);

//...
//when no longer needed, remove listeners
coreApi.locations().heading().removePhoneHeadingChangeListener(phoneHeadingChangeListener);
coreApi.locations().heading().removeUserHeadingChangeListener(userHeadingChangeListener);
coreApi.locations().heading().removeFusedUserHeadingChangeListener(fusedHeadingChangeListener);
// Register listeners, as desired
CoreApi.LocationManager.addPhoneHeadingChangeListener(listener: self)
CoreApi.LocationManager.addUserHeadingChangeListener(listener: self)
CoreApi.LocationManager.addFusedUserHeadingChangeListener(listener: self)

//...
//when no longer needed, remove listeners
CoreApi.LocationManager.removePhoneHeadingChangeListener(listener: self)
CoreApi.LocationManager.removeUserHeadingChangeListener(listener: self)
CoreApi.LocationManager.removeFusedUserHeadingChangeListener(listener: self)

//You can satisfy the protocol requirements by implementing the required method
extension YourViewController: PhoneHeadingChangeListener, UserHeadingChangeListener, FusedUserHeadingChangeListener {
    func onPhoneHeadingChanged(headingRad: CGFloat) {

    }

    func onUserHeadingChanged(headingRad: CGFloat) {

    }

    func onFusedUserHeadingChanged(headingRad: CGFloat) {

    }
}
Coordinate Systems
Mapsted uses the Universal Transverse Mercator (UTM, EPSG:3857) coordinate system to repesent the global (x,y) position in meters. Support is also provided for latitude and longitude (WGS84) in degrees, as shown below.
LatLng latLng_1 = new LatLng(someLatitude, someLongitude);
Mercator mercator_1 = MapCalc.toMercator(latLng); // From WGS84 to EPSG:3857

Mercator mercator_2 = new Mercator(someX, someY);
LatLng latLng_2 = MapCalc.toLatLng(mercator.getX(), mercator.getY());  // From EPSG:3857 to Lat, Lng
let pos1 = MNMercator(lat: someLatitude, lng: someLongitude)
print("X: \(pos1.x) Y: \(pos1.y)") // From WGS84 to EPSG:3857

let pos2 = MNMercator(x: someX, y: someY, z: someZ)
let latLng:CLLocationCoordinate2D = MNMercator.latLong(from: pos2)  // From EPSG:3857 to Lat, Lng
print("Lat: \(latLng.latitude) Long: \(latLng.longitude)")
Wayfinding
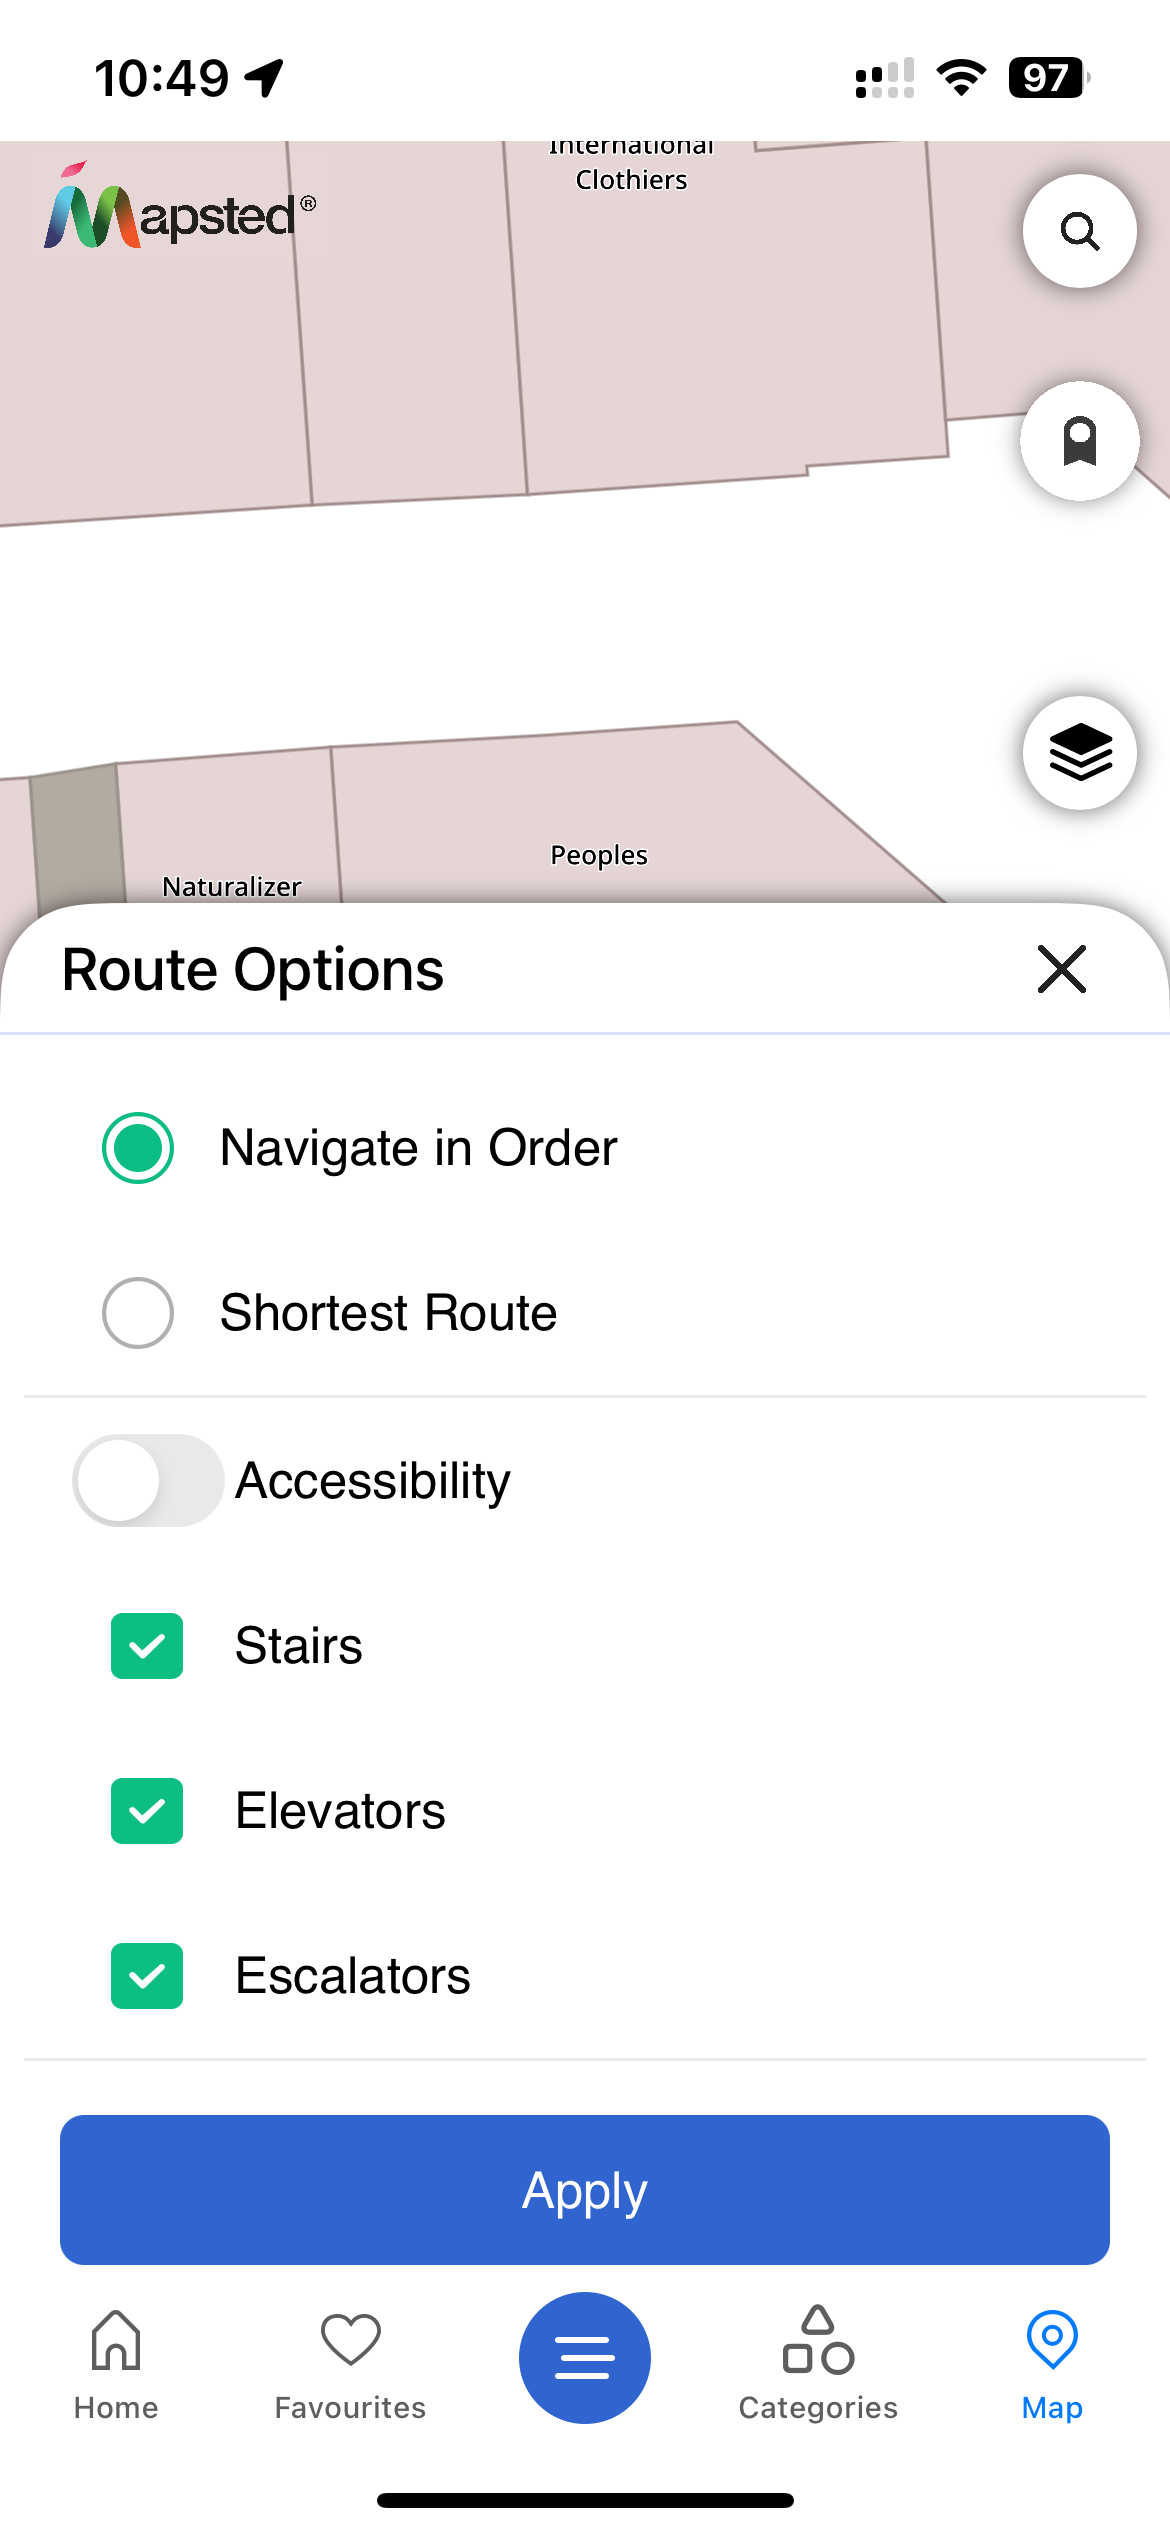
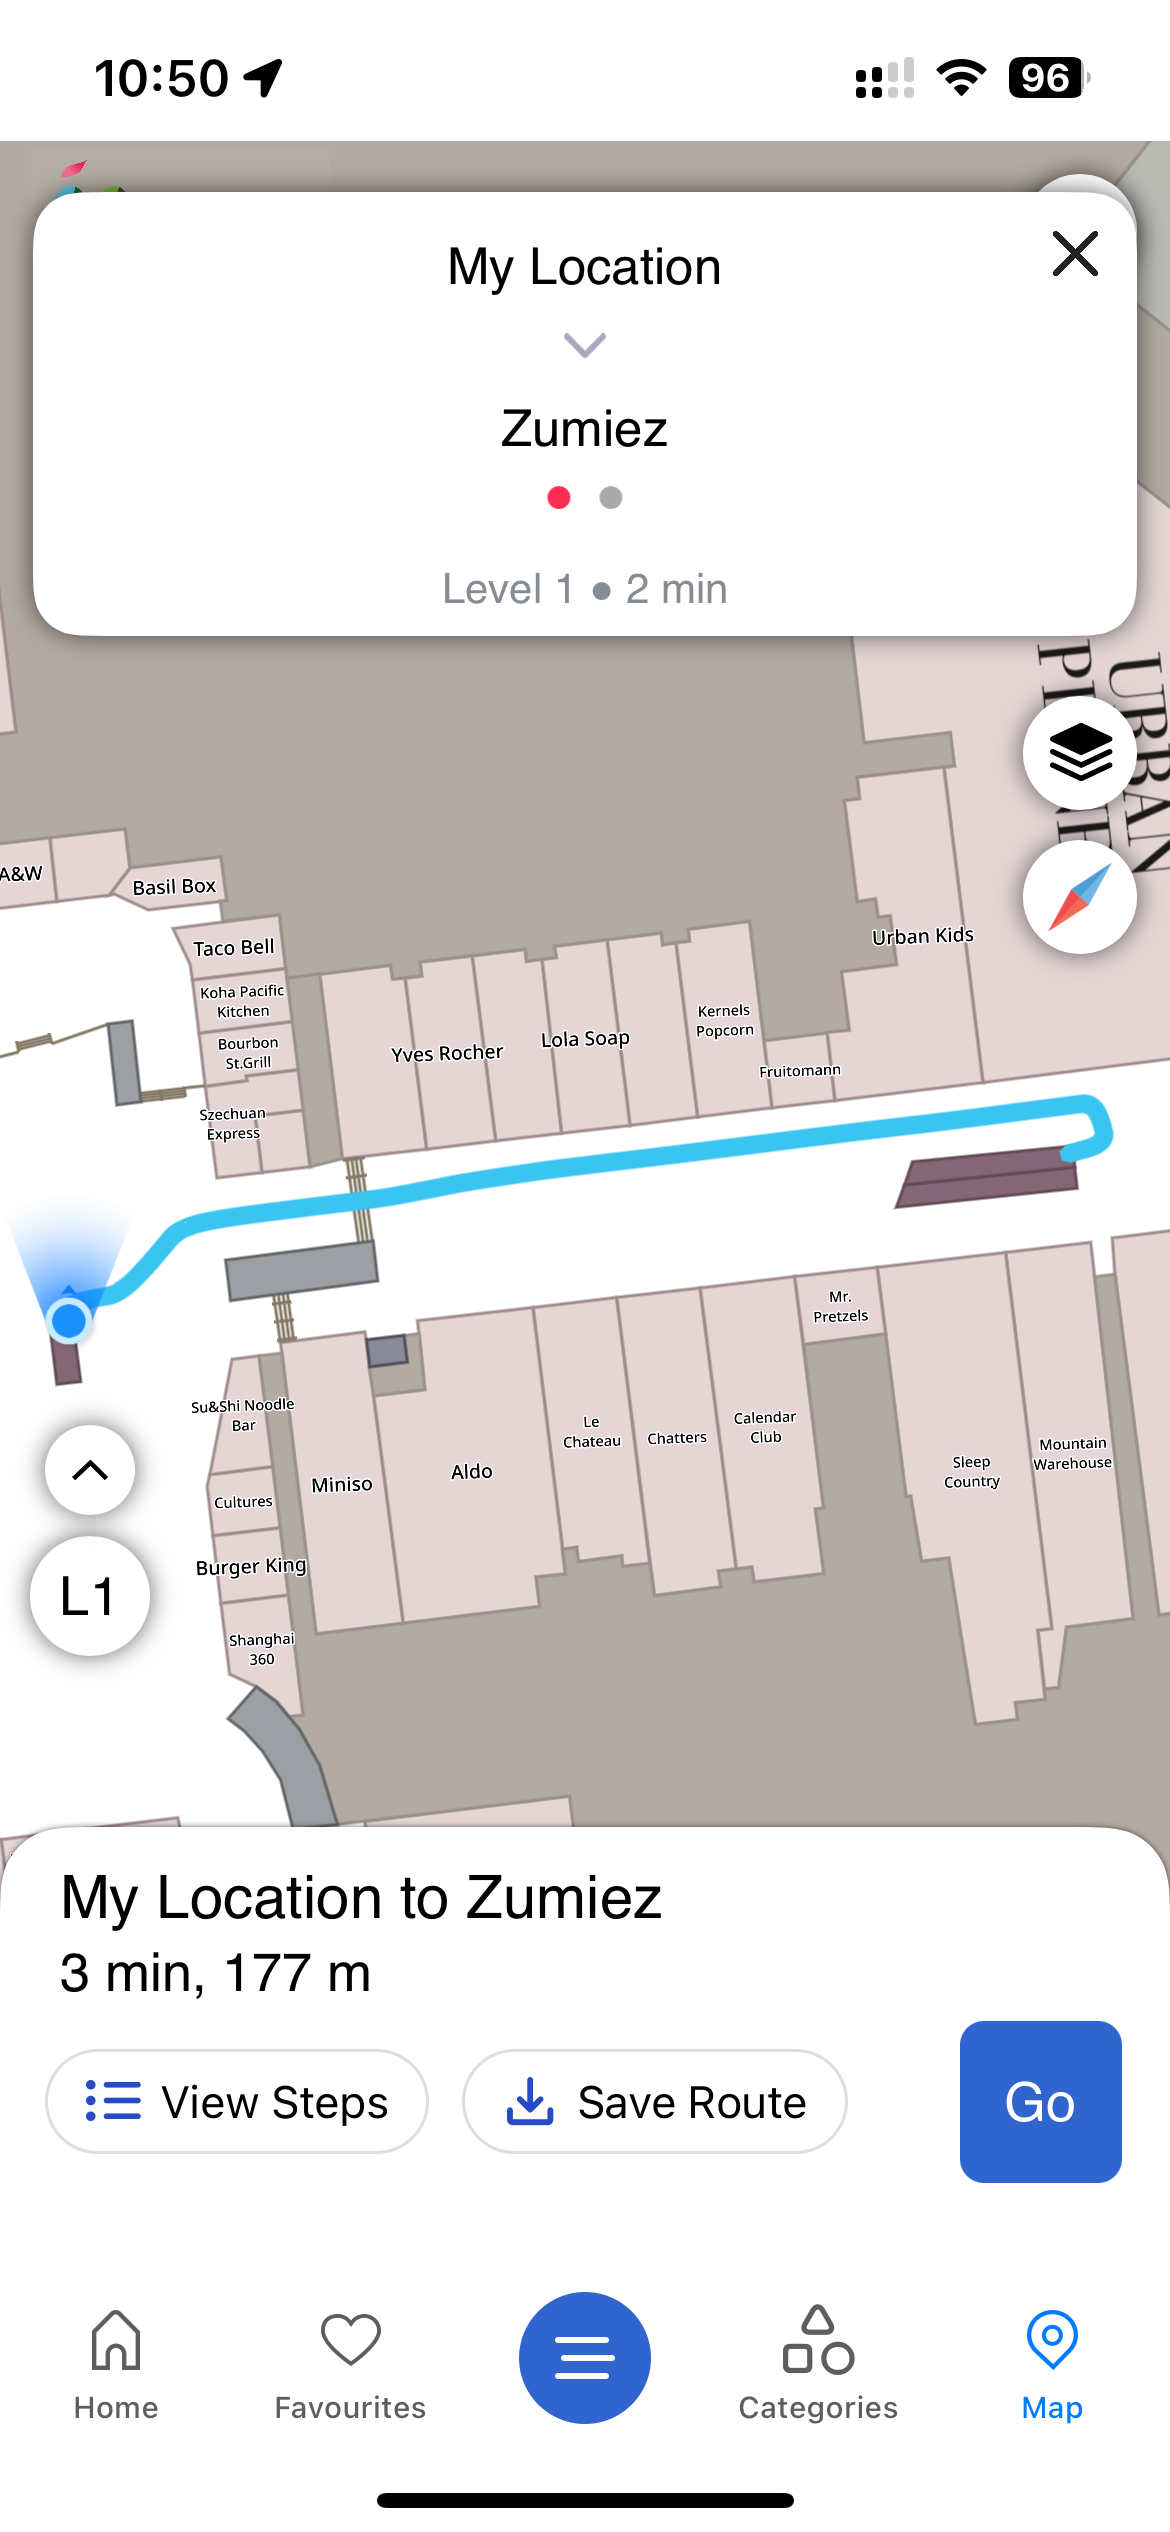
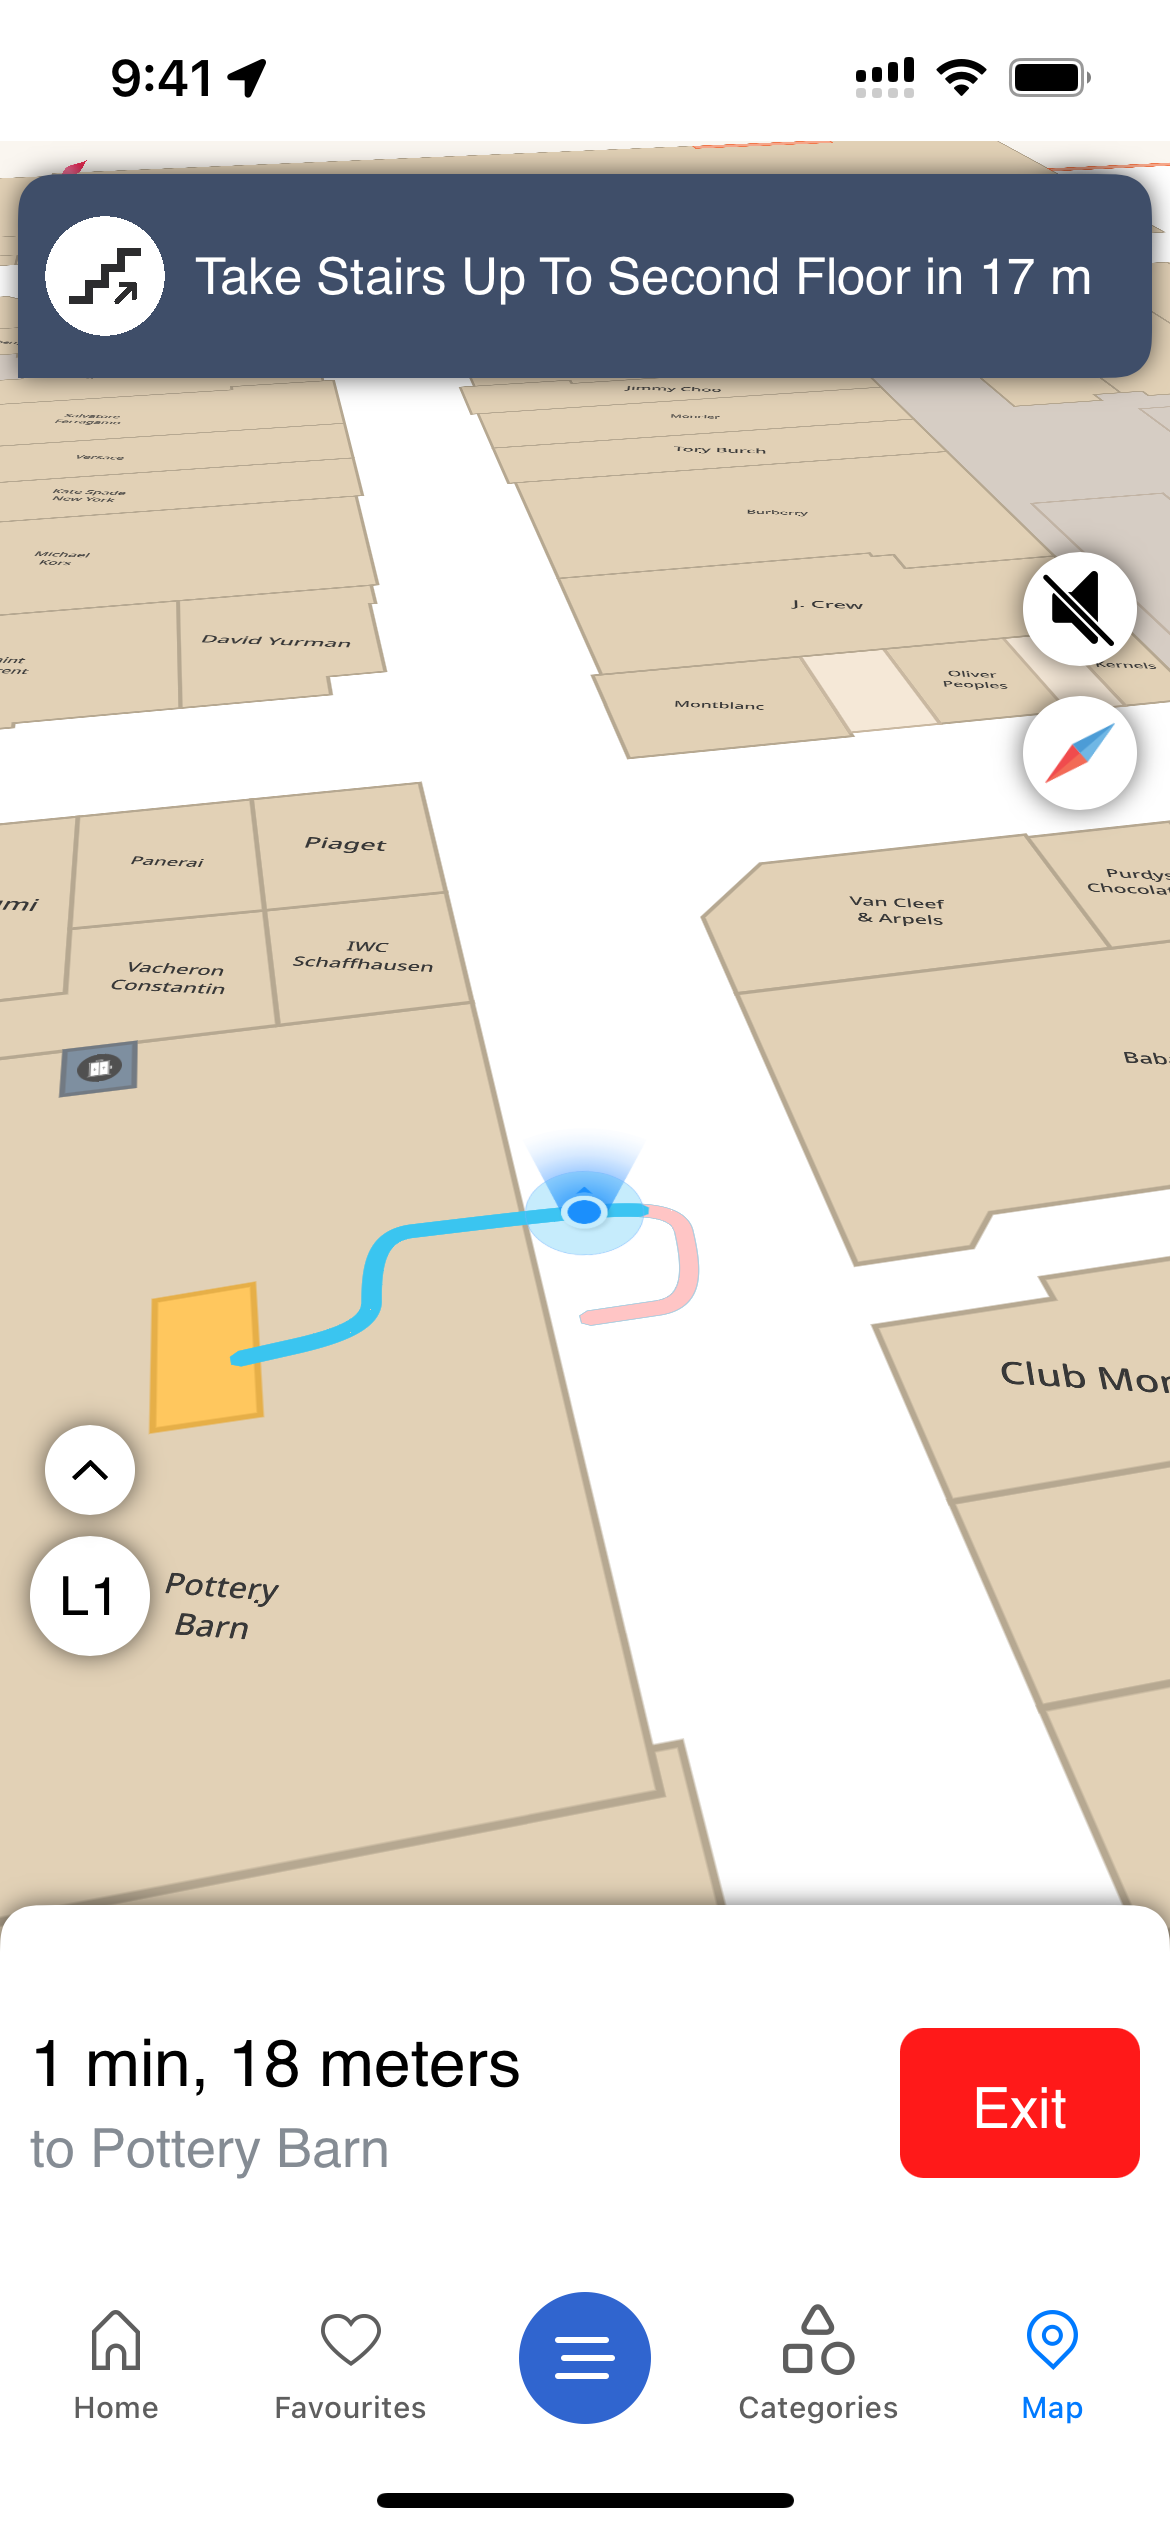
Wayfinding uses Mapsted's advanced routing technology to generate optimal routes to help users get around in selected properties and buildings. Users can optimize accessible routes by customizing navigation preferences to accommodate mobility needs, such as avoiding stairs and prioritizing elevators or escalators for a more inclusive travel experience. Additionally, they can plan routes with multiple stops, ensuring seamless and efficient navigation. The wayfinding engine can handle property-wide multi-destination routing. Each RouteRequest consists of a start location, such as the user's current location or a point of interest, and a list of destination locations or points of interest. The RouteRequest also consists of a set of routing options that determine which accessibility measures are necessary, the order the user would like to navigate to the destinations in, and allow for the use of optimized routes.
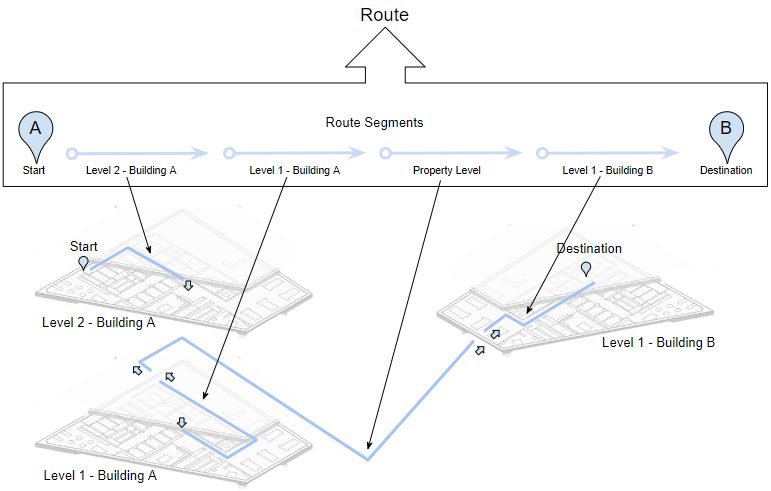
The RouteResponse consists of a list of Route objects, where each Route consists of a list of route segments. Each segment corresponds to a portion of the route on a specific floor of a building, or property level, for example outdoors, and is linked via a transition type. A figure showing an illustrative example of a RouteResponse is shown below. In the illustrative example above, the user is navigating from a location on Level 2 of Building A to a location on Level 1 of Building B. As shown, the route from point A to point B involves four route segments and includes three transitions - between floors, to outdoors, and to indoors.
Prebuilt UI/UX
When using the Prebuilt UI/UX, the wayfinding functionality is automatically in use.

Customizable UI/UX
There are a number of customizable routing parameters available, which can be set programmatically, as outlined below.
Programmatic Wayfinding
// Setup desired routing options.
// setItineraryOptimization(true) re-orders destinations optimally; false navigates in order.
// For an accessible route, use RoutingOptions.accessibleInstance(true) (see the Accessibility section).
RoutingOptions routingOptions = new RoutingOptions.Builder()
        .setIncludeStairs(true)
        .setIncludeEscalators(true)
        .setIncludeElevators(true)
        .setItineraryOptimization(true)
        .build();

// Create waypoints using Waypoint.from(ISearchable) or Waypoint.Builder
Waypoint waypoint1 = Waypoint.from(iSearchable1);
Waypoint waypoint2 = new Waypoint.Builder().addLocation(mercatorZone2).build();
Waypoint waypoint3 = Waypoint.from(searchEntity3);

// Build the route request. The propertyId is required.
RouteRequest routeRequest = new RouteRequest.Builder(propertyId)
        .setRoutingOptions(routingOptions)
        .setStartWaypoint(waypoint1)            // only if not from 'MyLocation'
        .addDestinationWaypoint(waypoint2)      // add possibly multiple destinations
        .addDestinationWaypoint(waypoint3)
        .setIsFromCurrentLocation(false)        // true if routing from the user's position
        .build();

// Start the async route request.
// The response is delivered to the RoutingRequestCallback; update the UI accordingly.
coreApi.routing().requestRoute(routeRequest, new RoutingRequestCallback() {
    @Override
    public void onSuccess(RouteResponse routeResponse) {
        // A route was found. To begin turn-by-turn navigation:
        Route route = routeResponse.getRoutes().get(0);
        RoutingConstraints constraints = new RoutingConstraints.Builder().build();

        coreApi.routing().startNavigation(route, RoutePathType.OPTIMAL_ROUTE,
                routingOptions, constraints, new NavigationCallback() {
            @Override
            public void onNavigationInitSuccess(NavigationState navigationState) {
                // Navigation started successfully
            }

            @Override
            public void onNavigationInitFailure(NavigationError navigationError) {
                // Navigation could not be started; inspect navigationError.getErrorType()
            }

            @Override
            public void onRouteSegmentReached(RoutePathSegment currentSegment,
                                              List<RoutePathSegment> visitedSegments,
                                              List<RoutePathSegment> upcomingSegments) {
                // A route segment was reached (e.g., a change of floors or buildings)
            }

            @Override
            public void onRouteInstruction(RoutePointInstruction currentInstruction,
                                           RoutePointInstruction nextInstruction,
                                           RoutePointInstruction afterNextInstruction) {
                // A new instruction is available for the navigating user.
                // e.g., currentInstruction: "Take Elevator to L3"
                //       nextInstruction:    "Then turn left in 5 m"
            }

            @Override
            public void onUserProgressAlongRoute(NavigationState navigationState) {
                // Called as the user progresses along the route; use it to drive the UI
            }

            @Override
            public void onRouteRecalculation(NavigationState navigationState,
                                             Route newRoute, RoutePathType routePathType) {
                // The user deviated from the route and a new route was recalculated
            }

            @Override
            public void onDestinationReached(Waypoint destination) {
                // Reached the destination of this route
            }

            @Override
            public void onNavigationStopped() {
                // Navigation ended (finished or cancelled)
            }
        });

        // Navigation can be cancelled midway (e.g., a user UI interaction) by calling:
        coreApi.routing().stopNavigation();
    }

    @Override
    public void onError(RouteResponse routeResponse) {
        // The route request failed; inspect routeResponse.getRouteError()
        RouteError error = routeResponse.getRouteError();
    }
});
// To make a route request, you should first setup your desired routing options

/*
    - optimizedRoute = false will navigate in order
    - optimizedRoute = true will re-order destinations optimally
*/
let optimizedRoute = true

//Preferred transition options
let useStairs = false
let useEscalators = true
let useElevators = true

let calculateFromCurrentLocation = true

let routeOptions = MNRouteOptions.init(useStairs, escalators: useEscalators, elevators: useElevators, current: calculateFromCurrentLocation, optimized: optimizedRoute)

// There is also an accessibility option provided - it may override the behaviour of Stairs/Elevator/Escalator
routeOptions.setAccessibility(true)

//Build a route request
var routeRequest: MNRouteRequest?

if calculateFromCurrentLocation { //startEntity is passed as nil
    routeRequest = MNRouteRequest.init(routeOptions: routeOptions, destinations: destinations, startEntity: nil)
}
else { //destinationsMinusStart is an array of destinations excluding the start
    routeRequest = MNRouteRequest.init(routeOptions: routeOptions, destinations: destinationsMinusStart, startEntity: startEntity)
}

if let routeRequest = routeRequest {
    CoreApi.RoutingManager.requestRoute(request: routeRequest, routingRequestCallback: self)
}

var routes : [MNRoute] = []

// To receive the callback after you make the route request, you will need to have implemented the RoutingRequestCallback protocol
extension YourViewController: RoutingRequestCallback {
    func onSuccess(routeResponse: MNRouteResponse) {
        //You can proceed to request using one of the routes returned with routeResponse
        //Check for error
        if routeResponse.errorType == .noError {
            routes = routeResponse.routes
        }
    }

    func onError(errorCode: Int, errorMessage: String, alertIds: [String]) {

    }
}

//Make sure routes are not empty, and choose a route from the list
guard let route = routes.first else {
    return
}

//Your can now make a route request with the route. In order to receive route status updates, you also pass a delegate to protocol RouteStatusCallback.
CoreApi.RoutingManager.startNavigation(route: route, routingStatusCallback: self)

//Your delegate will need to be implement the methods of *RoutingStatusCallback*.
extension YourViewController: RoutingStatusCallback {

    func onRoutingStatus(isRoutingModeOn: Bool, latestRouteResponse: MNRouteResponse) {
        // Indicates a status change for the latest route response
        // For example, if isRoutingModeOn is false, UI can adjust accordingly
    }

    func onRouteInstructionReceived(routeNode: MNRouteNode, nextRouteNode: MNRouteNode?) {
        // Called when a new instruction is available for the real-time navigating user
    }

    func onRouteSegmentReached(currentRouteSegment: MNRouteSegment,
                           visitedRouteSegments: [MNRouteSegment],
                           upcomingRouteSegments: [MNRouteSegment]) {
        //Called when a route segment has been reached.
    }

    func onUserProgressAlongRoute(routeUserProgress: MNRouteUserProgress) {
        //This function will be called as user continues progress along route
    }

    func onRouteRecalculation(newRouteResponse: MNRouteResponse) {
        // Called when the user deviates from the route provided
        // and a new route is automatically recalculated
    }

    func onDestinationReached(waypoint: MapstedCore.MapstedWaypoint) {
        // Called when the user reaches the destination (specified by the destinationEntityId)
    }
}
Understanding Route Responses
A RouteResponse contains a boolean which indicates whether or not the RouteRequest was successfully processed. An error may occur for several reasons, such as if an invalid start or data was provided, or a route could not be found.
A requested route may involve single or multiple destinations. A RouteResponse consists of a list of Route objects, where each Route represents a trip to a specific destination. Each Route consists of a list of route segments, where each segment represents a separate segment of the route, such as a different floor inside a building, or an indoor-outdoor segment. Each segment consists of a list of route points, where each route point represents a specific location, and possibly, a corresponding instruction.
// Note: do not forget to handle null cases when you receive a
// RouteResponse from the RoutingRequestCallback.
void onRouteResponseReceived(RouteResponse routeResponse) {
    if (!routeResponse.success()) {
        RouteError routeError = routeResponse.getRouteError();
        // check or log routeError
        return;
    }

    /*
        If multiple destinations were requested, there may be multiple routes.
        Each Route represents the trip to a specific destination.
    */
    List<Route> routes = routeResponse.getRoutes();

    for (Route route : routes) {
        // Select the desired path variant: optimal, accessible, or a bypass route.
        RoutePath routePath = route.getOptimalRoute();
        if (routePath == null) {
            continue;
        }

        // All segments for this path (e.g., multiple floors, or indoor-outdoor).
        for (RoutePathSegment segment : routePath.getSegments()) {
            // Outside property, within property, or within building.
            RouteSegmentType segmentType = segment.getSegmentType();

            // Path mercator points for UI plotting.
            List<Mercator> pathPoints = segment.getPoints();

            // Iterate the instruction points along this segment.
            for (RoutePointInstruction pointInstruction : segment.getInstructions()) {
                // Instruction type, e.g., ROUTE_CONTINUE, ELEVATOR_UP, ESCALATOR_UP, ...
                InstructionType instructionType = pointInstruction.getInstructionType();

                // Localized, human-readable instruction (English by default).
                Instruction instruction = pointInstruction.getInstruction(appContext);
                String instructionText = instruction.getText();

                // Drawable resource for this instruction type.
                int drawableId = instruction.getDrawableResId();
            }
        }
    }
}
func routeResponseReceived(response: MNRouteResponse) {
    guard response.isSuccessful else {
            // routing failed
            return
    }

    /*
    If multiple destinations are requested, there may be multiple routes.
    Each route represents the trip to a specific destination.
    */
    let routes = response.routes
    //Index into routes to access a particular route
    let route = routes[0];

    //You can access individual segments of a route as follows
    let routeSegment = route.segments[1] //size checks are skipped for brevity

    // Smoothed route for UI plotting
    let smoothedRoute = routeSegment.smoothedRouteNodes

    //Get instructions
    for routeSeg in route.segments {
        for routeNode in routeSeg.routeNodes {
            if routeNode.isKeyPoint {
                // instruction will take into account localization, if supplied
                // default is english
                let instruction = routeNode.instruction

                // You can customize your own behaviour by using the instruction type
                // e.g., TURN_LEFT, TURN_RIGHT, ENTER_BUILDING, ...
                let instructionType = routeNode.instructionType

                // EntityId of the instruction's landmark (-1 if doesn't exist)
                let landmarkEntityId = routeNode.landmarkEntityId
            }
        }
    }
}
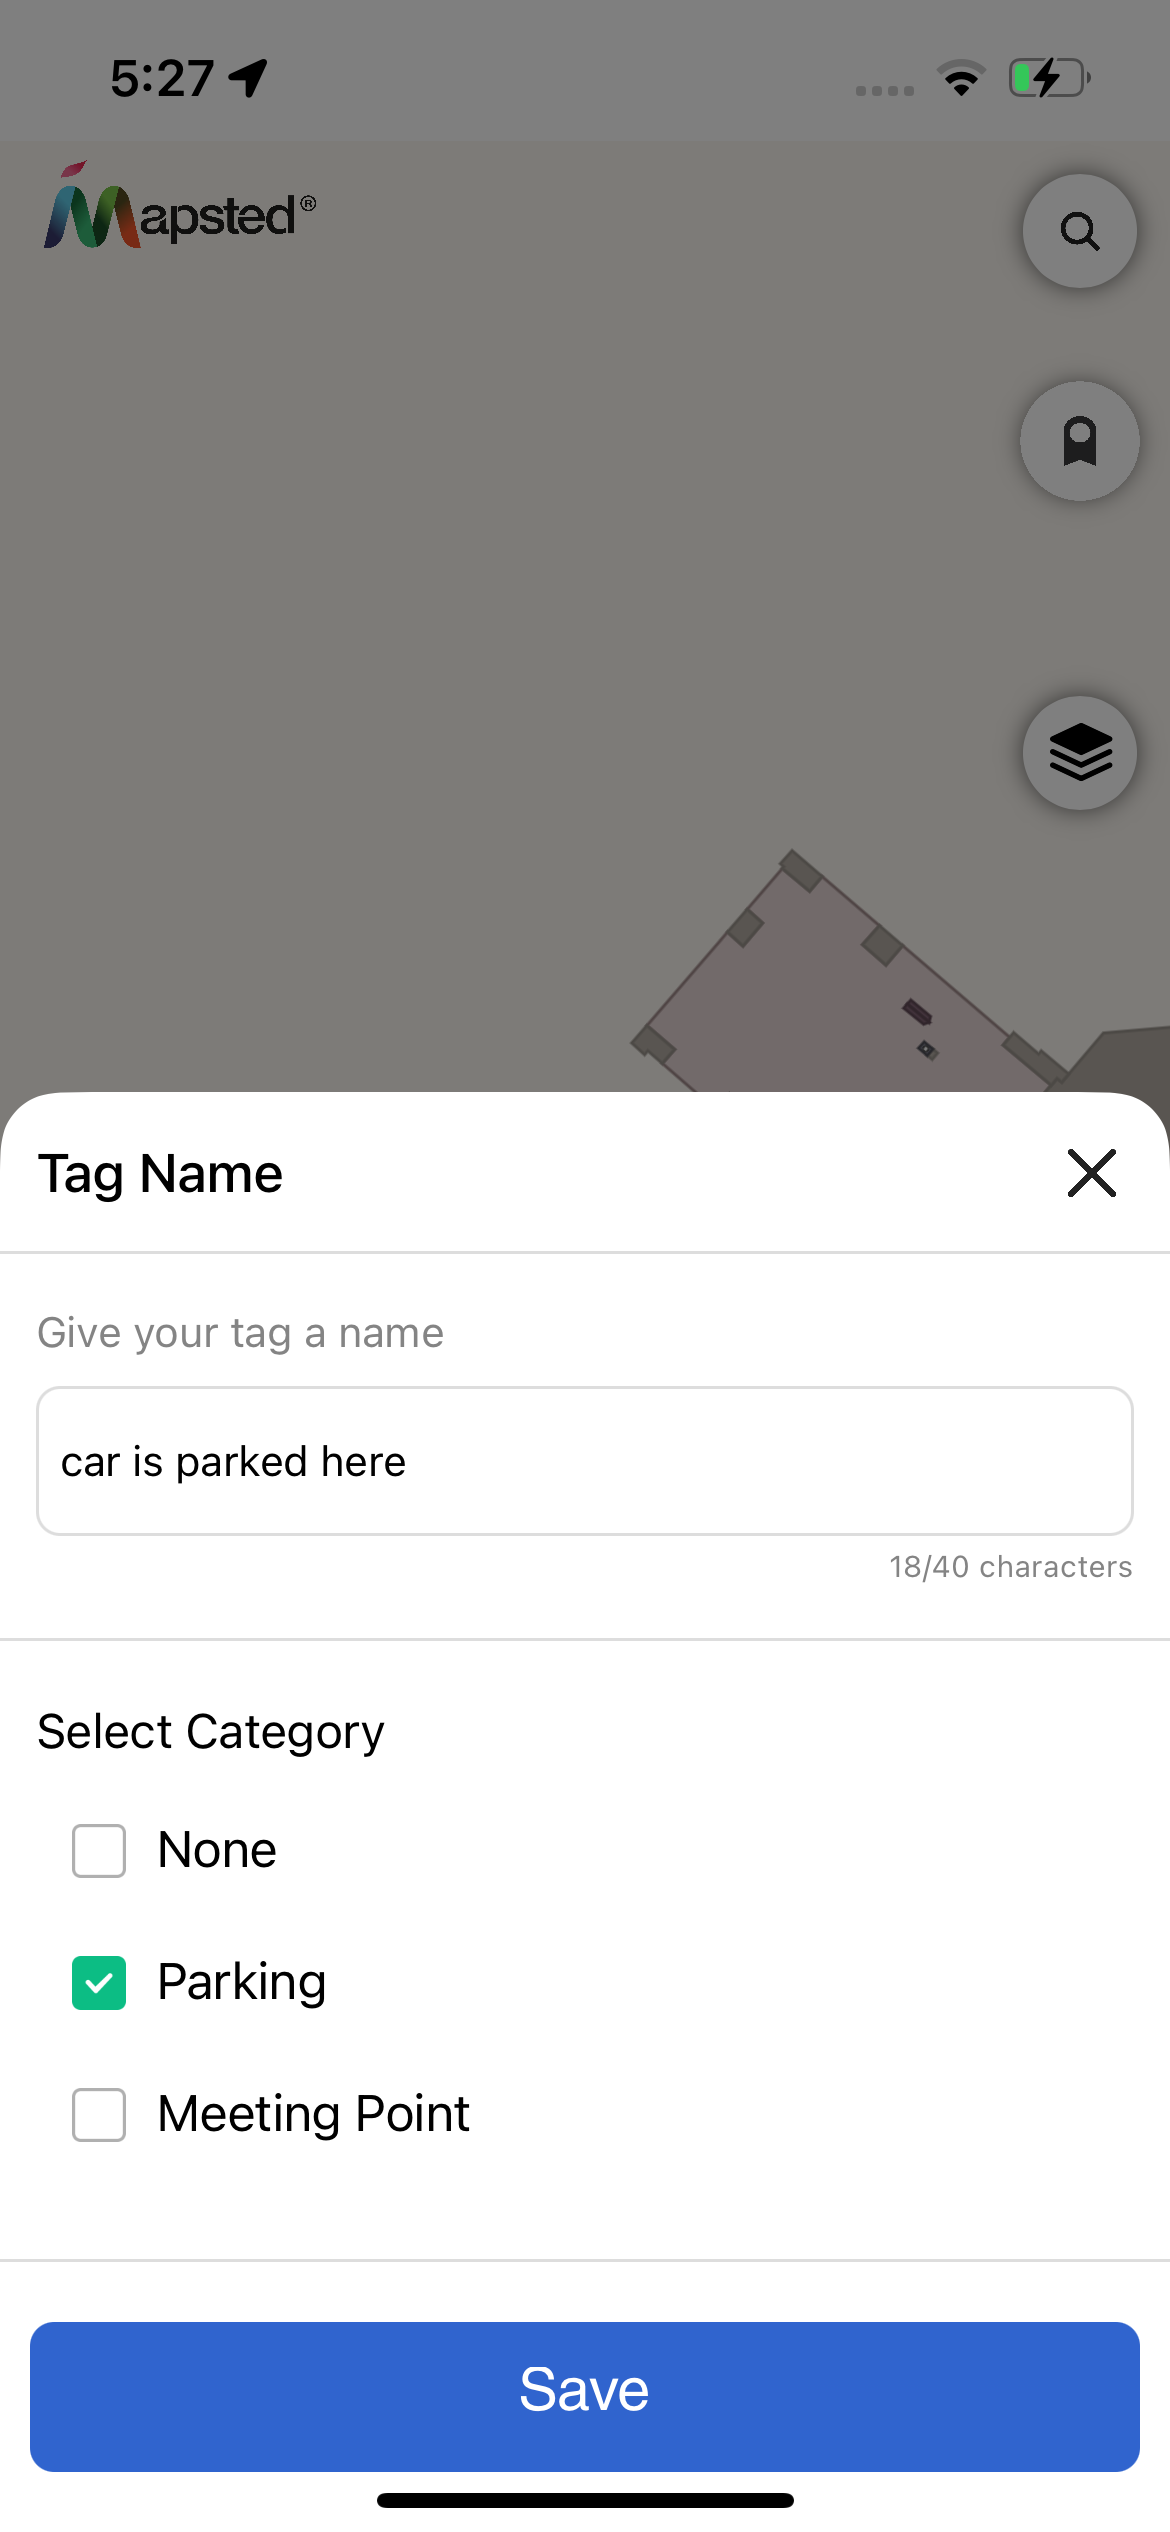
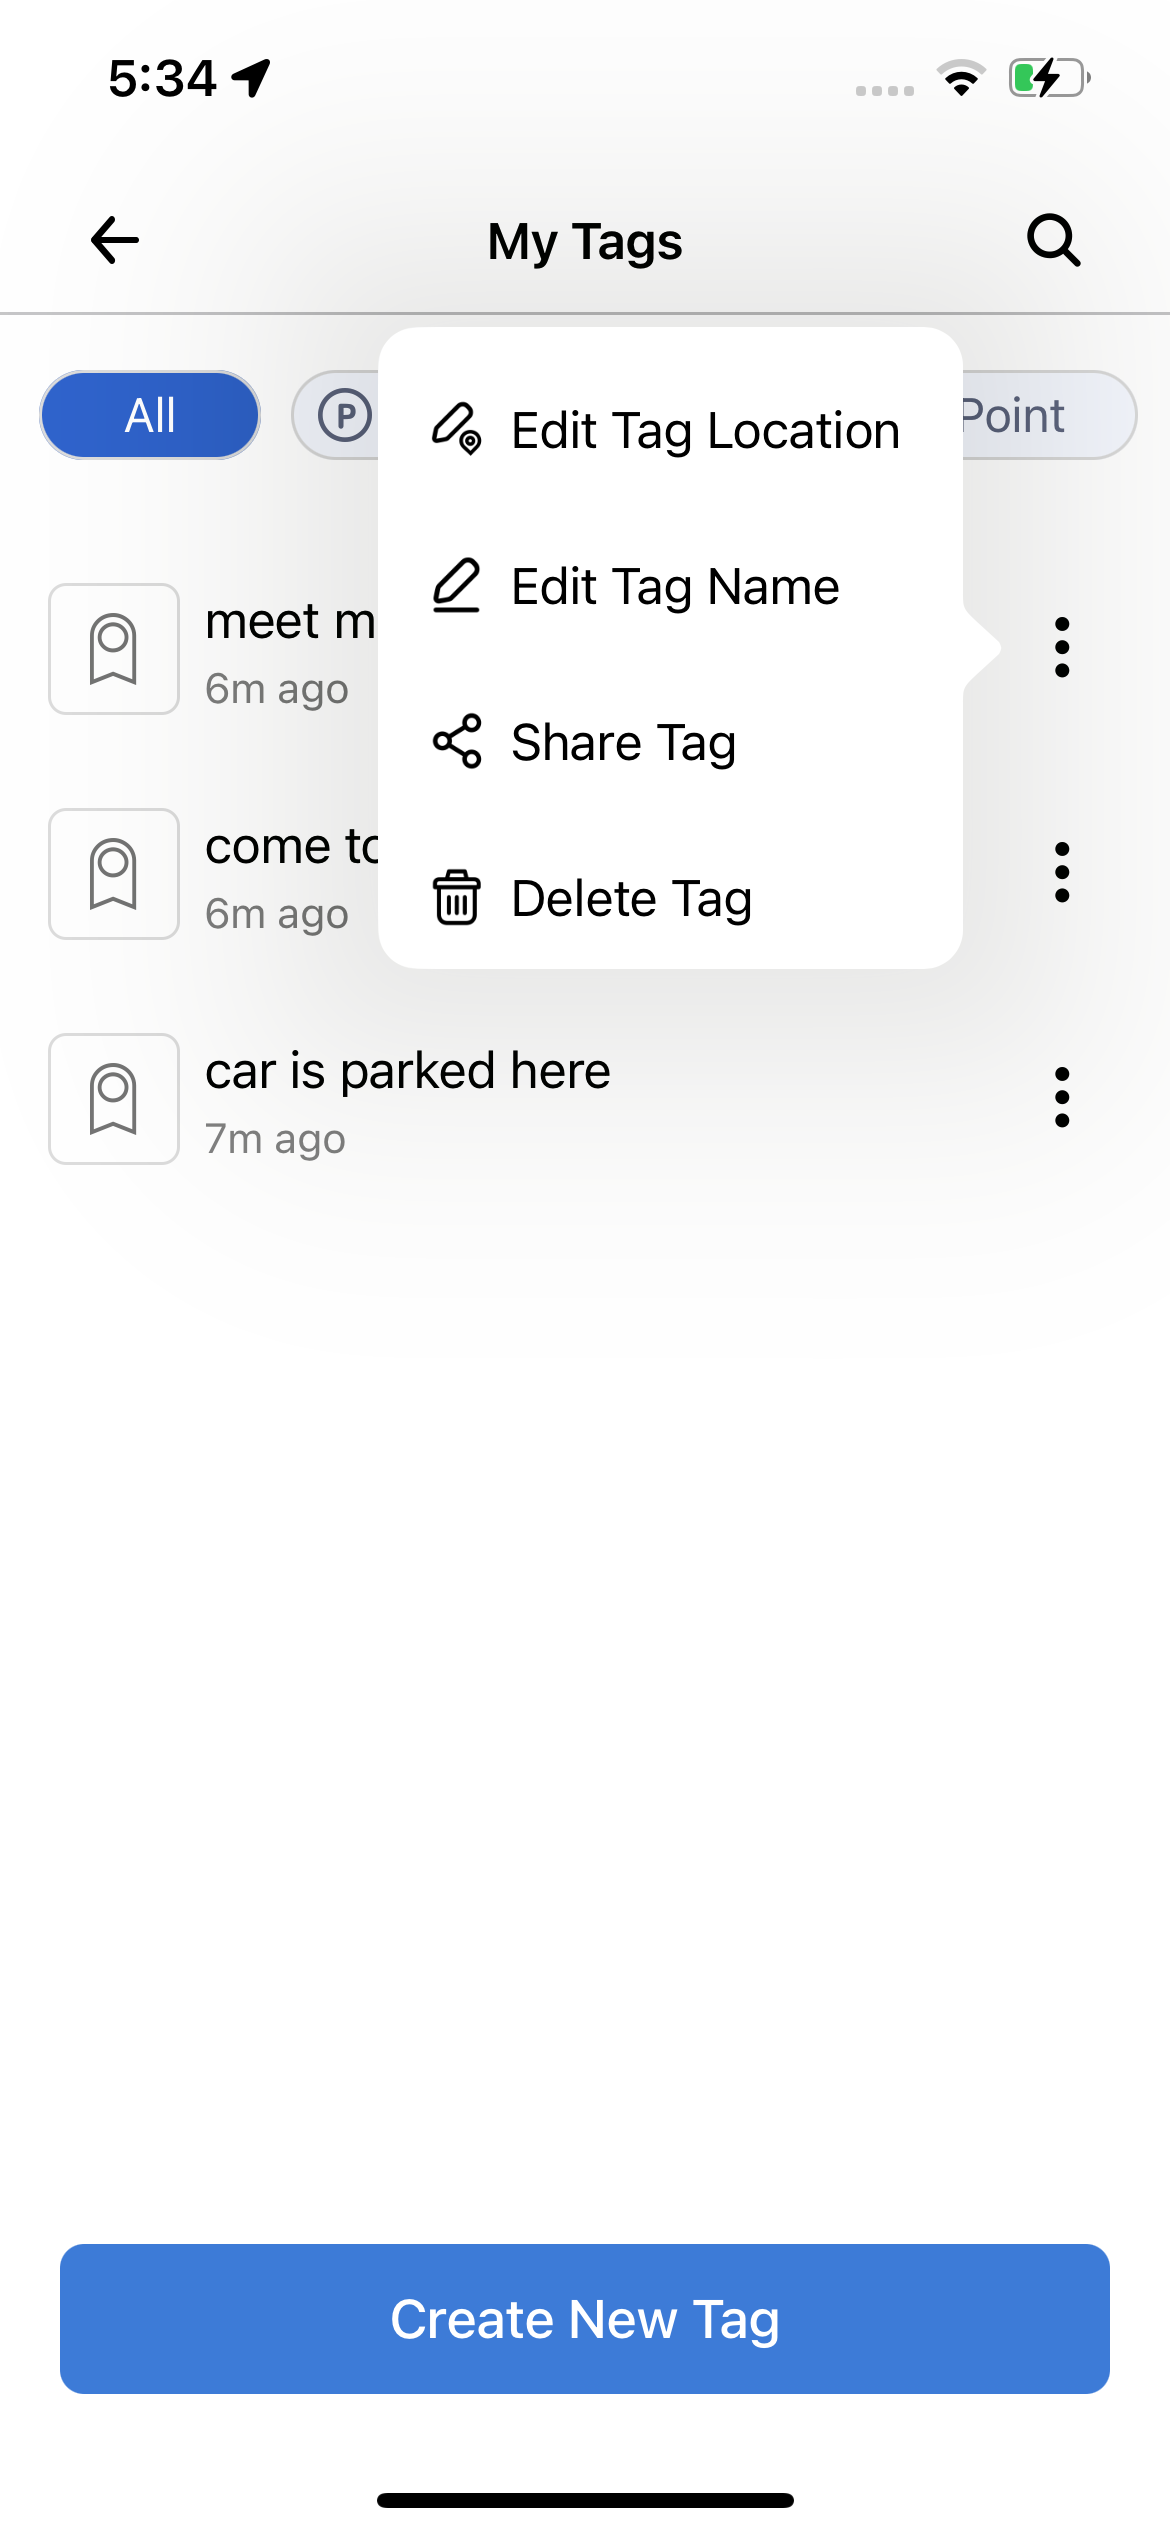
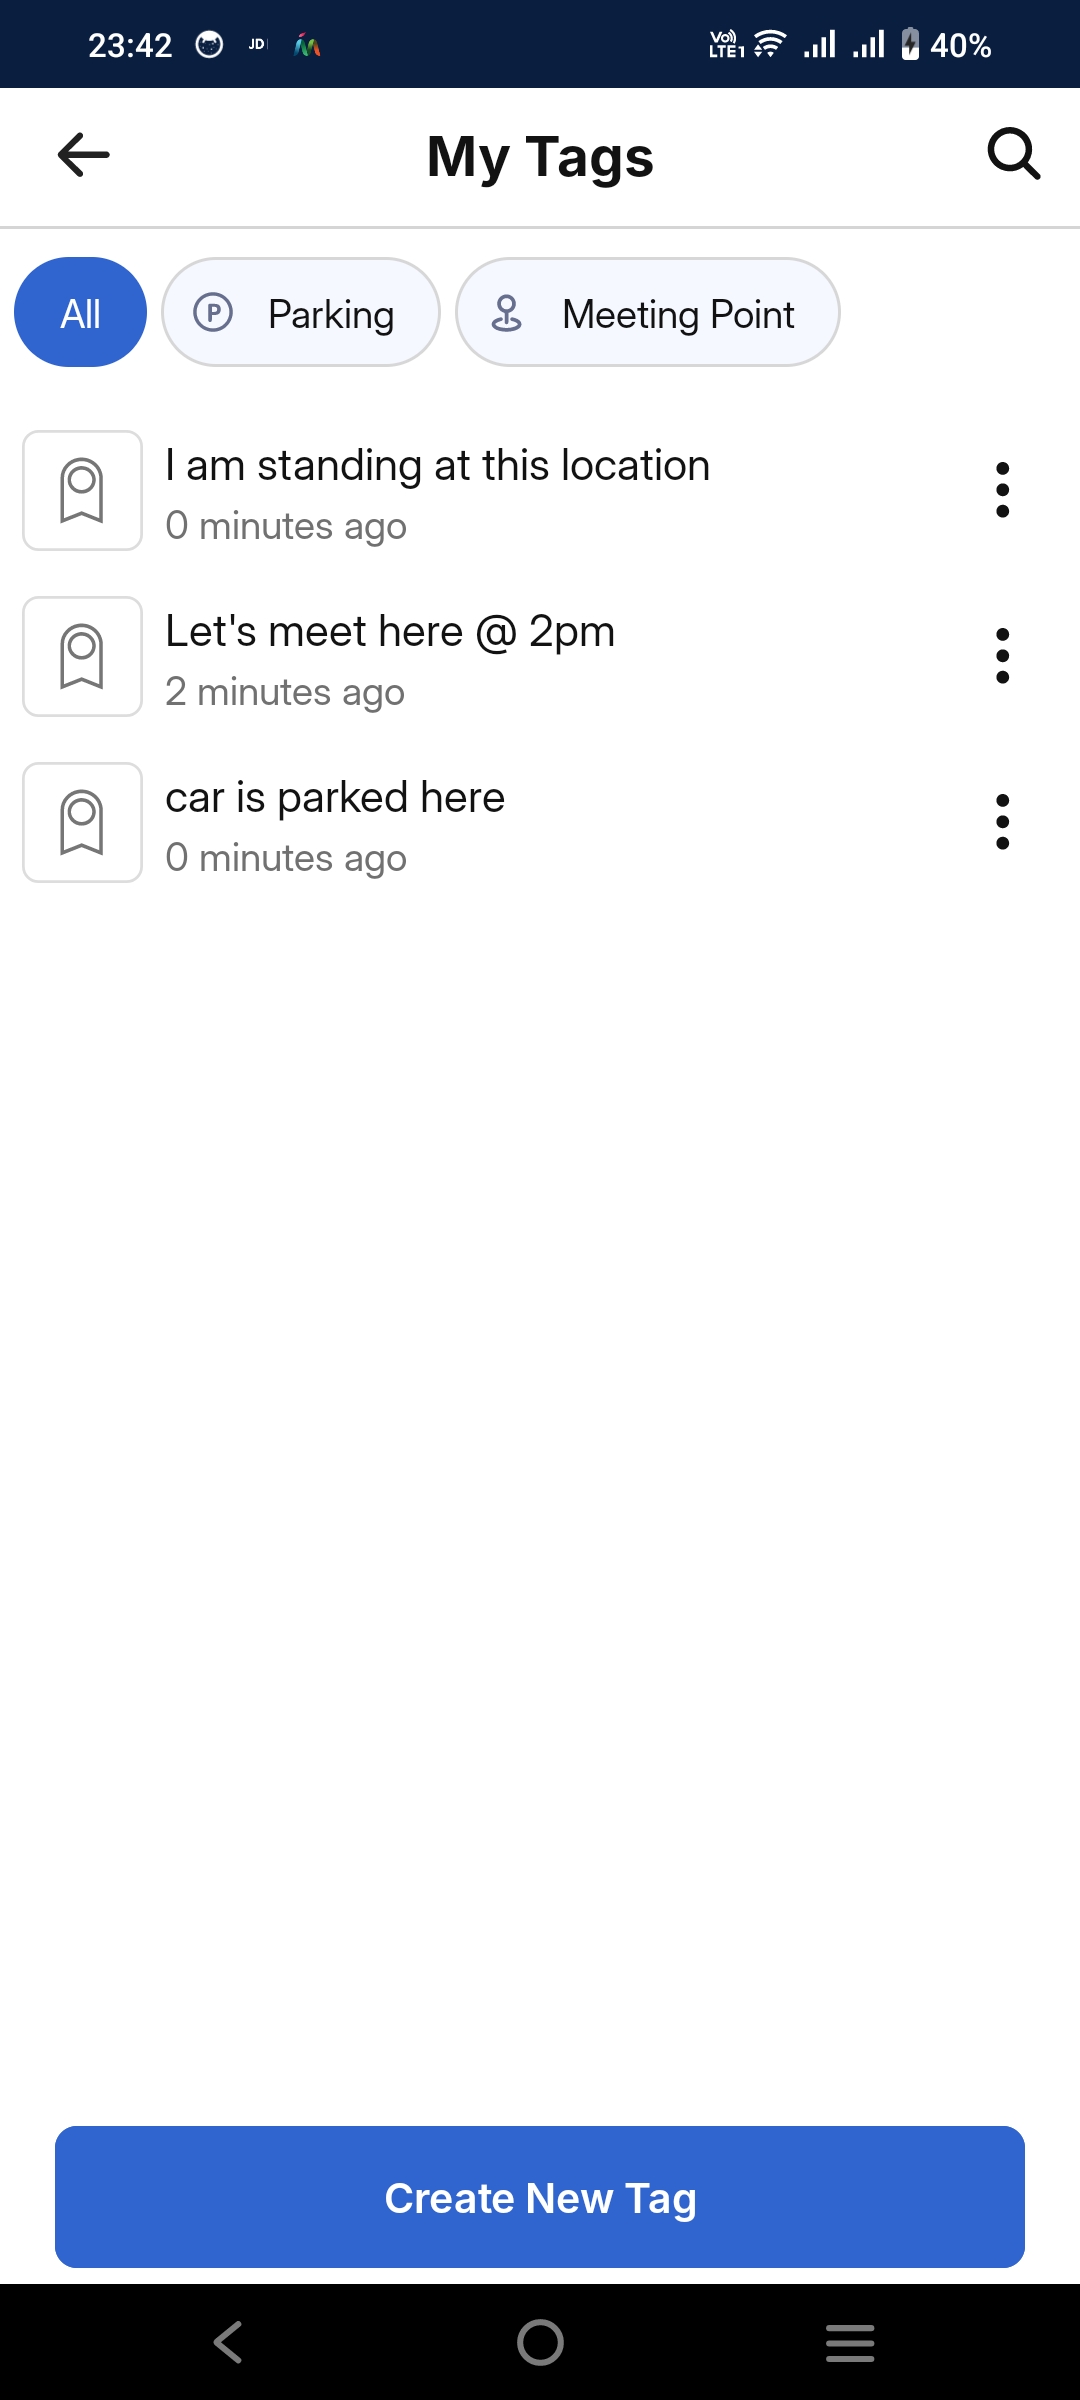
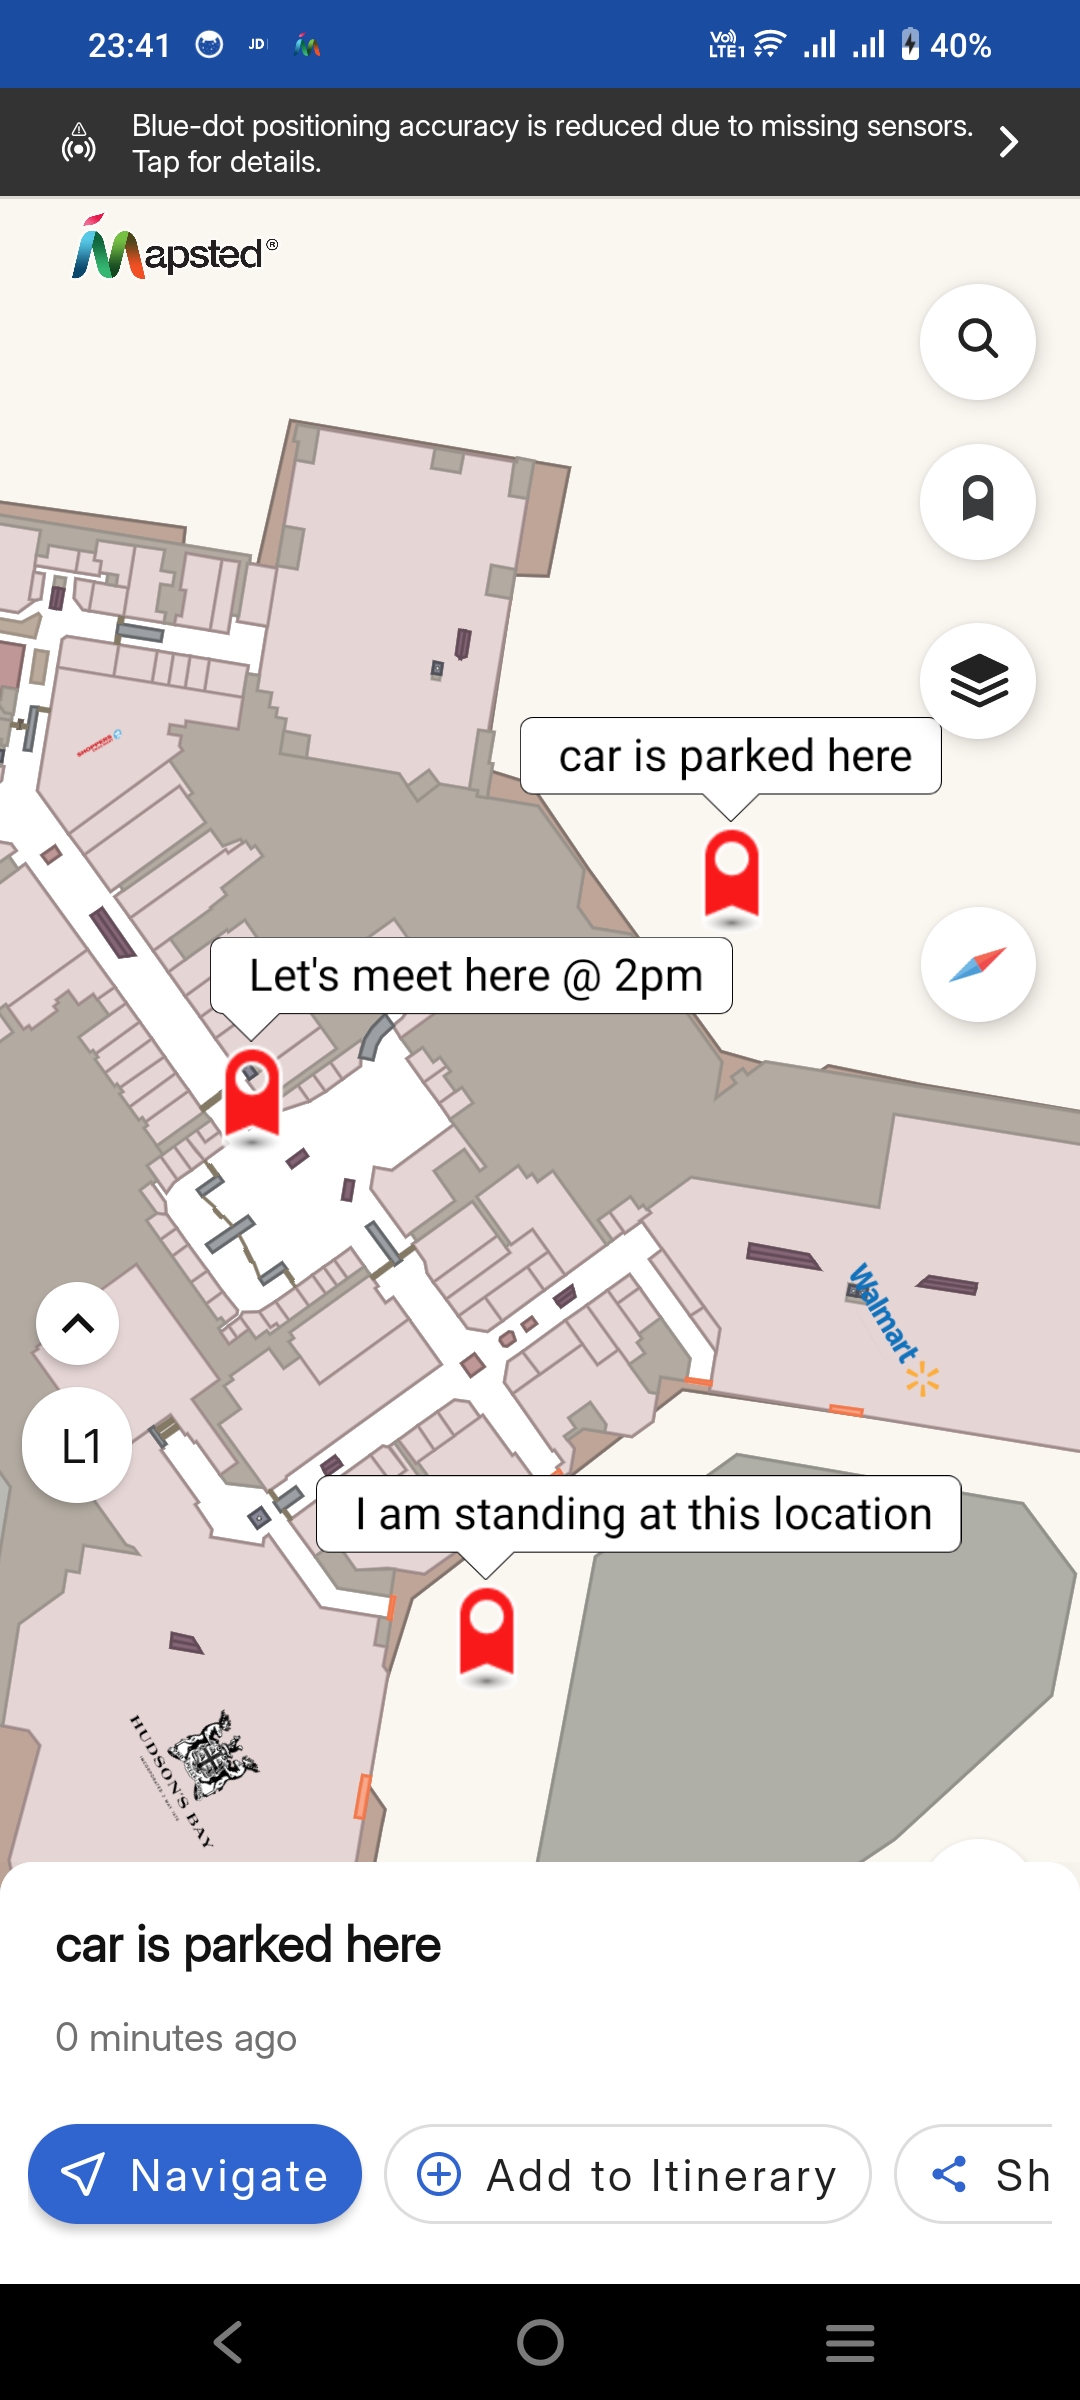
Programmatically Add Points-of-Interest
Mapsted Maps supports programmatically adding and wayfinding to your own Points of Interest (POI). You can create a Tag object which holds the necessary location data. Your custom Tag or POI can be added to the user's itinerary and/or be navigated to. You also have the ability to add multiple tags at the same time, or to delete all tags from a property.
Android: programmatic custom-POI / tag placement via the prebuilt UI is not available as a client API in 26.7.1. To route to your own location on Android, wrap a MercatorZone in a Waypoint and add it as a destination (see the Wayfinding sample above).
    let zone = MNZone(propertyId: thePropertyId, buildingId: theBuildingId, floorId: theFloorId)
    let mercator = MNMercator(x: xCoordinate, y: yCoordinate, z: zCoordinate)

    // When using prebuilt UI/UX,
    // This will place a pin on the POI location and provide options for adding to itinerary or navigation
    if let mapsVC = MapstedMapUiViewController.shared as? MapstedMapUiViewController {
        let newTagName = "My Tag";
        mapsVC.addTag(tagName: newTagName, tagPos: MNPosition(zone: zone, loc: mercator))

        //Use the addTags method to add more than one tag at once.

        //Initialize and populate your tags
        let multipleTags: [MNTag] = ...

        //Add the batch at once.
        mapsVC.addTags(tags: multipleTags)

        // Use deleteAllTags to delete all tags added to a property
        let pId = 1234
        mapsVC.deleteAllTags(propertyId: pId)
    }
Accessibility
Accessibility Routing
Mapsted SDK supports accessibility routing. When enabled, the provided routes avoid stairs, steps, and escalators, and use ramps or elevators to help the user navigate to their destination instead. For even finer control, the SDK also allows for users to specify specific transitions which they would like to take, for example if the user would prefer to take the escalator or elevator over stairs.
// If full accessibility is desired, use the convenience factory.
// Note: this overrides the individual stair/escalator/elevator settings.
RoutingOptions accessibleOptions = RoutingOptions.accessibleInstance(true);

// Alternatively, for finer control (e.g., prefer escalators/elevators over stairs),
// configure the transitions explicitly with the builder:
RoutingOptions customOptions = new RoutingOptions.Builder()
        .setIncludeStairs(false)
        .setIncludeEscalators(true)
        .setIncludeElevators(true)
        .setIncludeRamps(true)
        .build();

// Create a RouteRequest with these options and process it.
// See the Wayfinding section for the full request + navigation flow.
//Create an instance of MNRouteOptions. You can configure the first three parameters based on whether you prefer
//stairs/escalators/elevators. The MNRouteOptions object is used to create a route request.

let useStairs = false
let useEscalators = true
let useElevators = true

let routeOptions = MNRouteOptions.init(useStairs, escalators: useEscalators, elevators: useElevators, current: true, optimized: true)

//There is an accessibility mode that overrides previous settings.
routeOptions.setAccessibility(true)
Localization
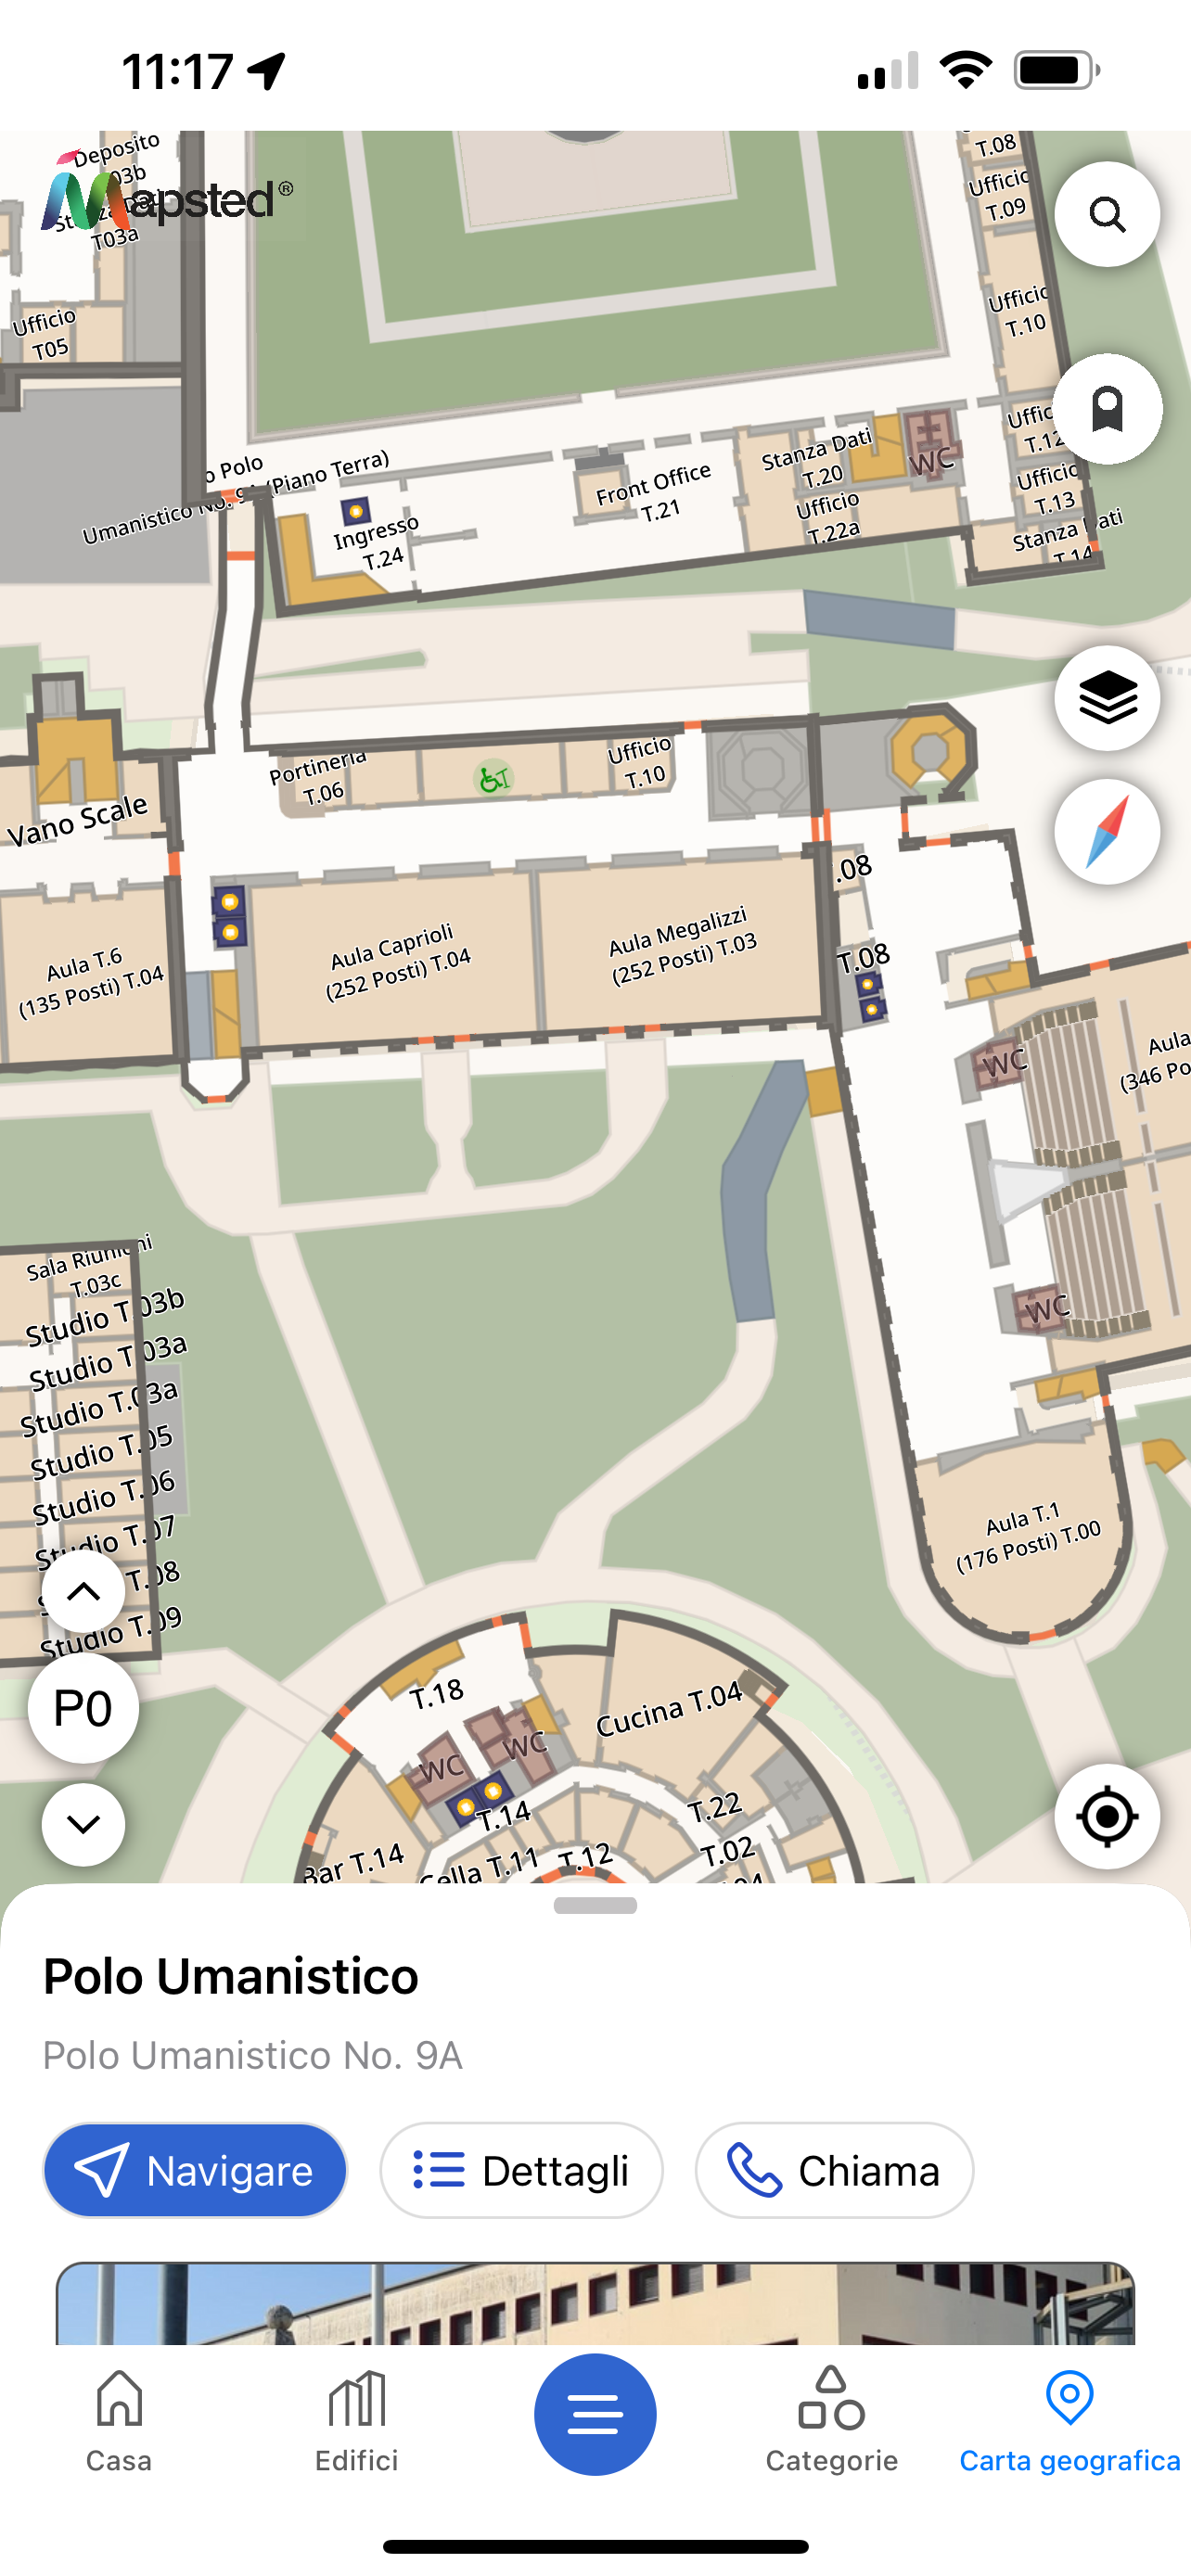
The Mapsted SDK offers multiple language support, including support for both left-to-right and right-to-left languages. Support is automatically provided for most languages, but appropriate translation and font files would be necessary to support non-mainstream languages. This is handled automatically when using the Map UI SDK or prebuilt UI/UX.
Localization Example
The figures below show the same map view in English and Italian, respectively.
Programmatically Controlling Localization
The Mapsted mobile SDK will automatically capture the localization based on the device's settings, if the selected language is supported. If the language is not available, it will automatically default back to English. The localization can also be modified programmatically, as shown below.
// Sample usage for listening for language events, notifying the Mapsted Map
// Note that when using the Mapsted Map-Ui or prebuilt UI/UX this is handled automatically
LocaleManager.getInstance(context).getLanguageMutableLiveData().observe(mActivity, (languageLiveData) -> {
     mapApi.mapView().config().setLanguageCode(languageLiveData, (language, propertyId, isAvailable) -> {
            // TODO: Update the rest of the UI
    });
});
//iOS automatically relaunches the app in use when the the user changes their
//preferred language from settings. To change the user default language programmatically,
//call the set method of the system provided UserDefault class by means of its shared standard object.

UserDefaults.standard.set(["en"], forKey: "AppleLanguages")
UserDefaults.standard.synchronize()

//You will need to provide the two letter language code to the method.
//Standard language code values include "en" for English, "fr" for French, "ar" for Arabic, etc.
Deep link
Mapsted SDK supports parsing deep links for various sdk features.
Deep links must be in following format
https://{your_host}/deeplink/{your_app_name}/{feature_name}/{optional_sub_feature}?{related_parameters}
your_host: your host/domain nameyour_app_name: an identifier for your appfeature_name: feature identifier which may befeedsormapoptional_sub_feature: optional sub feature are available iffeature_nameismap. They includeselect(for selecting an entity) orrouting(routing feature)related_parameters: additional parameters like property, building, floor or entity for their respective ids. It also includesdestinationswhich is list ofbuildingId:entityIditems.
Deep link Examples
| Description | Deep link |
|---|---|
| Campaign feeds for all properties | https://yourdomain.com/deeplink/appname/feeds |
| Campaign feeds for a particular property | https://yourdomain.com/deeplink/appname/feeds?property=504 |
| Select entity on map | https://yourdomain.com/deeplink/appname/map/select?property=123&building=111&floor=222&entity=333 |
| Open route preview | https://yourdomain.com/deeplink/appname/map/routing?property=123&destinations=111:333,111:444 Note: destinations are in |
Deeplink Setup
Register your deeplink URLs.
<activity android:name=".activities.MainActivity"
    android:label="@string/app_name"
    android:launchMode="singleTop"
    android:screenOrientation="portrait">
    <intent-filter android:autoVerify="true">
        <action android:name="android.intent.action.VIEW" />

        <category android:name="android.intent.category.DEFAULT" />
        <category android:name="android.intent.category.BROWSABLE" />

        <data android:host="yourdomain.com" />
        <data android:pathPrefix="/deeplink/appname"/>
        <data android:scheme="https" />
        <data android:scheme="http" />
    </intent-filter>
</activity>
Configure your app domain and path prefix for deeplink.
<!-- The two string keys mentioned below should be added to the strings.xml file, and their values should be replaced with your domain name and path prefix. -->
<string name="app_domain" translatable="false">your domain name </string>
<string name="deeplink_prefix" translatable="false">/deeplink/your_prefix</string>
<!-- For iOS, you can add the below mentioned keys in your application's `info.plist` file.
`app_domain` - This is the domain url.
`deeplink_prefix` - This should be the app name in lower case without spaces. -->

<key>deeplink_prefix</key>
<string>appname</string>
<key>app_domain</key>
<string>https://yourdomain.com</string>
Handling deep links
The mobile-sdk provides utility methods for checking whether or not a deeplink can be handled and for handling the deeplink events. See sample code below.
    // In you main activity
    // Make sure you've implemented the MapstedMapUiApiProvider interface

    private MapstedMapApi mapApi;
    private MapUiApi mapUiApi;
    private CoreApi coreApi;

    @Override
    onCreate(...){
        // ....
        // Initialize Mapsted Sdk
        coreApi = MapstedCoreApi.newInstance(this);
        mapApi = MapstedMapApi.newInstance(this, coreApi);
        mapUiApi = MapstedMapUiApi.newInstance(this, mapApi);
        // ....

        // Check if the provided deeplink is supported by SDK, if yes proceed for its invokation
        // after the initialization of SDK callback execution
        // Here is a sample implementation

        Uri uri = getIntent().getData();
        if (ProcessMapDeepLink.Companion.isMapstedSupportedDeeplink(uri)) {
             // Initialize sdk and process deeplink
            coreApi.setup().initialize(...., new CoreApi.CoreInitCallback() {
                @Override
                public void onSuccess() {
                    ProcessMapDeepLink.Companion.executeDeepLink(this, containerViewId, uri);
                }
                // ...
            });
        }
        else {
            // Deeplink not supported by SDK
        }
    }
    // In you main activity
    // Make sure you've implemented the MapstedMapUiApiProvider interface

    private val coreApi: CoreApi? = null
    private val mapApi: MapstedMapApi? = null
    private val mapUiApi: MapUiApi? = null

    val activity = this
    var uri : Uri = intent.data ?: Uri.parse(" ")

    override fun onCreate(...., ....) {
        // ....
        // Create Mapsted Sdk objects
        coreApi = MapstedCoreApi.newInstance(context)
        mapApi = MapstedMapApi.newInstance(context, coreApi)
        mapUiApi = MapstedMapUiApi.newInstance(context, mapApi)

        // Check if the provided deeplink is supported by SDK, if yes proceed for its invokation
        // after the initialization of SDK callback execution
        // Here is a sample implementation

        if (ProcessMapDeepLink.isMapstedSupportedDeeplink(uri)) {

            // Initialize sdk and process deeplink
            coreApi?.setup()?.initialize(CoreParams(), object : CoreInitCallback {
                override fun onSuccess() {
                    ProcessMapDeepLink.executeDeepLink(activity, containerViewId, uri);
                }
                // ...
            })
        }
        else {
            // Deeplink not supported by SDK
        }
    }
To use the deeplink with map-ui sdk
Add the below on the code functions on to your app's AppDelegate
import MapstedCore

func application(_ application: UIApplication, window: UIWindow?, continue userActivity: NSUserActivity, restorationHandler: @escaping ([UIUserActivityRestoring]?) -> Void) -> Bool
{
    CoreApi.DeeplinkManager.clearDeeplinkUrl()

    // Get URL components from the incoming user activity.
    guard userActivity.activityType == NSUserActivityTypeBrowsingWeb, let incomingURL = userActivity.webpageURL, let components = NSURLComponents(url: incomingURL, resolvingAgainstBaseURL: true) else {
        return false
    }

    // Check for specific URL components that you need. (Routing)
    guard let path = components.path, let params = components.queryItems else {
        return false
    }

    print("deeplink: url = \(incomingURL)")
    print("deeplink: path = \(path)")

    CoreApi.DeeplinkManager.setDeeplinkUrl(url: incomingURL.absoluteString)

    if let top = window?.visibleViewController {
        if let delegate = top as? MNDeepLinkDelegate {
            //YourViewController which has the object of MapstedMapUIViewController and YourViewController should be implementing MNDeeplinkDelegate
           if let vc = top as? YourViewController {
                vc.processDeepLink(path: path, params: params) { result in

                }
                return true
            }
            else {
                DispatchQueue.main.async {
                    delegate.processDeepLink(path: path, params: params) { result in

                    }
                }
            }
            return true
        }
    }
    return true
}
Add below code into your ViewController which implements the Mapsted's MapView using map-ui sdk
//YourViewController is responsible for showing the Mapsted's Mapview. MapstedMapUIViewController is integrated into YourViewController
class YourViewController : UIViewController, MNDeepLinkDelegate {
   private var mapsVC: MapstedMapUiViewController?

   //..

   //MNDeeplinkDelegate methods are written below
   func processDeepLink(path: String, params: [URLQueryItem]?, completion: ((Bool) -> Void)?) {
        mapsVC?.processDeepLink(path: path, params: params, completion: completion)
   }

    func processDeepLink(uri: URL, completion: ((Bool) -> Void)?) {
        mapsVC?.processDeepLink(uri: uri, completion: completion)
    }
}
To use the deeplink with app-template sdk
Add the below on the code functions on to your app's AppDelegate
import MapstedCore
import AppTemplate

    func application(_ application: UIApplication, window: UIWindow?, continue userActivity: NSUserActivity, restorationHandler: @escaping ([UIUserActivityRestoring]?) -> Void) -> Bool {
    CoreApi.DeeplinkManager.clearDeeplinkUrl()

    // Get URL components from the incoming user activity.
    guard userActivity.activityType == NSUserActivityTypeBrowsingWeb, let incomingURL = userActivity.webpageURL, let components = NSURLComponents(url: incomingURL, resolvingAgainstBaseURL: true) else {
        return false
    }

    // Check for specific URL components that you need. (Routing)
    guard let path = components.path, let params = components.queryItems else {
        return false
    }

    print("deeplink: url = \(incomingURL)")
    print("deeplink: path = \(path)")

    CoreApi.DeeplinkManager.setDeeplinkUrl(url: incomingURL.absoluteString)

    if let top = window?.visibleViewController {
        if let delegate = top as? MNDeepLinkDelegate {
           if let vc = top as? LaunchViewController {
                vc.processDeepLink(path: path, params: params) { result in

                }
                return true
            }
            else {
                DispatchQueue.main.async {
                    delegate.processDeepLink(path: path, params: params) { result in

                    }
                }
            }
            return true
        }
    }
    return true
}
Geofences
The geofence-sdk allows you to programmatically incorporate precision hyperlocal geofences which can be triggered based on a combination of various criteria (e.g., vicinity to a point of interest), direction (e.g., on enter, on exit), as well as other factors (e.g., trigger immediately, trigger on dwell for some timespan). These geofences can be programmatically created and a callback is received if the combinations of conditions trigger simultaneously. Note that these geofences require the mobile sdk to be given location permissions and be running in either the foreground or background.
When registering a geofence, you will be require to supply your own geofenceId. Likewise, you can register a listener and be notified when the geofence triggers.
// Setup sample Geofences for Square One Shopping Center (sample property)
int propertyId = 504;
int buildingId = 504;
int floorOneId = 941; // L1
int floorTwoId = 942; // L2

// Create instance of GeofenceApi
geofenceApi = MapstedGeofenceApi.newInstance(this, coreApi);

// Create single geofence trigger (Poi Vicinity) for two different Poi's
geofenceApi.geofenceTriggers().addGeofenceTrigger(propertyId,
        new GeofenceTrigger.Builder(propertyId, "poi-trigger-210923") // example geofenceId
                .setLocationCriteria(new PoiVicinityLocationCriteria.Builder()
                        .addEntityZone(new EntityZone(propertyId, buildingId, floorTwoId, 414)) // Foot Locker
                        // Can add more EntityZones if desired
                        .setActivationDistanceTh(10.0F)
                        .setTriggerDirection(ILocationCriteria.LocationTriggerDirection.ON_ENTER)
                        .build())
                .build());

// Create a list of geofence triggers
List<GeofenceTrigger> geofenceTriggers = new ArrayList<>();

// Add Enter Property (Square One)
geofenceTriggers.add(new GeofenceTrigger.Builder(propertyId, "property-trigger-1231")
            .setLocationCriteria(new PropertyLocationCriteria.Builder(propertyId)
                    .setTriggerDirection(ILocationCriteria.LocationTriggerDirection.ON_ENTER)
                    .build())
            .build());

// Add Enter Floor (Square One - L1)
geofenceTriggers.add(new GeofenceTrigger.Builder(propertyId, "floor-trigger-9343")
        .setLocationCriteria(new FloorLocationCriteria.Builder(floorOneId)
                .setTriggerDirection(ILocationCriteria.LocationTriggerDirection.ON_ENTER)
                .build())
        .build());

// Register list of triggers
geofenceApi.geofenceTriggers().addGeofenceTriggers(propertyId, geofenceTriggers);

// Add callback listener
geofenceApi.geofenceTriggers().addListener((propertyId, geofenceId) -> {

    // Optional: Unsubscribe to ensure that event triggers only once
    boolean unSubscribeSuccess = geofenceApi.geofenceTriggers().removeGeofenceTrigger(propertyId, geofenceId);

    Log.v("onGeofenceTriggered: pId: %d -> geofenceId: %s", propertyId, geofenceId);

    // Handle geofenceId event (e.g., UI pop-up, logging to analytics, etc.)
});
// Setup sample Geofences for Square One Shopping Center (sample property)
let propertyId = 504
let buildingId = 504
let entityId = 414 // Foot Locker
let floorId = 941 //L1
let delaySecond: Float = 5.0

// Register the listener (self conforms to GeofenceEventListener; geofencing lives in MapstedCore on iOS 26.7.1)
CoreApi.GeofenceManager.addListener(self)

// Enter POI Vicinity (Foot Locker)
let addEntityEntryTrigger = GeoFenceUtility.shared.createGeofenceForEntity(
    propertyId: propertyId, entityId: entityId, buildingId: buildingId, floorId: 942,
    geofenceId: "Trigger-Entity-Entry-\(entityId)", delaySecond: delaySecond, direction: .ON_ENTER)

// Exit POI Vicinity (Foot Locker)
let addEntityExitTrigger = GeoFenceUtility.shared.createGeofenceForEntity(
    propertyId: propertyId, entityId: entityId, buildingId: buildingId, floorId: 942,
    geofenceId: "Trigger-Entity-Exit-\(entityId)", delaySecond: delaySecond, direction: .ON_EXIT)

// Enter Property (Square One)
let addPropertyEntryTrigger = GeoFenceUtility.shared.createGeofenceForProperty(
    propertyId: propertyId, geofenceId: "Trigger-Property-Entry-\(propertyId)", delaySecond: delaySecond, direction: .ON_ENTER)

// Exit Property (Square One)
let addPropertyExitTrigger = GeoFenceUtility.shared.createGeofenceForProperty(
    propertyId: propertyId, geofenceId: "Trigger-Property-Exit-\(propertyId)", delaySecond: delaySecond, direction: .ON_EXIT)

// Enter Building (Square One)
let addBuildingEntryTrigger = GeoFenceUtility.shared.createGeofenceForBuilding(
    propertyId: propertyId, buildingId: buildingId, geofenceId: "Trigger-Building-Entry-\(buildingId)",
    delaySecond: delaySecond, direction: .ON_ENTER)

// Exit Building (Square One)
let addBuildingExitTrigger = GeoFenceUtility.shared.createGeofenceForBuilding(
    propertyId: propertyId, buildingId: buildingId, geofenceId: "Trigger-Building-Exit-\(buildingId)",
    delaySecond: delaySecond, direction: .ON_EXIT)

// Enter Floor (L1)
let addFloorEntryTrigger = GeoFenceUtility.shared.createGeofenceForFloor(
    propertyId: propertyId, floorId: floorId, geofenceId: "Trigger-Floor-Entry-\(floorId)",
    delaySecond: delaySecond, direction:.ON_ENTER)

// Exit Floor (L1)
let addFloorExitTrigger = GeoFenceUtility.shared.createGeofenceForFloor(
    propertyId: propertyId, floorId: floorId, geofenceId: "Trigger-Floor-Exit-\(floorId)",
    delaySecond: delaySecond, direction:.ON_EXIT)

// For example, Create Array of Geofence triggers
self.arrGeoTriggers = [
    addEntityEntryTrigger, addEntityExitTrigger,
    addPropertyEntryTrigger, addPropertyExitTrigger, addBuildingEntryTrigger,
    addBuildingExitTrigger, addFloorEntryTrigger, addFloorExitTrigger
    ].compactMap { $0 }

// Add Geofence Triggers
let _ = EngineFacade.shared.addGeofenceTriggers(propertyId: propertyId, builders: self.arrGeoTriggers)

// ...

// Remove Geofence Trigger by geofenceId
EngineFacade.shared.removeGeofenceTrigger(propertyId: propertyId, geofenceId: geofenceId)

// Remove all Geofence Triggers
EngineFacade.shared.removeAllGeofenceTriggers(propertyId: propertyId)

// ...

// Example function for handling geofence callback
func handleGeofence(propertyId: Int, geofenceId: String) {
    DispatchQueue.main.async {
        // Setup example alert title/message
        var altTitle: String? = ""
        var altMsg: String? = ""

        switch geofenceId {
            case "Trigger-Entity-Entry-414":
                altTitle = "Entity Entry alert"
                altMsg = "You are entering Foot Locker at Square One Shopping Centre."
                break
            case "Trigger-Entity-Exit-414":
                altTitle = "Entity Exit Alert"
                altMsg = "You just exited Foot Locker at Square One Shopping Centre."
                break
            case "Trigger-Property-Entry-504":
                altTitle = "Property Entry alert"
                altMsg = "You are entering the Square One Shopping Centre property."
                break
            case "Trigger-Property-Exit-504":
                altTitle = "Property Exit alert"
                altMsg = "You just exited the Square One Shopping Centre property."
                break
            case "Trigger-Building-Entry-504":
                altTitle = "Building Entry alert"
                altMsg = "You are entering the Square One Shopping Centre building."
                break
            case "Trigger-Building-Exit-504":
                altTitle = "Building Exit alert"
                altMsg = "You just exited the Square One Shopping Centre building."
                break
            case "Trigger-Floor-Entry-941":
                altTitle = "Floor Entry alert"
                altMsg = "You are entering the Floor - L1 on Square One Shopping Centre."
                break
            case "Trigger-Floor-Exit-941":
                altTitle = "Floor Exit alert"
                altMsg = "You just exited the Floor - L1 on Square One Shopping Centre."
                break
            default:
                break
        }

        // For example, setup an alert view to notify
        let alert = UIAlertController(title: altTitle, message: altMsg, preferredStyle: .alert)
        alert.addAction(UIAlertAction(title: "Ok", style: .default, handler: nil))

        self.present(alert, animated: true, completion: nil)
    }
}
Location Marketing
The Location Marketing module allows you to incorporate precision location-based Triggers, Events, or Feeds. Campaigns can be easily created, configured, managed, and published using the Mapsted Notify software. When using the Location Marketing module, these campaigns will be automatically synced with the Mapsted Maps - Mobile SDK.
Campaigns created via the Mapsted Notify Software can displayed as Feed items. Campaigns can also be associated with various Triggers. A Trigger is a combination of Location Criteria (e.g., geofence), Demographic Criteria (e.g., device type), and/or Behaviour Criteria (e.g., keyword searches).
When enabled, the Mapsted Maps - Mobile SDK will provide a callback to identify that a particular campaign and trigger has occurred, referred to as a Marketing Event. When using the Prebuilt UI/UX, the Marketing Event may be displayed as a Notification, a Dialog, or in a Feed Bar (a rectangular pop-up at the top of the screen). On the other hand, for Customizable UI/UX, the Marketing Event may be handled however you see fit.
News & Events
The Location Marketing module provides an API to retrieve the currently active campaigns. The campaign feeds may be retrieved for a single or multiple properties.
LocationMarketingApi marketingApi = ...

// ------------------------
// Option 1: Customized UI/UX
// ------------------------
// Get Feeds and show in your own UI
// You can retrieve propertyId from mapApi or coreApi. Alternatively, if you need
// feeds for multiple properties, you can pass in an arraylist of propertyIds as well.
marketingApi.repo().getFeedsAsync(propertyId, feedsList -> {
    // show feeds to UI
});

// ------------------------
// Option 2: Prebuilt UI/UX
// ------------------------
// Use a FeedFragment. A FeedFragment shows the feed in a list. You can provide the campaignId argument to
// pre-scroll to that campaign. Campaign ids can be retrieved from LocMarketingListener
FeedFragment feedFragment = FeedFragment.newInstance(propertyId, null, false);
//use fragment manager to show the above feedFragment. The parent activity should implement FeedFragmentListener

//Parent activity
public class MyActivity extends AppCompatActivity implements LocationMarketingApiProvider, FeedFragmentListener {
    ...
@Override
    public LocationMarketingApi provideLocationMarketingApi() {
        return marketingApi;
    }

    @Override
    void onFeedSelected(Feed feedItem){}

    @Override
    void onFeedShareClicked(Feed feedItem){}

    @Override
    void onFeedViewed(Feed feed){}

    @Override
    void onFeedFragmentViewCreated(int propertyId){}
    ...
}

@Override
protected void onDestroy() {
    // ...
    if (marketingApi != null) {
        marketingApi.lifecycle().onDestroy();
    }
    // ...
}
//Import the Location Marketing SDK first
import LocationMarketing

//Instantiate Location Marketing API
let locMarketingManager = LocMarketingApi.shared

//If you have a variable for identifying the property you want to fetch feeds for
let myPropertyId = 123

//Fetch feeds and pass them to the callback method which will know how to process them.
locMarketingManager.fetchCampaignsForProperty(propertyId: myPropertyId) { campaigns in
    guard let fetchedCampaigns = campaigns else {
        return
    }
    for campaign in fetchedCampaigns {
        //do something
    }
}
Campaign Triggers/Events
Marketing Events occur whenever the necessary Trigger Criteria have occurred. The Marketing Event can be handled in a number of different ways. For example, the campaign can be displayed using a Dialog or Feeds Bar (a rectangular pop-up at the top of the screen) when the app is foreground or a Notification when app is in background. Campaigns and Triggers can be configured using the Mapsted Notify software.
//activity onCreate
//When the user interacts with the notification or dialog, LocMarketingListener will
//receive callback to open the map or open the website.

private void setupLocMarketingSdk(CoreApi coreApi) {
// create an instance of location marketing api
LocationMarketingApi marketingApi = MapstedLocationMarketingApi.newInstance(
    getApplicationContext(), // For showing dialogs, notifications, etc.
    coreApi, // Core SDK integration
    getSupportFragmentManager(), // For handling dialog fragments
    getInAppNotificationApi(), // To show in-app notifications
    entity -> {
        // Handle notification click or 'Navigate' button action on popup here
        // For example: redirect to given entity on the map or perform any custom navigation or simple
        // toast it
         Toast.makeText(this, "Event is on the " + entity.getLongName() + ".", Toast.LENGTH_SHORT).show();
    });

    //activity onNewIntent
    public void onNewIntent(Intent intent) {
        if (marketingApi != null && marketingApi.events().canHandle(intent)) {
        marketingApi.events().onNewIntent(intent);
        }
    }
}
//Import the Location Marketing SDK first
import LocationMarketing

//Assuming you have already initialized, you can use its shared instance
let locMarketingManager = LocMarketingApi.shared

//To respond to notifications from the Mapsted Location Marketing API, set your delegate as listener
locMarketingManager.setListener(listener: self)

//For this to work, you delegate needs to have implemented the LocMarketingListener protocol
extension MyViewController : LocMarketingListener {

    //Mandatory method
    //Implementation is required for this method
    public func navigateToMap(homeEntities: [EntityInfo]) {
        //Choose from home entities and show on the map
    }

    //Optional method
    //Provide an alternate implementation for the dismiss() method
    //to perform additional actions after the notification popup is dismissed
    func dismiss(action: Action?) {}

    //Optional method
    //override the openWebsite() method or return false to modify the default behavior
    //By default, this method opens the websiteURL in an embedded webview.
    func openWebsite(websiteURL: String) -> Bool { return false }

}
Alerts
The Alerts module allows you to incorporate precision location-based Alerts. These can be easily created, configured, managed, and published using the Mapsted Notify software. When using the Alerts module, these alerts will be automatically synced with the Mapsted Maps - Mobile SDK.
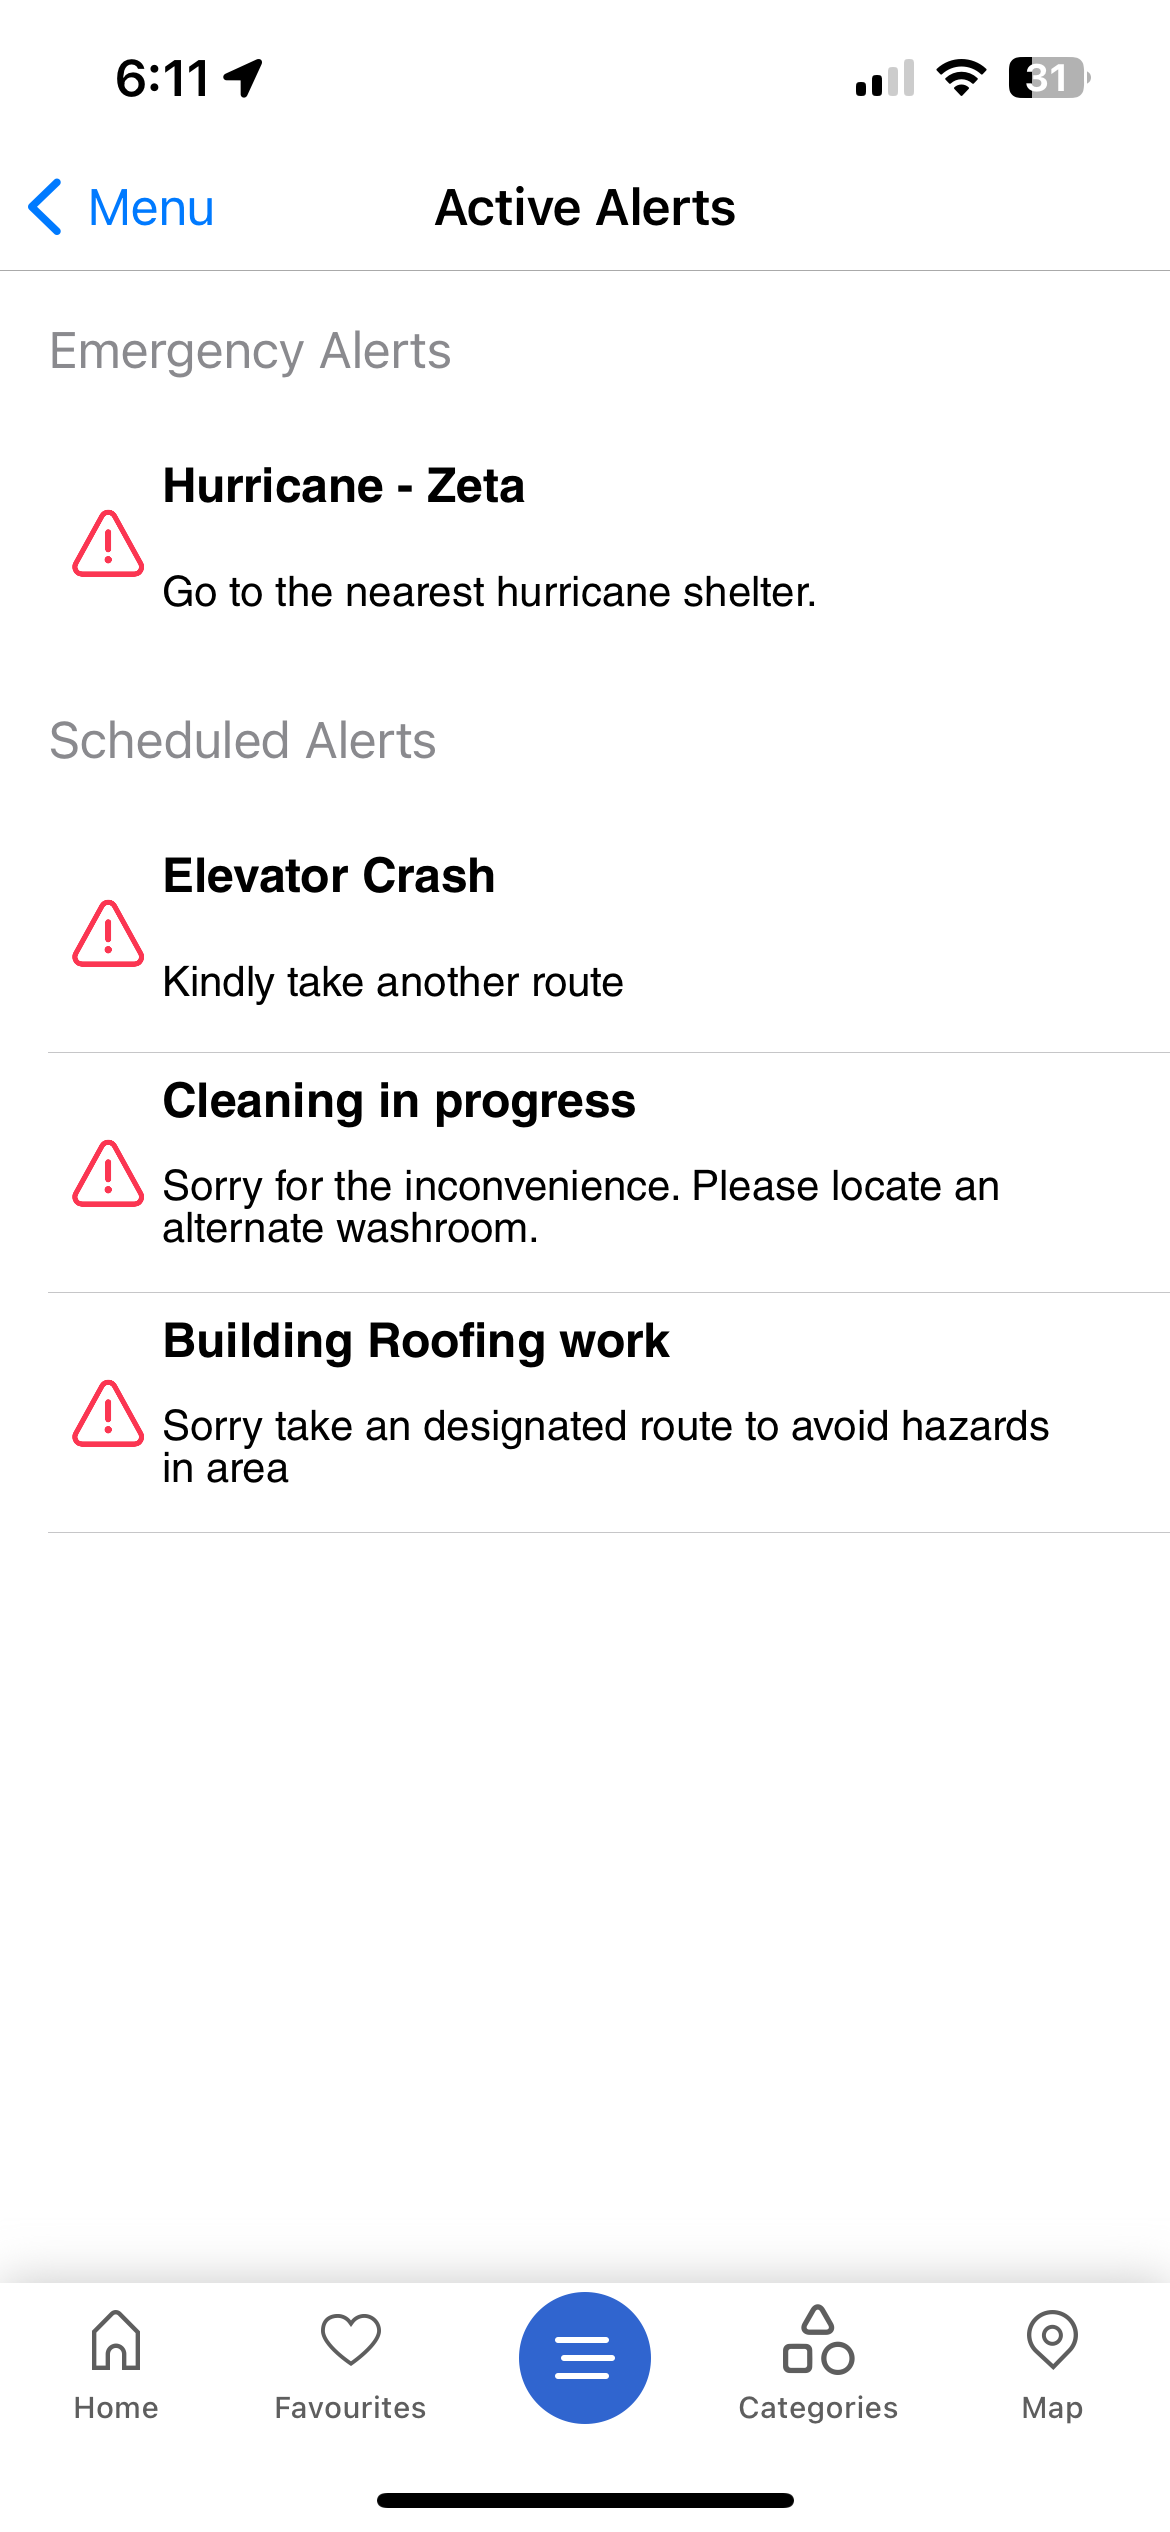
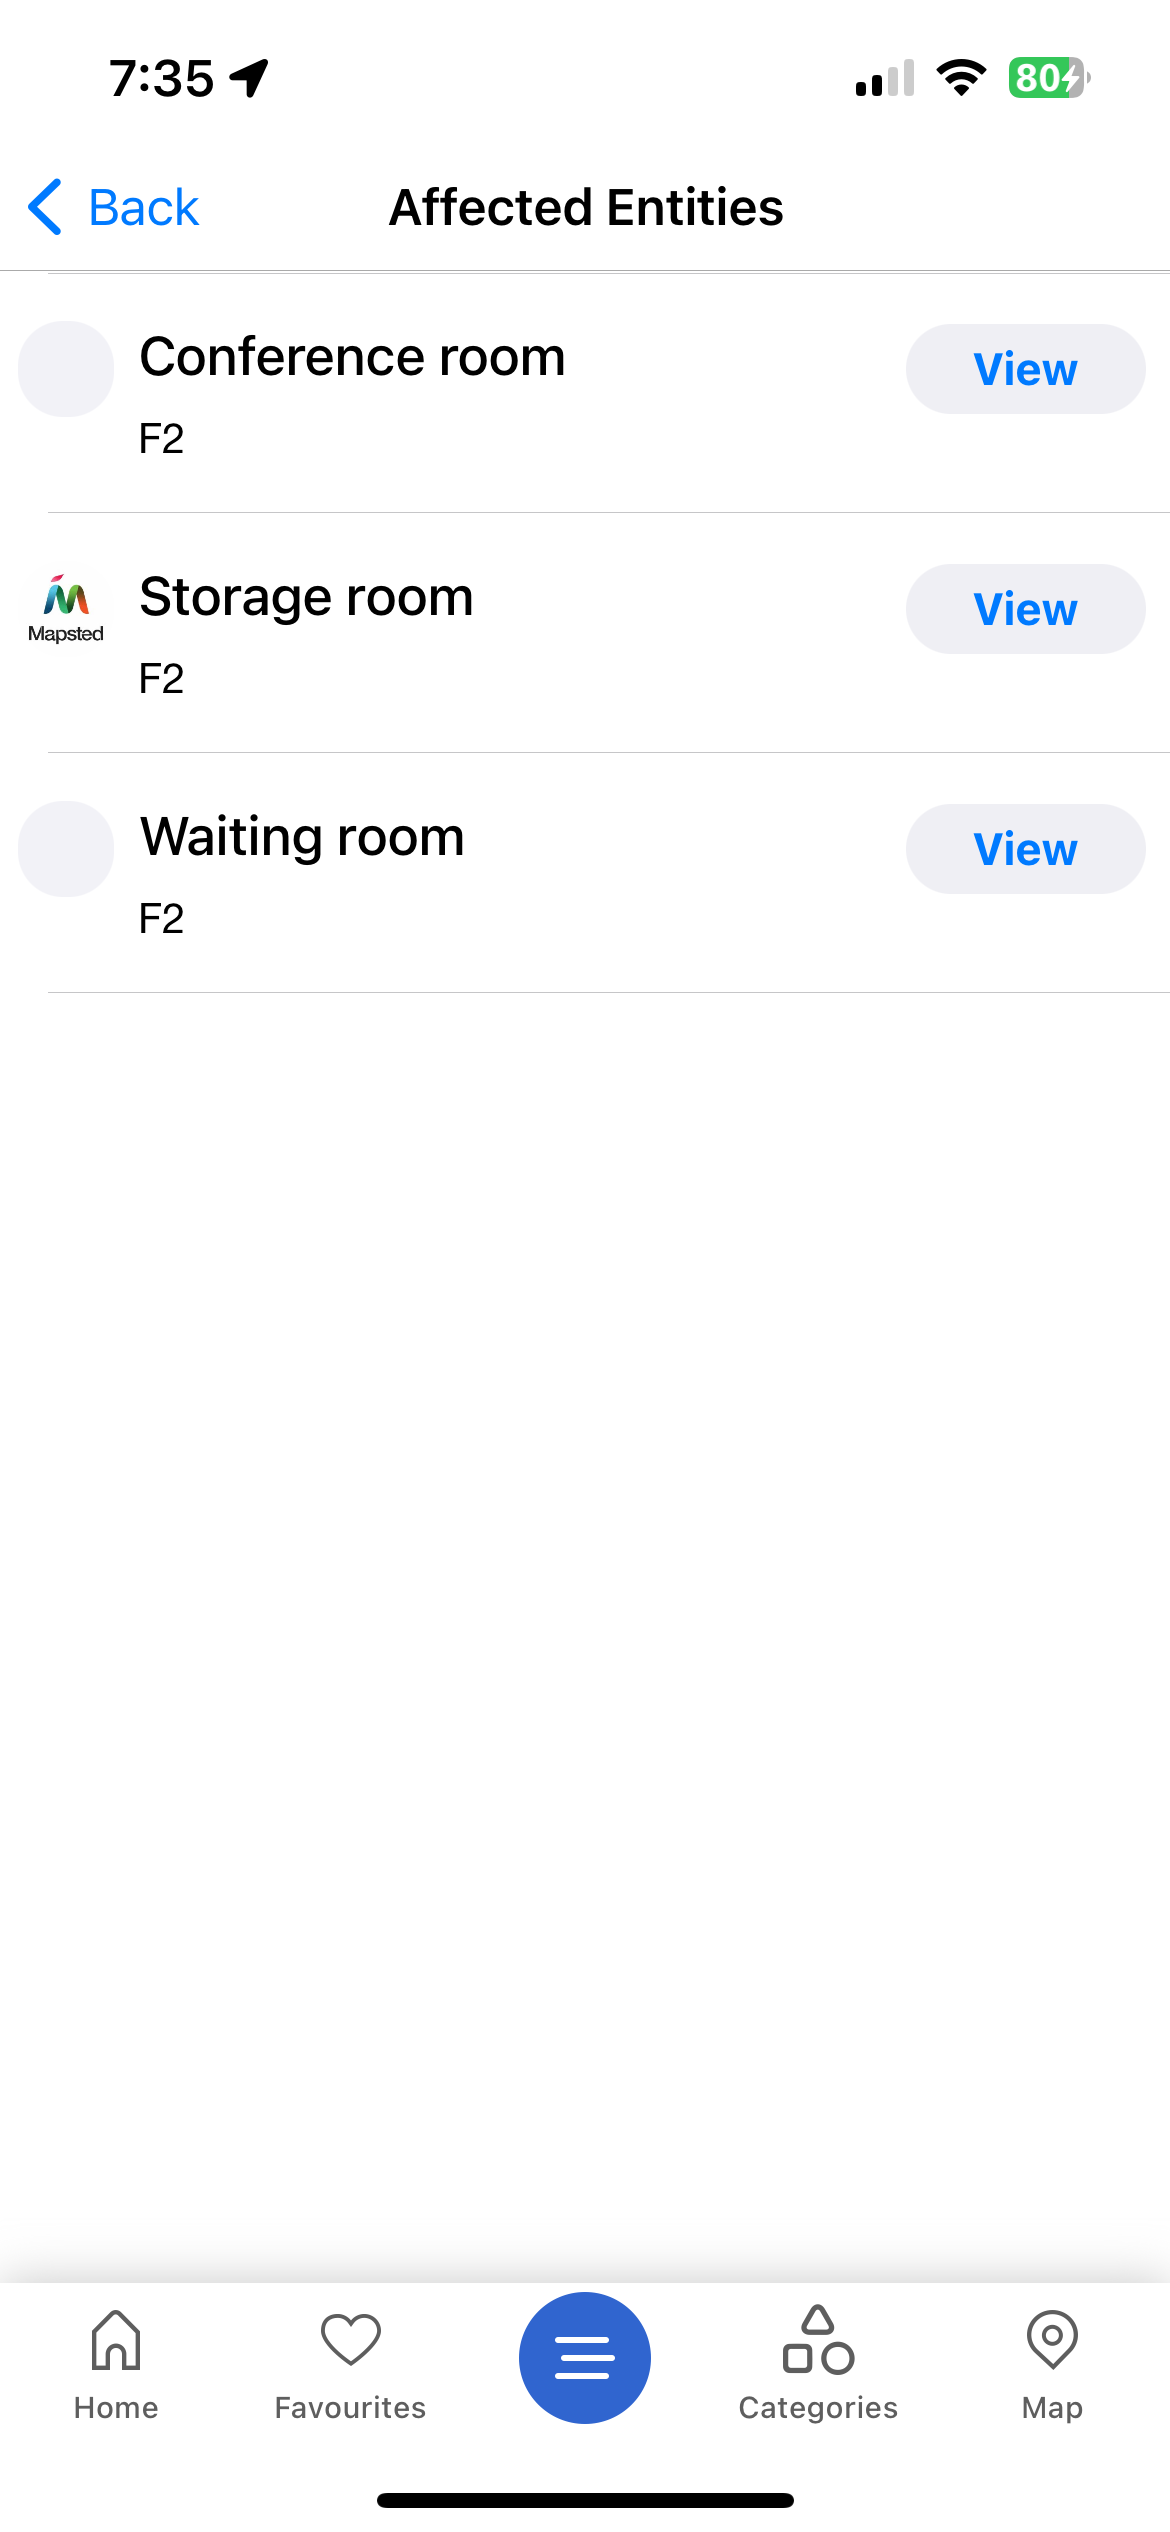
Scheduled Alerts
Scheduled alerts are one time or recurring alerts that are pre-scheduled. Similar to location marketing campaigns, scheduled alerts also has triggers that causes the alerts to activate when the location criteria are met. Scheduled alerts can be created and set by signing into the Mapsted Hub Web Software.
Not available on the Android SDK — the alerts module was removed in 26.7.1. Alerts is available on iOS only.
let myPropertyId = 504;

//to get list of ongoing scheduled alerts for a property
let alertList = AlertsApi.shared.getOngoingAlertsForProperty(propertyId: myPropertyId)
for scheduled in alertList {
    //do something with each
}
Emergency Alerts
To receive emergency alerts, first send your firebase token. Emergency alerts can be created and sent by signing into the Mapsted Hub Web software. Emergency alerts are sent via Firebase messaging service. Therefore, you would need to register your app on Firebase console.
// 1. Setup alertApi as in Scheduled Alerts example above

// 2. Setup your own Firebase Token (if desired)
FirebaseMessaging.getInstance().getToken().addOnCompleteListener(task -> {
    if (!task.isSuccessful()) {
        return;
    }
    String token = task.getResult();
    alertsApi.setup().updateFirebaseTokenForEmergencyAlerts(getApplicationContext(), token);
});

// 3. Example usages
alertsApi.repo().getEmergencyAlerts(propertyId, emergencyAlerts -> {
    // ...
});
...

let identifier = "com.myCompany.myApp" //Usually the Bundle identifier from your app
AlertsApi.shared.sendFirebaseToken(token: fcmToken, appIdentifier: identifier);

...
Then, configure your app to receive the firebase messages
//create a service by extending EmergencyAlertsFirebaseMessagingService.
//Observe {@link InAppNotificationLiveDatas.DeactivatedLiveData} and
//{@link InAppNotificationLiveDatas.ActivatedLiveData} to get
//activated or deactivated emergency alerts when the app is in foreground.
//When the app is in background, android notification is created. When the
//notification is opened, the app will open with a deeplink in following format.
//`https://share.mapsted.com/deeplink/defaultapp/alerts/emergency_alert?id={id}`.
//You can use the AlertManager to get details about the alert with id.
public class MyEmergencyFirebaseMessagingService extends EmergencyAlertsFirebaseMessagingService {
    @Override
    public void onNewToken(@NonNull String token) {
        alertsManager.sendFirebaseTokenForEmergencyAlerts(getApplicationContext(), token);
    }
}
<-- Register your service in the AndroidManifest -->
<application ..>
    <service
        android:name="com.example.myapp.MyEmergencyFirebaseMessagingService"
        android:exported="false">
        <intent-filter>
            <action android:name="com.google.firebase.MESSAGING_EVENT" />
        </intent-filter>
    </service>
</application>
..
/*
In a typical scenario, you integrate Firebase messaging AppDelegate via an extension
to the Firebase `MessagingDelegate` protocol
*/

extension AppDelegate : MessagingDelegate {

    //implement this method
    func messaging(_ messaging: Messaging, didReceiveRegistrationToken fcmToken: String?) {

        /** Other code .... */

        let appIdentifier = "com.myCompany.myApp" //Usually the Bundle identifier from your app
        AlertsApi.shared.sendFirebaseToken(token: fcmToken, appIdentifier: identifier);

        /** Other code .... */

    }

}

 /*
 If your application was launched or resumed because of the remote notification, you will get a callback
 in the AppDelegate's `application(_:didReceiveRemoteNotification:fetchCompletionHandler:) method
 */
func application(_ application: UIApplication,
                 didReceiveRemoteNotification userInfo: [AnyHashable: Any],
                 fetchCompletionHandler completionHandler: @escaping (UIBackgroundFetchResult) -> Void) {

    //Ask the Alerts API to process the notification if applicable
    AlertsApi.shared.processNotification(userInfo: userInfo, completion: { (handled, error)  in
        if handled {
            //Alert Found
            print("Alert Handled")
        }
        if let error = error {
            print("\(error.localizedDescription)")
        }

    })
}


/*
 The `application(_:didReceiveNotificationResponse:withCompletionHandler:) method will be called by
 your app on the Application Delegate when the user responded to the notification
*/
extension AppDelegate : UNUserNotificationCenterDelegate {
func userNotificationCenter(_ center: UNUserNotificationCenter, didReceive response: UNNotificationResponse, withCompletionHandler completionHandler: @escaping () -> Void) {

    /** ... Some code **/

  //If you are using Alerts SDK, ask it to process any alerts
  AlertsApi.shared.processNotification(response: response, window: self.window, completion:{ handled, error in
        if handled {

        }
        if let error = error {

        }
    })

    //If you are using LocMarketing SDK, ask it to process any campaign events
    LocMarketingApi.shared.processNotification(response: response, window: self.window, completion:{ success, error in
        if handled {

        }
        if let error = error {

        }

    })

    /** ... More code **/
}


//to get list of emergency alerts for a property
let myPropertyId = 504

AlertsApi.shared.fetchEmergencyAlerts(propertyId: myPropertyId, callback: { alertList in
    for emergency in alertList {
        // do something with each
    }
})
Prebuilt UI/UX
We offer a wide variety of Prebuilt app templates and UI components which have been designed and optimized for use with the complete Mapsted Maps Mobile framework.
Depending on your desired level of customization, you can choose from several Prebuilt UI/UX options. Our Prebuilt app templates provide a fully immersive mobile application that includes basic customizations such as colour changes. For more advanced customization, you can use our Prebuilt UI components to build your own application. These components include a suite of Prebuilt UI views, such as wayfinding UI/UX, itinerary management, and category lists.
Mobile Sdk Style Customization
When integrating the Mapsted mobile-sdk into your application, you will notice that many of the mobile-sdk views will adapt based on your app theme. However, some views include additional custom styling which are intended to accentuate various key features (e.g., highlighted button colour). These additional view stylings can be customized as outlined below.
// in style.xml file, overwrite the desired Mapsted styles or individual fields

// Mapsted map bottom sheet style
<style name="MapstedButtonMapBottomSheet"></style>

// Mapsted bottom sheet directions button style
<style name="MapstedButtonMapBottomSheetDirections"></style>

// Mapsted map action button style
<style name="MapstedMapActionButton"></style>

// Mapsted rounded corner button style
<style name="MapstedRoundCornerButton"></style>

// Accented rounded button (e.g., for GO in RoutePreview screen)
<style name="MapstedRoundCornerButtonAccent"></style>
// To be added shortly
Prebuilt App Templates
Our Prebuilt app templates allow you to experience the look and feel of a full mobile application within minutes, while providing basic customization options to give the app your own look and feel. See below for examples of a few app template UI screens.
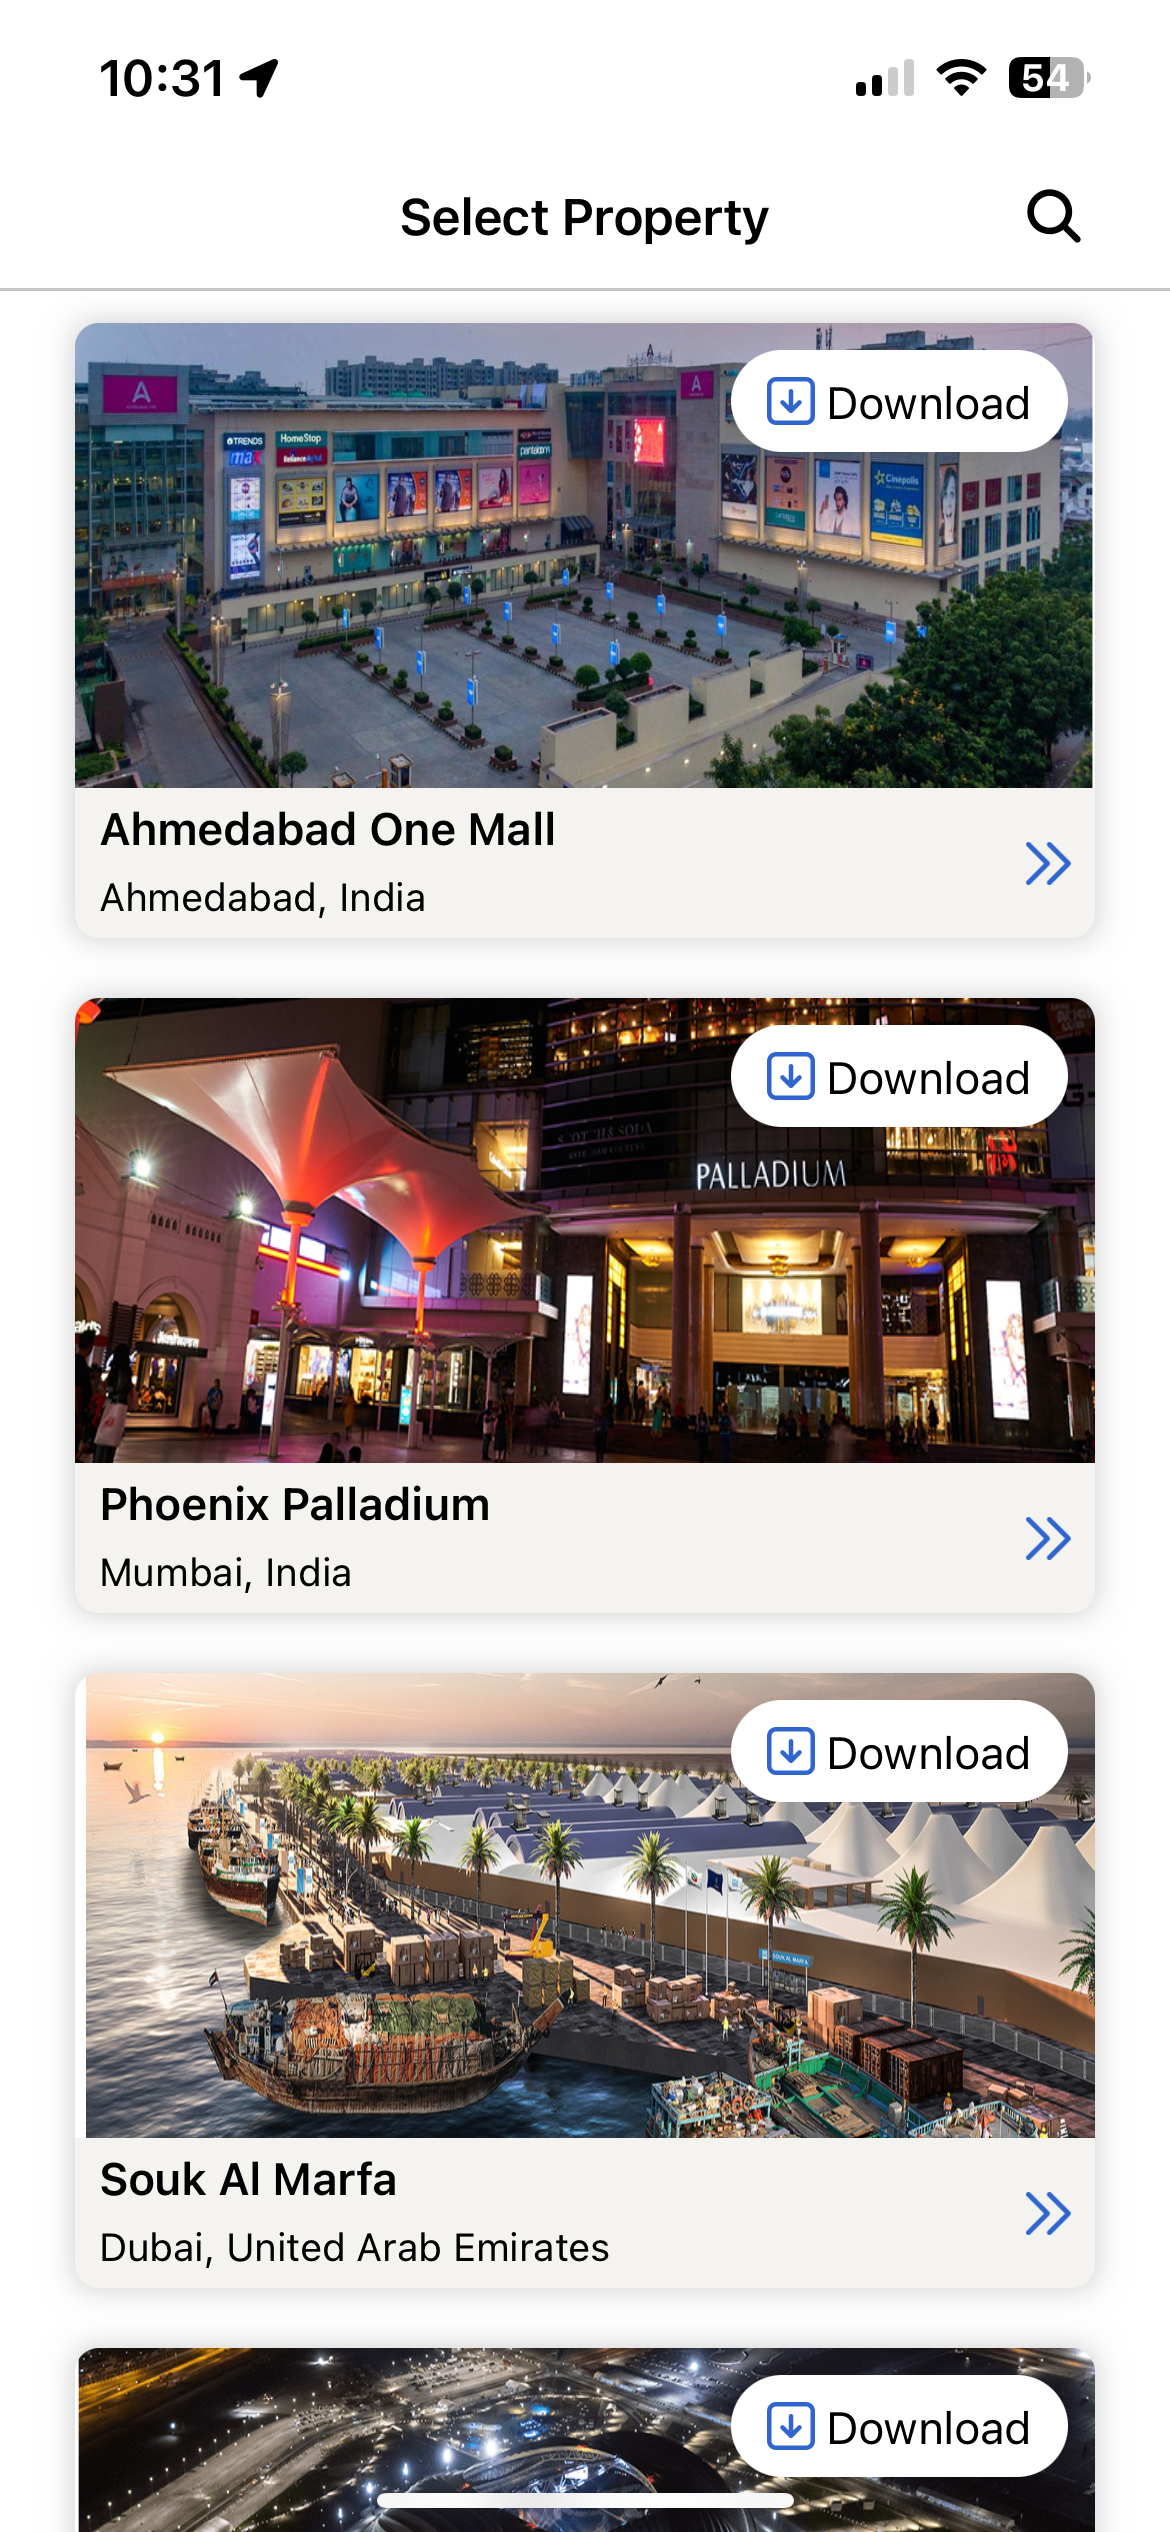
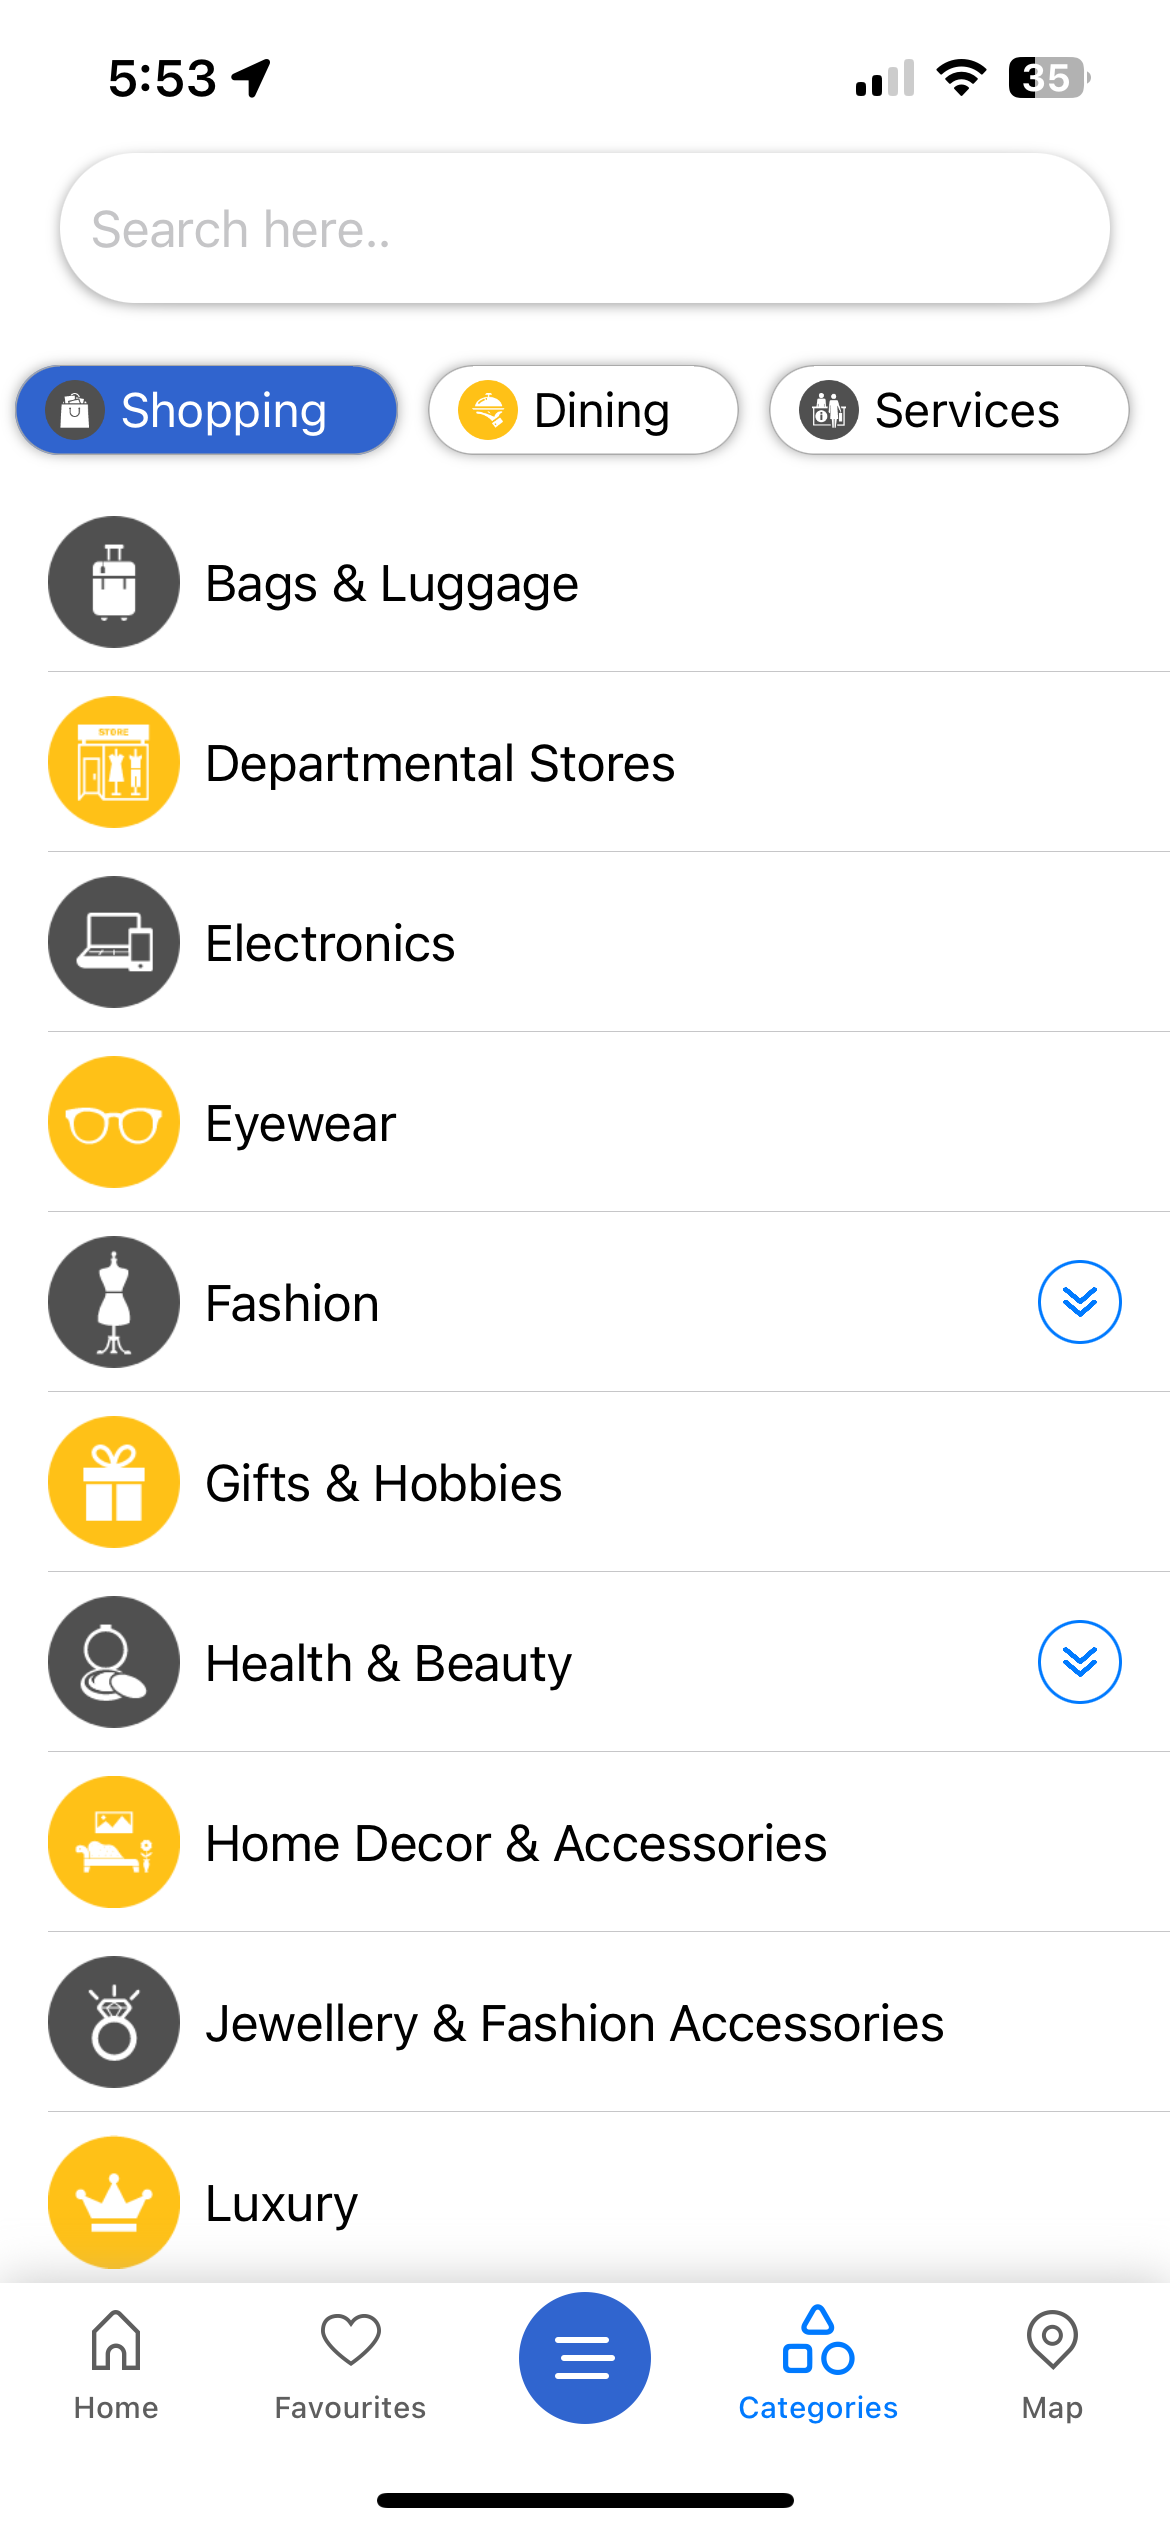
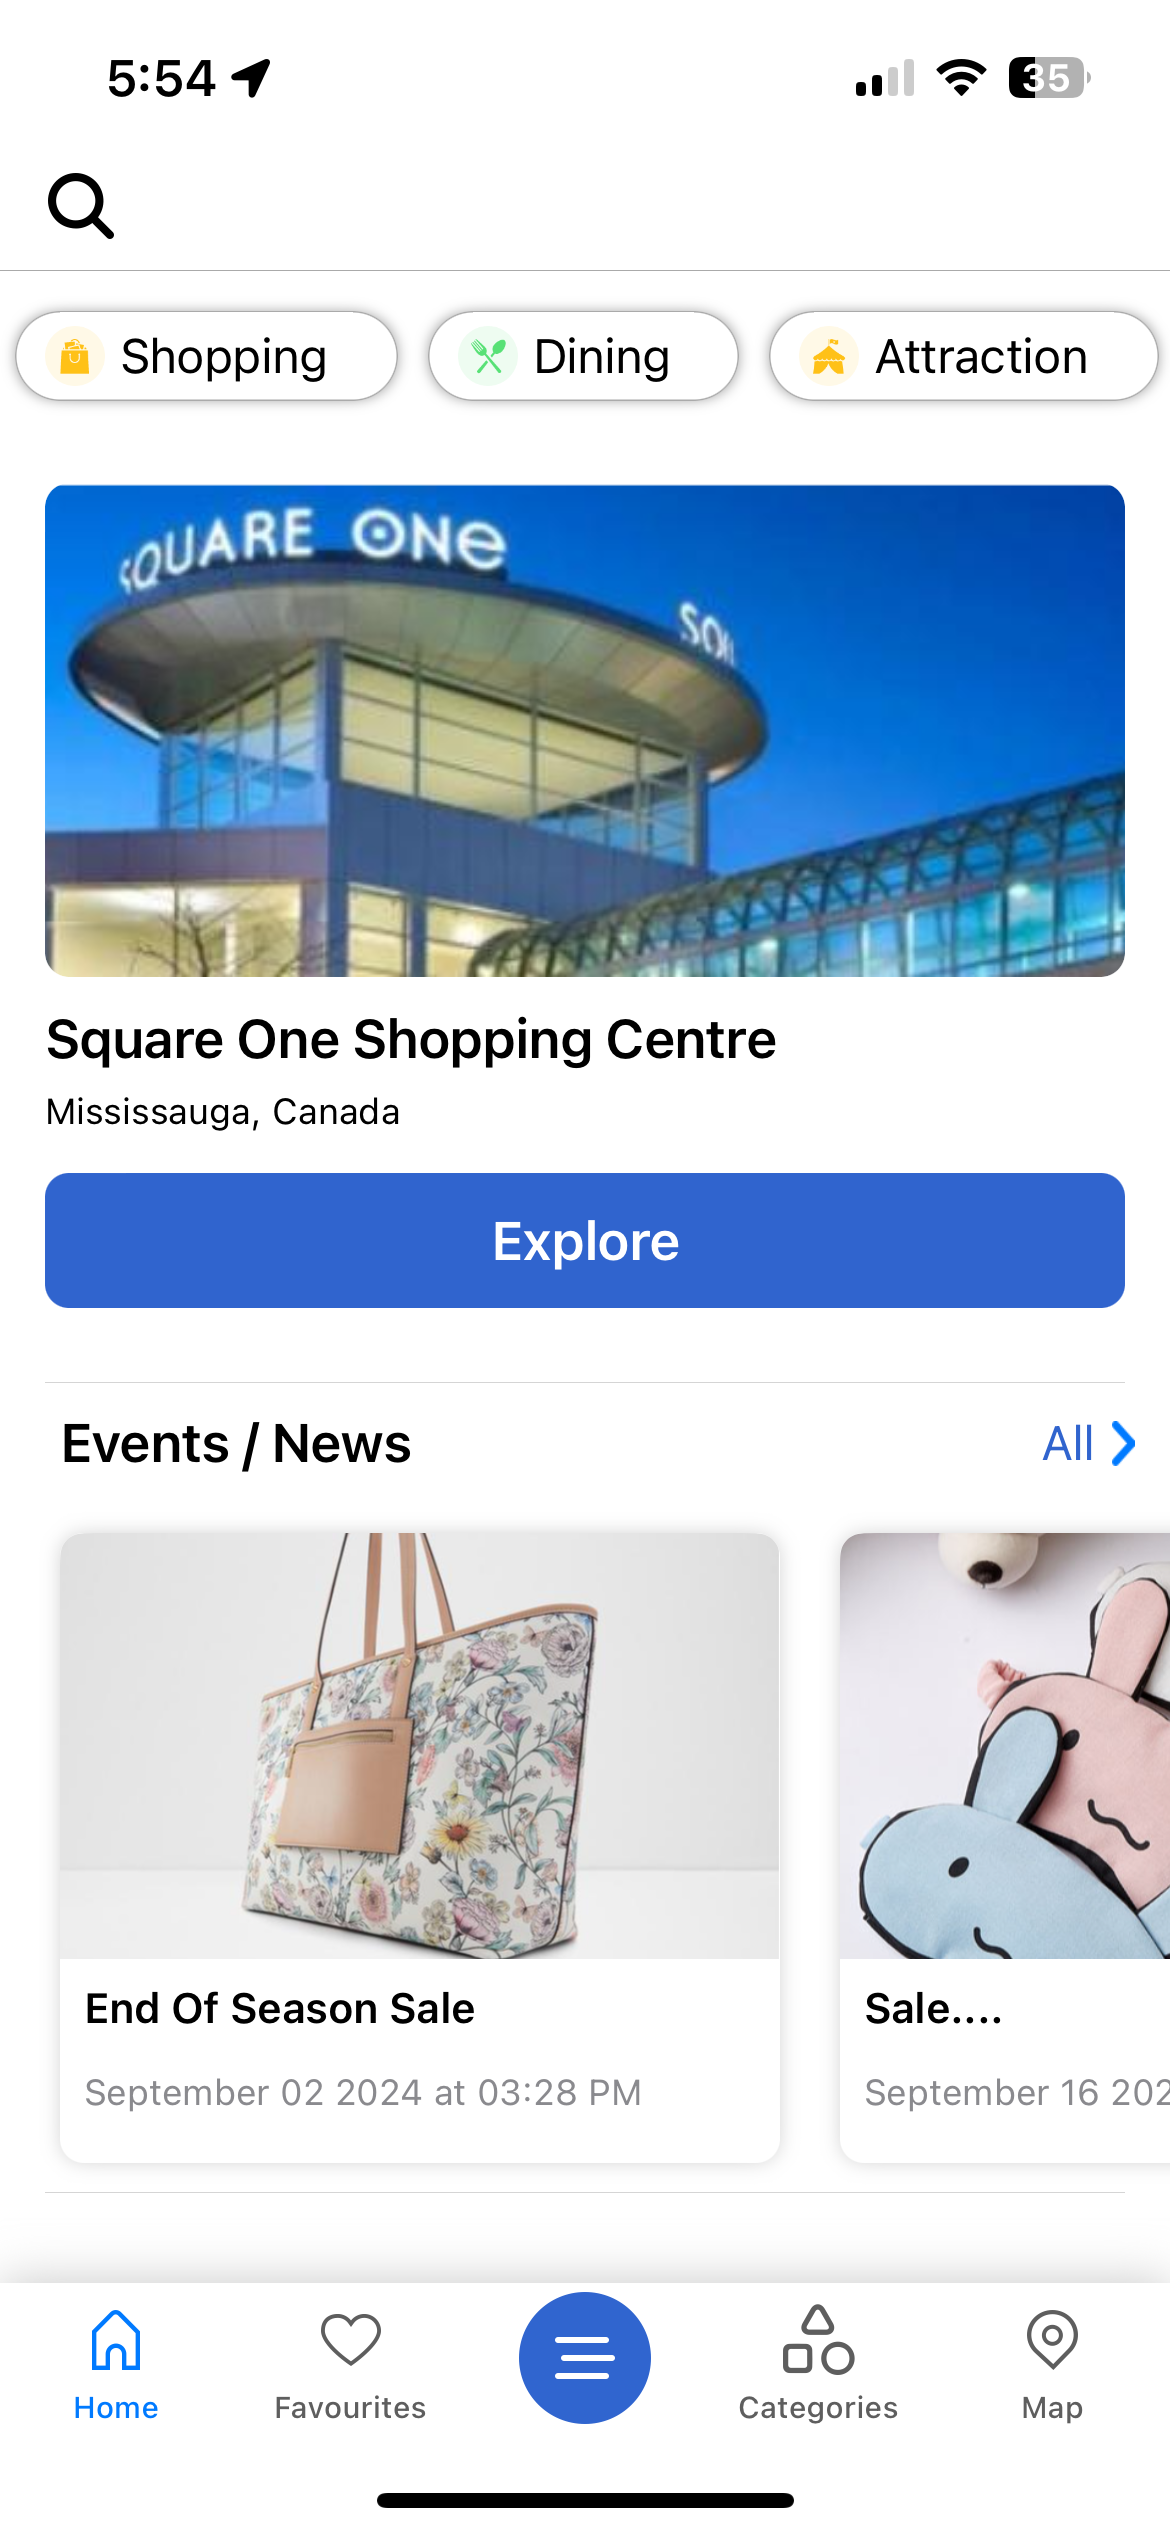
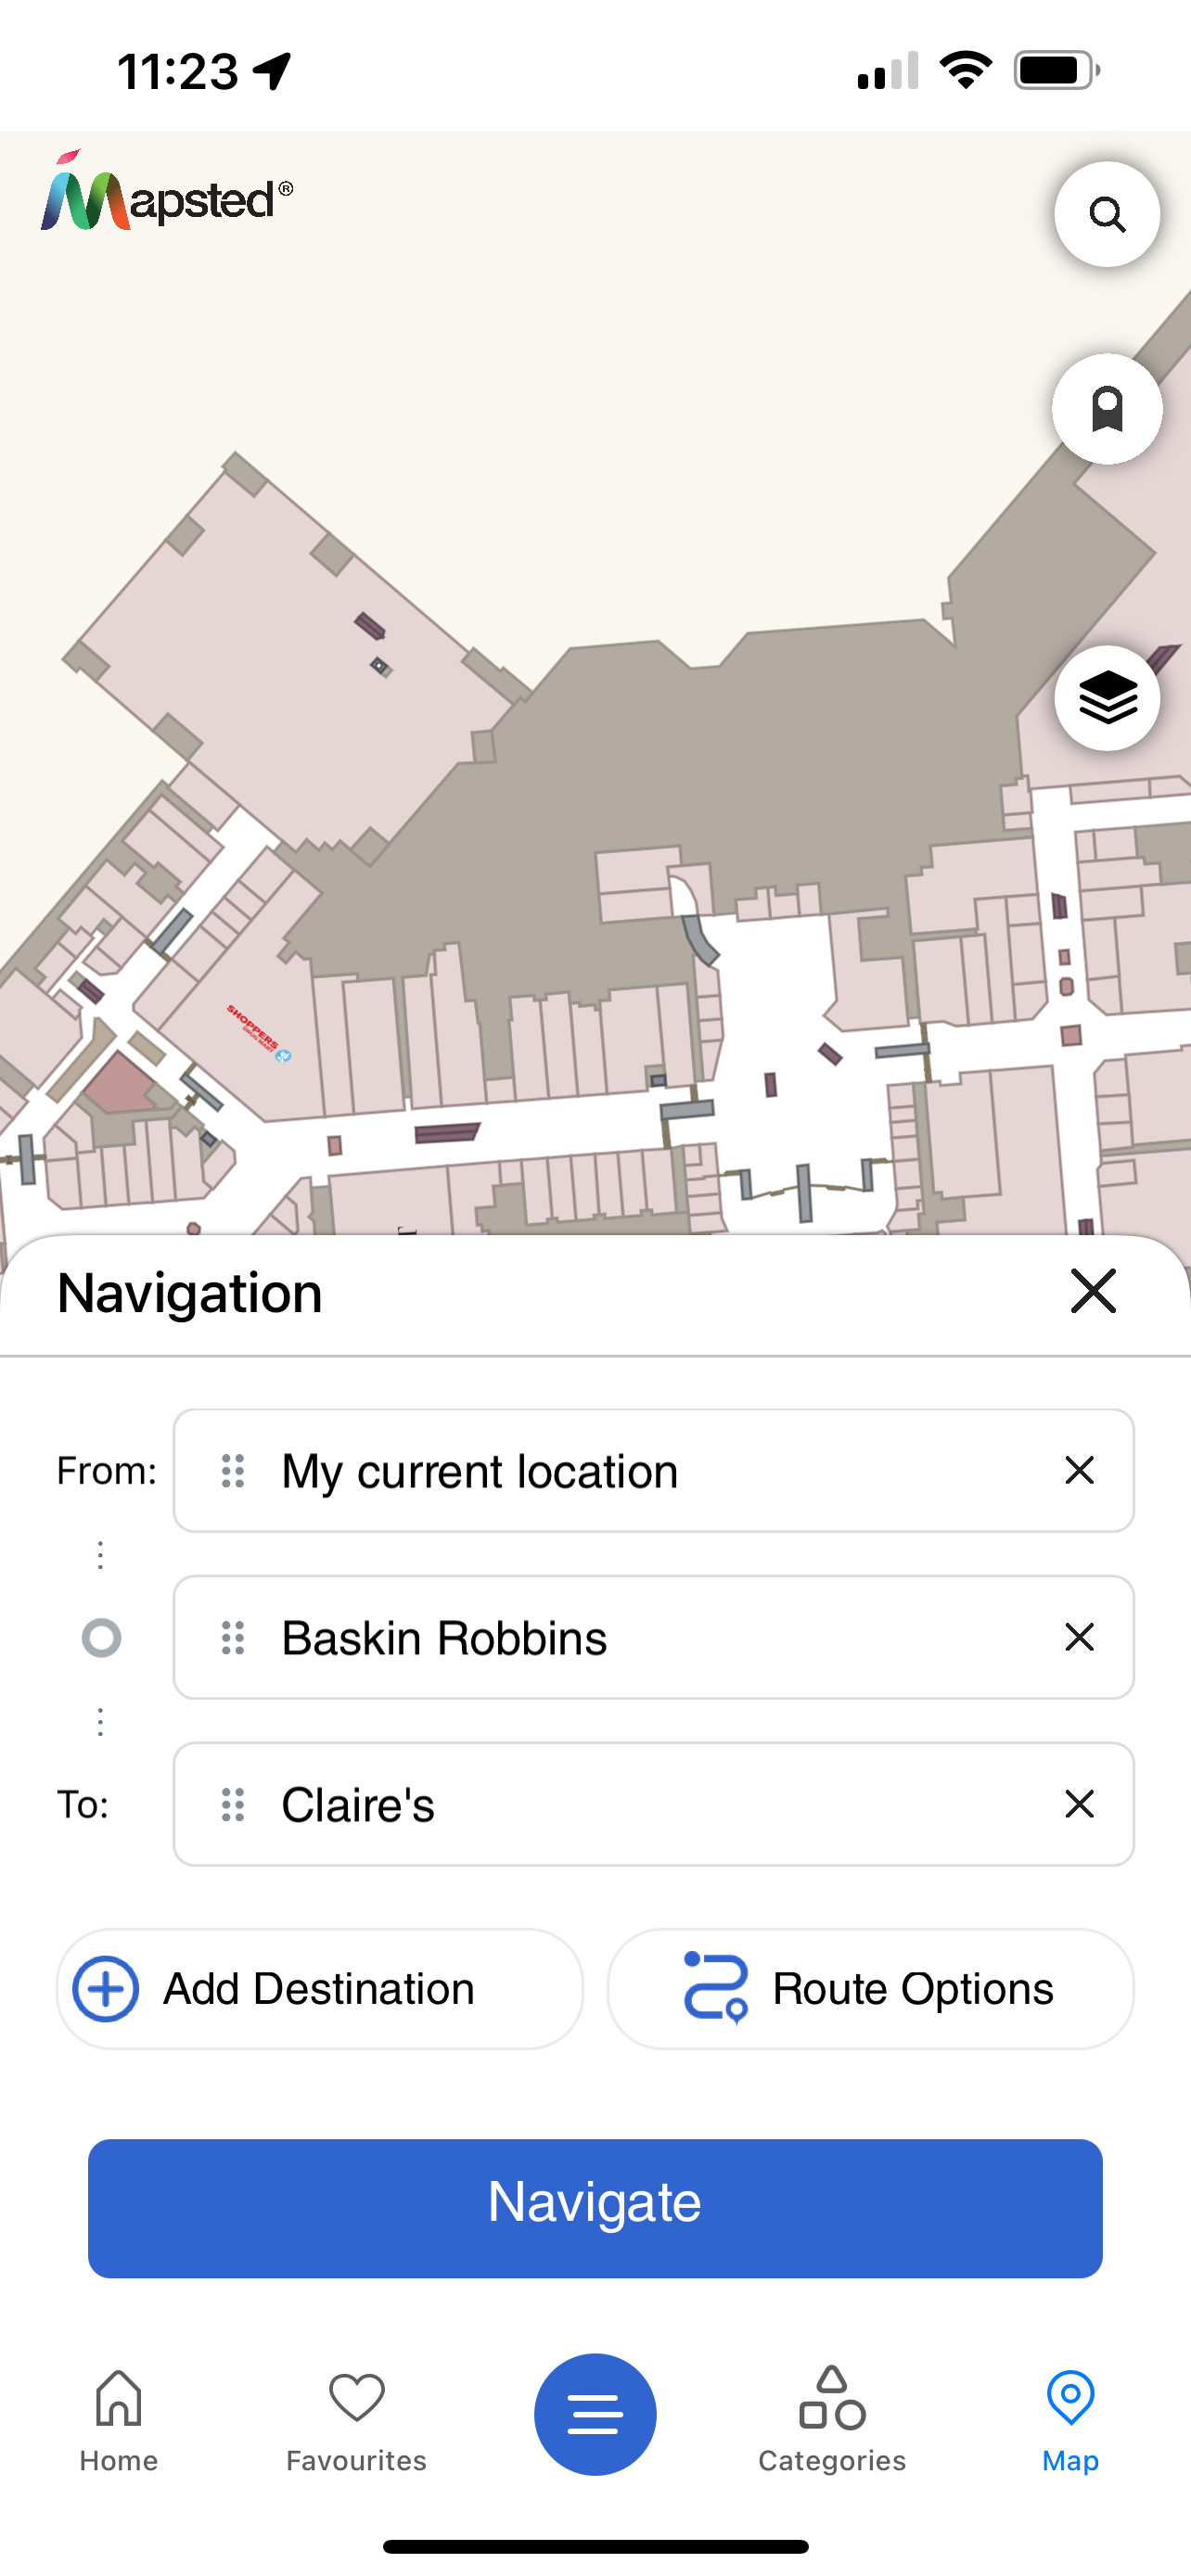
To learn how to enable a Prebuilt app template, see the sample code below.
// Extending a Mapsted App Template enabled Mapsted's Prebuilt app template
// Note that this could also be achieved using an Intent to launch
// AppTemplateMainActivity
public class AppTempActivity extends AppTemplateMainActivity {
    @Override
    protected void onCreate(Bundle savedInstanceState) {
        super.setCustomParams(getCustomParams());
        super.onCreate(savedInstanceState);
        // Anything you want
    }

    private CustomParams getCustomParams() {
        return CustomParams.newBuilder(this)
                //set desired params
                .build();
    }
}
// Go to the AppDelegate.swift file in the main bundle of your application.
// Inside the application(_:didFinishLaunchingWithOptions:) method, add the relevant lines as per the example below
import AppTemplate

internal func application(_ application: UIApplication, didFinishLaunchingWithOptions launchOptions: [UIApplication.LaunchOptionsKey: Any]?) -> Bool {

    // Load and show the root view controller
    self.window = UIWindow(frame: UIScreen.main.bounds)

    //Set AppTemplateParams to use map overlays and show login, if applicable
    AppTemplateParams.shared.useMapOverlays = true
    AppTemplateParams.shared.requireClientLogin = true

    //Add details to show the app update popup if there is an update of the app available on app store.
    if let info = Bundle.main.infoDictionary, let currentVersion = info["CFBundleShortVersionString"] as? String, let identifier = info["CFBundleIdentifier"] as? String {
        AppTemplateParams.shared.setUpdateVersionPopupDetails(currentAppVersion: currentVersion, appBundleIdentifier: identifier)
    }

    //Compute copyright text OR use from localizable strings
    let copyRightText = NSLocalizedString("Startup.CopyrightText", comment: "Sample")

    //Set the name of the animation gif image without the extension and splash screen copyright text. This will display while the app intiailizes.
    AppTemplateParams.shared.splashScreenInfo = SplashScreenInfo(copyrightInfoText: copyRightText, splashScreenGifLightMode: "Logo-Animation", splashScreenGifDarkMode: "Logo-Animation-Dark")

    //Set the SplashScreenPermissionViewController as root viewcontroller to the window.
    let permissionController = SplashScreenPermissionViewController.instantiateViewController()
    let navController = UINavigationController(rootViewController: permissionController)
    navController.isNavigationBarHidden = true

    self.window?.rootViewController = navController

    self.window?.makeKeyAndVisible()

    return true
}
Customized Bottom Navigation Tab Bar
With our App Template, you now have the flexibility to customize the tab bar by reordering the tabs to suit your preferences. Additionally, you can seamlessly integrate your own views into the tab bar for a more tailored user experience.


Detailed instructions on how to implement these customizations are provided in the example below.
public class AppTempActivity extends AppTemplateMainActivity {

    /**
     * Creating Menu items with predefined & custom menu options.
     **/
    public BottomMenu buildBottomMenus() {
        return MenuUtil.BottomMenu.Builder()
                .addMenu(
                    //   Icon to be shown on the menu on bottom navigation bar
                    com.mapsted.app_template.R.drawable.icon_menu_home,
                    //   Text to be set on the  menu on bottom navigation bar
                    "Home",
                    menuType = MenuUtil.MenuType.Home
                )
                .addMenu(
                    com.mapsted.app_template.R.drawable.icon_menu_map,
                    "Map",
                    menuType = MenuUtil.MenuType.Map
                )
                .addMenu(
                    com.mapsted.app_template.R.drawable.hamburger_menu,
                    "Menu",
                    menuType = MenuUtil.MenuType.Menu
                )
                .addMenu(
                    com.mapsted.app_template.R.drawable.icon_menu_buildings,
                    "Buildings",
                    menuType = MenuUtil.MenuType.Building
                )
                // add more menu or custom menus
                .addCustomMenu(
                    //   Icon to be set on the menu on bottom navigation bar
                    com.mapsted.app_template.R.drawable.ic_events_news,
                    //   Text to be set on the  menu on bottom navigation bar
                    "Events",
                    //  Provide the fully qualified class name of the fragment that should open upon tapping.
                    invokableClassName = "com.mapsted.ui_components.presentation.EventsListFragment"
                )
                // For properties with a single building, we have introduced a solution that allows you to add a fallback menu item to the bottom menu.
                .setFallBack(
                    //   Icon to be set on the fallback menu on bottom navigation bar
                    com.mapsted.app_template.R.drawable.ic_favourite,
                    //   Text to be set on the fallback menu on the bottom navigation bar
                    "Favorites",
                    //  Provide the fully qualified class name of the fragment that should open upon tapping.
                    invokableClassName = "com.mapsted.template_core.ui.favorites.FavoritesFragment"
                )
                .build()
        }
    }

    @Override
    protected void onCreate(Bundle savedInstanceState) {
        super.onCreate(savedInstanceState);
        //...
        /**
         * To add custom menu to bottom navigation call below method
         **/
        super.setupCustomMenu(buildBottomMenus());
        //...
    }
}
// Create a UIViewController which inherits from SplashScreenPermissionViewController as shown below and override the function getBottomMenu()

import UIKit
import AppTemplate

class YourViewController: SplashScreenPermissionViewController {
    static func initViewController() -> YourViewController {
        let splashScreenPermissionViewController = super.instantiateViewController()
        if let yourViewController = splashScreenPermissionViewController as? YourViewController {
            return yourViewController
        }
        return YourViewController()
    }

    // Override getBottomMenu method to customize the bottom tab bar
    override func getBottomMenu() -> MapstedMenu {
        // Create your viewcontoller and add it to tab bar as custom item.
        //For properties with a single building, we have introduced a solution that allows you to add a fallback menu item to the bottom menu.
        let myCustomViewController = MyCustomViewController(nibName: "MyCustomViewController", bundle: Bundle.main)
        let mapstedMenu = MapstedMenu.builder().addItem(menuType: .Home)
                                            .addItem(menuType: .Map)
                                            .addItem(menuType: .Menu)
                                            .addItem(menuType: .Buildings)
                                            .addCustomItem(icon: UIImage(systemName: "calendar")!, name: "Schedule", providerView: myCustomViewController)
                                            .setFallbackForBuilding(menuType: .Favourites)
        return mapstedMenu
    }
}

//Now on the application's AppDelegate, please set the YourViewController as rootViewController to the window.
internal func application(_ application: UIApplication, didFinishLaunchingWithOptions launchOptions: [UIApplication.LaunchOptionsKey: Any]?) -> Bool {

    // Load and show the root view controller
    self.window = UIWindow(frame: UIScreen.main.bounds)

    //...
    //...

    let yourViewController = YourViewController.initViewController()
    let navController = UINavigationController(rootViewController: yourViewController)
    navController.isNavigationBarHidden = true

    self.window?.rootViewController = navController

    self.window?.makeKeyAndVisible()

    return true
}
Note
For iOS, the "Menu" option must always be present in the tab bar if we want to switch between properties
Prebuilt UI Components
The Prebuilt app templates outlined in the previous section use a variety of Prebuilt UI components. Our UI components are specific UI/UX views which are designed and optimized to interact with the Mapsted Maps Mobile framework. This allows you to custom pick and choose which aspects of our Prebuilt UI/UX you want to use in your application.
The Prebuilt UI components are an excellent choice when you already have your own application and want to easily add some additional functionality based on the Mapsted Maps Mobile framework. For example, one common usage is to trigger a Mapsted Map view and use various Prebuilt UI components, like wayfinding UI/UX or itinerary management, when a maps button is clicked within your application. In other scenarios, various Prebuilt UI components can be reused in other areas of your application, for example category lists.
Customizable UI/UX
The customizable UI/UX allows you to use various prebuilt UI/UX components, while also allowing you the option of adding your own customizable UI. As an example, you can use your own UI views on the Mapsted Map. This section explains how you can create and display custom views on the map. The two examples below show how custom UI elements, such as the blue "Explore More" button and the horizontal floating category list, were added to the Mapsted Map component.
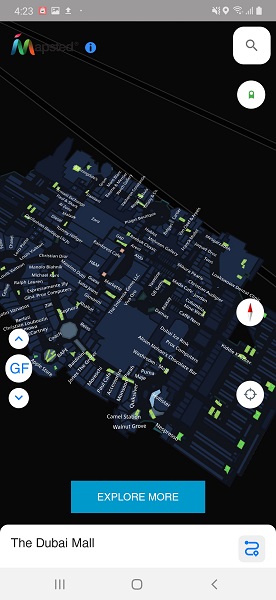
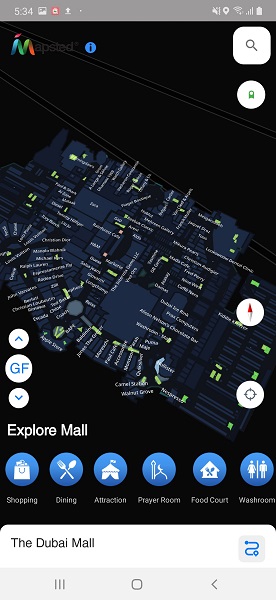
Programmatically Add, Update, and Remove Custom Views
Any view can be programmatically added, modified, and removd from the Mapsted Map. Each view that is passed in should be given a custom view tag (a string to uniquely identify the view), which can be used for retrieving/modify, and/or removing the view. The sample code below shows how a view can be added, modified, and removed.
// Note that if you want to add customizable UI views you need to have initialized your SDK as follows:

// Setup your custom params
CustomParams params = CustomParams.newBuilder()
                        // Add customization options
                        .build();

params.setActivity(this);

// When you initialize your SDK, you must provide both containers for the BaseMap and MapUi
params.setBaseMapContainerView(mBinding.flBaseMap); // Container for the MapView
params.setMapUiContainerView(mBinding.flMapUi); // Container for MapUiView & Custom UI

 mapUiApi.setup().initialize(params, new MapUiApi.MapUiInitCallback() {
    @Override
    public void onCoreInitialized() {
        //Internally core api has initialized
    }

    @Override
    public void onMapInitialized() {
        //Internally map api has initialized
    }

    @Override
    public void onSuccess() {
        // initialized successfully
    }

    @Override
    public void onStatusUpdate(SdkStatusUpdate sdkUpdate) {
        //sdk status update during initialization
    }

    @Override
    public void onFailure(SdkError sdkError) {
        // initialization failed
    }
});

// ...

// Create Custom View (e.g., contains a button named with id custom_button)
View myView = LayoutInflater.from(this).inflate(R.layout.custom_layout, null, false);
Button customButton = myView.findViewById(R.id.custom_button);

// For example, set click listener
customButton.setOnClickListener(new View.OnClickListener() {
    @Override
    public void onClick(View v) {
        // Handle click event
    }
});

// Display custom View on the map
mapApi.mapView().customView().addViewToMapFragment("my_custom_tag", myView);

// Get custom View on the map
View myView = mapApi.mapView().customView().getViewOnMap("my_custom_tag");

// Can now modify view, as desired (e.g., change visibility)
// ...

// Remove custom View from the map
mapApi.mapView().customView().removeViewFromMap("my_custom_tag");
//To access UI components, you need to add the following import
import appuikit

//To facilitate adding UI components to your app, a ContainerViewController class is provided
//which allows easy swapping in/out of viewcontrollers. To use this, first drag and drop a container
//view to your viewcontroller and set the embedded viewcontroller class in IB to ContainerViewController.
//Assuming you have named the embedded segue "containerSegue", you can obtain a reference to the
//ContainerViewController as follows.

override func prepare(for segue: UIStoryboardSegue, sender: Any?) {
    if segue.identifier == "containerSegue" {
        if let containerVC = segue.destination as? ContainerViewController {
            self.containerVC = containerVC
        }
    }
}

//Now to add a viewcontroller, simply call addController. Parameter isNew should be
//set to true in case you want to maintain a stack of the viewcontrollers in memory
//for fast swapping. If set to false, only one viewcontroller will be retained.

containerVC.addController(controller: categoryListVC, yOffset: 0, isNew: false)

//To display a floating category list, access the CategoryCarouselViewController.
//Pass categoryUIDs which is list of category uids to display. The alignment can
//be horizontal/vertical. Your viewcontroller needs to conform to CategorySelectionDelegate
//to get notified when user selects a category.

if let categoryListVC = CategoryCarouselViewController.instantiateViewController(propertyInfo: propertyInfo, categoryUIDs: categoryUIDs, alignmentIsVertical: false, delegate: self) as? CategoryCarouselViewController {
    categoryListVC.setCategoryTextColor(color: .white)
    containerVC.addController(controller: categoryListVC, yOffset: 0, isNew: false)
}

extension YourViewController : CategorySelectionDelegate {
    func selectedCategory(category: MNCategory) {
        //handle the selection...
    }
}
Save Routes
The Saved Routes feature enables users to create, save, and access personalized navigation paths across multi-building indoor environments, such as shopping malls, airports, hospitals, and campuses. By enabling users to save frequent or complex routes across buildings, the feature enhances navigation efficiency and provides a seamless experience in large and intricate indoor spaces.
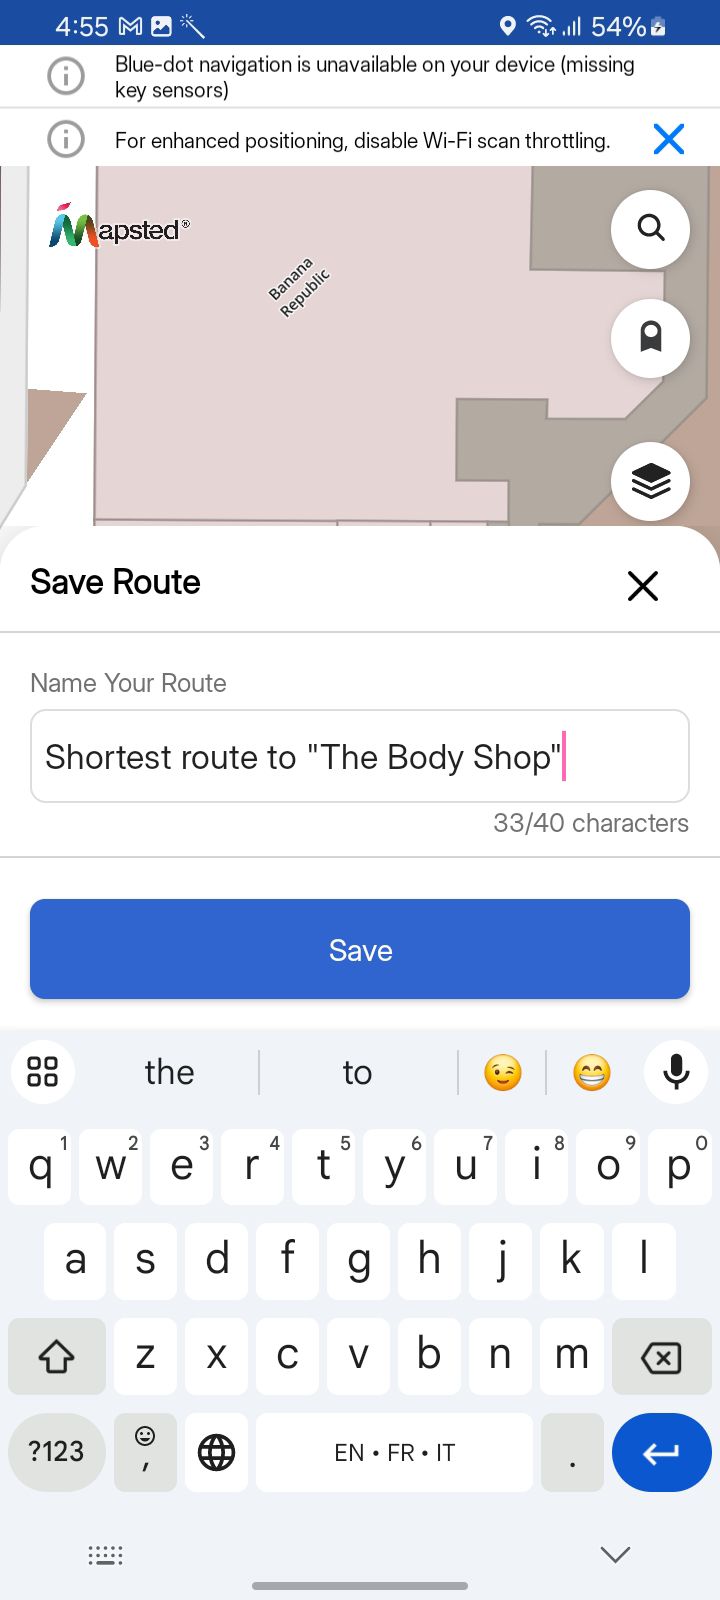


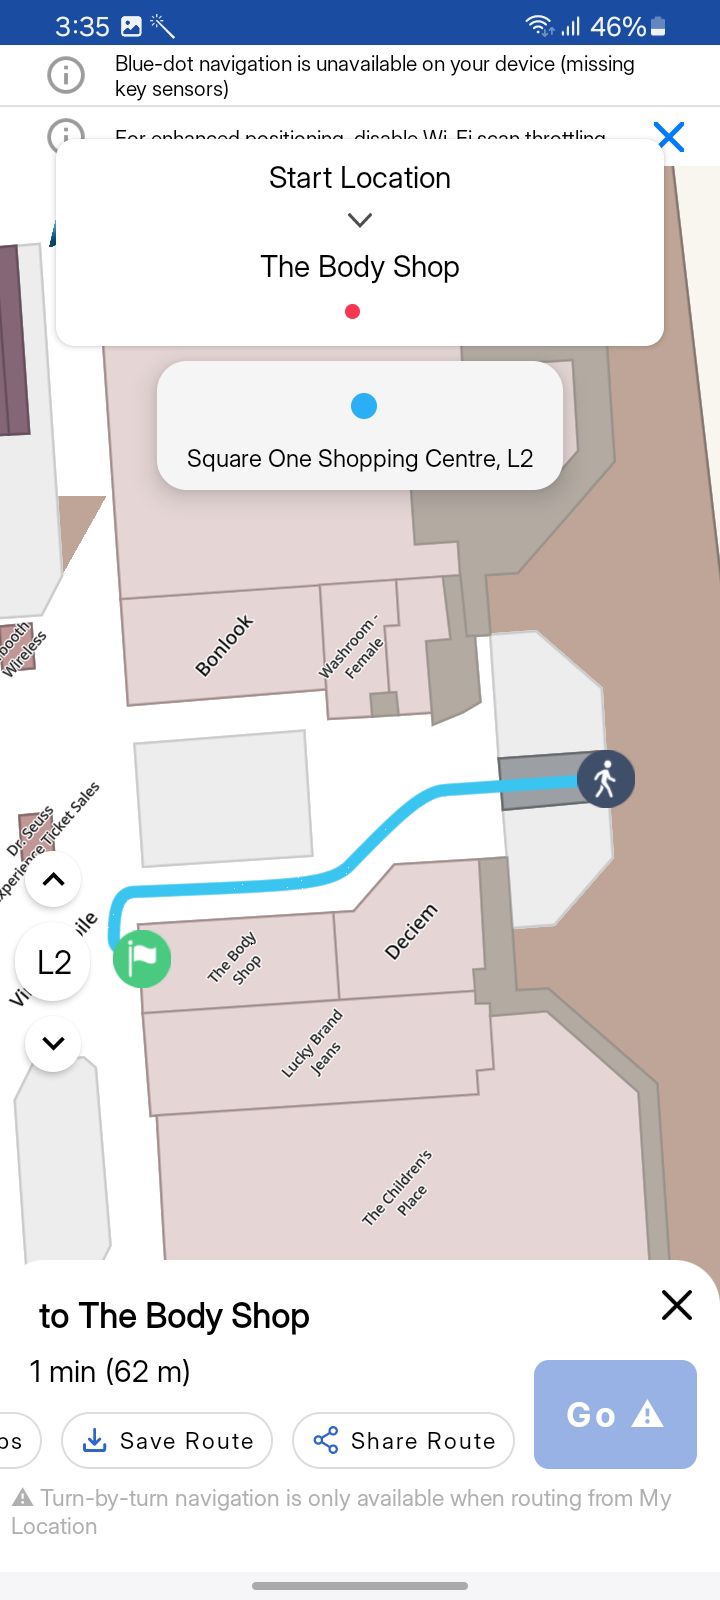
Key Features
Create a Route
- Users can select start and end points across multiple buildings within the indoor map.
- Supports optional waypoints (e.g., departments, stores, restrooms, elevators) between the start and end points.
- Allows for various route preferences (e.g., shortest route, accessibility-friendly paths, avoiding stairs/escalators).
Save the Route
- Once a route is created, the user can save the route by naming it (e.g., "Office to Cafeteria").
- The route is stored under the "Saved Routes" section in the user interface for future access.
Access Saved Routes
- Users can navigate to the "Saved Routes" section from the main menu, where users can manage all of their saved routes (view, edit, delete).
- Select any previously saved route to view or follow the directions on the map.
Follow the Route
- Upon selecting a saved route, the map will display the route visually.
- The user receives step-by-step navigation guidance along the saved path.
Offline Access
- Saved routes can be accessed without an internet connection, as long as the indoor map is preloaded.
Share a Route
- Users can share a saved route with others by sharing a URL that can be sent via email or messaging apps.
- Recipients can open the shared URL on their devices, follow the route, or save it for future use.
Benefits
-
Time-saving: Frequent routes can be saved, eliminating the need to set up the route each time.
-
Convenience: Users can quickly switch between saved routes depending on their current location or task.
-
Easy Sharing: The ability to share routes via a simple URL provides flexibility and convenience for distribution.
-
Infinite Saved Routes: The Save Route feature allows you to save an infinite number of routes, providing extensive route management.
Location Sharing
The Mapsted Maps Mobile framework offers several location-sharing options which use the power of our location positioning technology to help users interact with friends or colleagues.
Using location sharing, users can also display their locations on each other's maps. This can be especially useful for couples or family members that wish to visit different places in a large venue, while still being aware of each other's location.
Using location tags, users can easily share a specific location and/or message to one another for easy coordination. For example, a user could tag the food court on level 3 of a shopping centre, and share the location tag with several friends, along with a message that reads, "Meet me at 1 pm for lunch."
Sharing User's Location
We are providing this feature to quickly share user’s location to anyone when they are inside a Property premises. When user initiates location sharing, a url will be provided. This url will be used to share User’s current location through sharable media like messages, WhatsApp, chats etc. When other user receive this location share link, and when they select it, they will be redirected to web page showing them the shared location and as user moves his location will be updated here. We also provide listners to location updates and you can utilise this to update any UI if you want.
 // Setup location share api instance instantiation, once CoreApi & MapUiApi are initialized
 LocationShareApi liveLocationShareAPI = new MapstedLocationShareApi(this.getApplicationContext(), coreApi, mapUiApi);
 liveLocationShareAPI.setup().initialize();

// Start location sharing
liveLocationShareAPI.events().shareLiveLocation(selectedPropertyId, position, liveLocationResponse -> {
    if (liveLocationResponse != null && liveLocationResponse.getSuccess()) {
        // location sharing started
    }
});

 // Stop location sharing
liveLocationShareAPI.events().deleteSharedLiveLocation(liveLocationResponse -> {
    // ...
});

 //Setting up location share callbacks
liveLocationShareAPI.addLiveLocationTriggerListener(status -> {
    //If status is true, location sharing is started.
    //If status is false, location sharing is stopped.
});

// Destroy instance in onDestroy()
liveLocationShareAPI.lifecycle().onDestroy();
//Import the Location Sharing SDK first
import MapstedLocationShare

//Initialize/Start Location sharing
LocationShareApi.location.startLocationShareUpdates(propertyId: propertyId, position: position) { shareLiveLocResponse in

if let uShareLiveLocResponse = shareLiveLocResponse {
    if uShareLiveLocResponse.success {
        if let url = uShareLiveLocResponse.url {
            //Share url to the other user whom you want to allow to track your location.
            }
        }
    }
}

//Stop live location share:
LocationShareApi.location.stopLocationShareUpdates()

//To check if Share live location is enabled.
let liveLocationShareEnabled = LocationShareApi.location.isShareLiveLocationEnabled()

//Start observing live location share status changes
LocationShareApi.location.addShareLiveLocationChangeListener(listener: self)

//Stop observing live location share status changes
LocationShareApi.location.removeShareLiveLocationChangeListener(listener: self)
Location Tags
When location tagging is enabled in your application, users can use a long press gesture on the map to set a tag. This tag can be labelled, saved, navigated to, or shared with another user. Users also have the option to attach a message to the tag.
To learn how to enable or disable a location tag, see the sample code below.
// For example, to enable tag UI when initializing
CustomParams params = CustomParams.newBuilder(...)
                // Other parameters
                .setEnableTagUI(true) // enable tag UI
                .build();
// ...
// Note that this can also be adjusted in runtime, as shown below

// Enable location tagging
mapUiApi.tags().setEnableTagUI(true); // for the UI views

// Disable location tagging
mapUiApi.tags().setEnableTagUI(false); // for the UI views
//Enable location tagging
MapstedMapApi.shared.allowTagsOnMap(enable: true)

//Disable location tagging
MapstedMapApi.shared.allowTagsOnMap(enable: false)
Location Tags sharing (Coming Soon)
Once the location tag is shared and received by another user, they can easily view and navigate to it. This provides a simple and easy-to-use approach for sharing information about a specific location with a friend or colleague.
Top Notification Bar
The top notification bar provides real-time updates on ongoing events and alerts within the app interface, ensuring users stay informed without disruption.
Prebuilt UI/UX
Tags
The Tags feature enables users to efficiently create, manage, and save location-specific tags for streamlined access and navigation. This functionality is designed to enhance user experience by facilitating quick and effortless retrieval of important locations, while also allowing users to categorize tags for better organization and searchability.
Prebuilt UI/UX