v6
Mapsted Mobile SDK (v6+)
This section will guide you through the basic setup of both Android and iOS projects and how to integrate each with the Mapsted SDK.
Current Version: v6
Prerequisites
In order to use the Mapsted mobile SDK, a licence key is required. For convenience, we supply a sample licence key which provides access to a single property (Square One Shopping Center), which can be downloaded here Android License Key and IOS License Key. These licences can be used for initial sdk integration and testing. ../../ You can download your licence key which will give you acces to your properties via the Mapsted developer portal. If you do not yet have a Mapsted account, please contact the Mapsted Sales Team to get one setup.
Android
This guide will take you through the process of integrating the Mapsted Android SDK.
1. Minimum Requirements
To import the Mapsted SDK, your Android project must meet the following minimum requirements.
| Library | Version |
|---|---|
| Minimum Android SDK Version | 24 |
You must be running jdk 11 or higher. In Android Studio, open Files > Settings. Under Gradle options, Choose Gradle JDK to use jdk 11 or higher.
2. Setup Permissions
The mobile sdk includes the permissions it requires in its respective AndroidManifest file. Note that different sdk modules may require additional permissions.
3. Include Licence Files
Place the Mapsted Android licence file in the assets folder located at $(ProjectPath)/app/src/main/assets. You will need to create the assets folder if it does not exist.
4. Import the Mapsted SDK
This section describes integrating the Mapsted SDK into your Android project.
If you are using the kotlin gradle build.gradle.kt, please refer to Migrating build logic from Groovy to Kotlin
Add the following code into your project's gradle file:
allprojects {
    repositories {
        google()
        mavenCentral()
        maven { url 'https://jitpack.io' }
        maven { url "https://mobilesdk.mapsted.com:8443/artifactory/gradle-mapsted" }
    }
}
Make sure you have all the below settings in the app level build.gradle file.
apply plugin: 'com.android.application'

android {
    compileSdkVersion 34

    defaultConfig {
        applicationId "your.packagename"
        minSdkVersion 24
        targetSdkVersion 34
        versionCode = 1
        versionName = "1"
        testInstrumentationRunner "androidx.test.runner.AndroidJUnitRunner"
    }

    buildTypes {
        //...
    }

    buildFeatures {
        dataBinding true
        viewBinding true
    }

    compileOptions {
        sourceCompatibility JavaVersion.VERSION_11
        targetCompatibility JavaVersion.VERSION_11
    }
    tasks.withType(org.jetbrains.kotlin.gradle.tasks.KotlinCompile).all {
        kotlinOptions {
            jvmTarget = '11'
        }
    }

     configurations {
        implementation.exclude group: 'org.jetbrains', module: 'annotations'
    }

    packagingOptions {
        resources.excludes.add("META-INF/gradle/*")
        resources.excludes.add("META-INF/*")
    }
}

dependencies {
    implementation fileTree(dir: 'libs', include: ['*.jar'])

    // Import Mapsted SDKs
    // Note: Order is important.
    // Top resources overwrite bottom. Ensure that more "core" SDKs are lower

    // Set SDK version once to ensure all imports have same version
    def mapstedSdkVersion = '6.2.10'

    // If using app-templates, import here:
    implementation("com.mapsted:app-template:${mapstedSdkVersion}") // Example app-template
    implementation("com.mapsted:app-template-core:${mapstedSdkVersion}")// It provides the core/common functionality/utilties which are used by the app-template`.

    // Optionally, if you want location marketing or alerts (both depend on inapp-notification)
    implementation("com.mapsted:sdk-loc-marketing:${mapstedSdkVersion}")
    implementation("com.mapsted:sdk-alerts:${mapstedSdkVersion}")
    implementation("com.mapsted:sdk-inapp-notification:${mapstedSdkVersion}")

    // Optionally, if your want programmatic geofences
    implementation("com.mapsted:sdk-geofence:${mapstedSdkVersion}")

    // Optionally, if you want prebuilt Mapsted UI/UX, include this dependency
    implementation("com.mapsted:sdk-ui-components:${mapstedSdkVersion}")

    // Optionally, If you want access to the Mapsted Map UI, include this dependency
    implementation("com.mapsted:sdk-map-ui:${mapstedSdkVersion}")

    // If you want access to the Mapsted map, include this dependency
    implementation("com.mapsted:sdk-map:${mapstedSdkVersion}")

    // This is always required to use the Mapsted SDK
    implementation("com.mapsted:sdk-core:${mapstedSdkVersion}")

     // If you want to use Location share feature, include this module
    implementation("com.mapsted:sdk-loc-share:${mapstedSdkVersion}")

    // If you want to use Mapsted Top Bar Notifications feature, include this module
    implementation("com.mapsted:sdk-topbar-notifications:${mapstedSdkVersion}")
}
5. Proguard exclusion
If you have proguard enabled in your project, please keep all mapsted related public classes and interfaces.
Add the following in your proguard file.
-keep interface com.mapsted.** { *; }
-keep public class com.mapsted.** { public protected *; }
-keep interface com.carto.** { *; }
-keep public class com.carto.** { public protected *; }
6. Initialization of Mapsted SDK
The Mapsted SDK is very flexible and allows for multiple levels of integration. We will outline several different recommendations below, and you can adjust based on your requirements and preferences.
Setting up Map Views
When you initialize the map-sdk and map-ui-sdk, you must supply a corresponding View (usually a FrameLayout), and the mobile sdk will inflate this view with the appropriate Map View or Map Ui View. Our recommendation for setting up your .xml when using map-sdk and map-ui-sdk is as follows:\
<!-- General container -->
<RelativeLayout
    android:id="@+id/rl_map_container"
    android:layout_width="match_parent"
    android:layout_height="0dp"
    android:background="@android:color/transparent"
    app:layout_constraintBottom_toBottomOf="parent"
    app:layout_constraintEnd_toEndOf="parent"
    app:layout_constraintStart_toStartOf="parent"
    app:layout_constraintTop_toTopOf="parent">

    <!-- View to be supplied to the map-sdk -->
    <FrameLayout
        android:id="@+id/fl_base_map"
        android:layout_width="match_parent"
        android:layout_height="match_parent"
        android:visibility="gone" />

    <!-- View to be supplied to the map-ui-sdk -->
    <FrameLayout
        android:id="@+id/fl_map_ui"
        android:layout_width="match_parent"
        android:layout_height="match_parent"
        android:visibility="gone" />
</RelativeLayout>
Integrating the Core SDK
The core-sdk is the most important module in the Mapsted Android SDK as it is a dependency for almost every other module. For example, initializing the map-sdk (and MapView) requires that the core-sdk already be initialized. As such, it is not recommended to continuously destroy and recreate the core-sdk. The main interface for the core-sdk is the CoreApi.
Note that it is very important to not create multiple instances of the CoreApi as this would lead to a major performance overhead and likely result in concurrency issues.
For some use-cases, you may wish to create a dedicated Activity for handling Mapsted-related functionality. Should you choose to create the CoreApi instance within this Activity, then the Mapsted SDK would be essentially shut down completely everytime the Activity is destroyed.
As such, it is recommended to maintain the CoreApi instance beyond the scope of a single Activity, allowing for the mobile SDK to be initialized just once and allowing for fast loading on subsequent map launches, etc. Note that this is also necessary if you intend to make use of the various CoreApi functionality while the MapView is not visible (e.g., triggering map data downloads or point-of-interest search/filterings).
We have provided a utility Application class, MapstedBaseApplication which provides getter/setters for creating and/or retrieving the coreApi instance. It is our strong recommendation that you create your Application class and extend the MapstedBaseApplication, which allows for the CoreApi to be shared between activities, if desired, but will also automatically handle the CoreApi destruction/clean-up.
A sample Application class is shown below, which provides access to application.getCoreApi(context), which can be accessed from any Activity.
public class MyApplication extends MapstedBaseApplication {
    // ...
}

public class MyActivity extends AppCompatActivity {
    // ...
    CoreApi coreApi = ((MapstedBaseApplication)getApplication()).getCoreApi(this);
    // ...
}
Integrating the Core, Map, and Map-Ui SDKs
You can create/obtain instances of the CoreApi, MapApi, and MapUiApi in one of two ways, as shown below:
// Recommended approach
CoreApi coreApi = ((MapstedBaseApplication)getApplication()).getCoreApi(this);

// Alternative appoach:
// CoreApi coreApi = MapstedCoreApi.newInstance(this);

MapApi mapApi = MapstedMapApi.newInstance(this, coreApi);
MapUiApi mapUiApi = MapstedMapUiApi.newInstance(getApplicationContext(), mapApi);

// Note:
// This gives you full control of each sdk
// You are managing the lifecycle of each Api, so you are responsible for calling the appropriate lifecycle().onDestroy()
// If you are using the MapstedBaseApplication, then you do not need to manage the coreApi lifecycle.
Customizable Parameters
When you initialize a mobile sdk module, you must supply it with the corresponding parameter object, which allows for customization options.
| Sdk | Params class | Extends |
|---|---|---|
| sdk-core | CoreParams | -- |
| sdk-map | CustomMapParams | CoreParams |
| sdk-map | CustomParams | CustomMapParams |
As can be seen, due to the inheritance relationship, a single instance of CustomParams can be created and supplied for initializing each of the foundational sdks. A sample CustomParams creation is shown below.
// Some sample customization parameters
CustomParams params = CustomParams.newBuilder(this)
            .setBaseMapStyle(BaseMapStyle.DEFAULT)
            .setMapPanType(MapPanType.RESTRICT_TO_SELECTED_PROPERTY)
            .setMapZoomRange(new MapstedMapRange(6.0f, 25.0f))
            // Set whatever parameters you want
            .build();

// Note that you can also create a CoreParams or CustomMapParams (as necessary, if required)
Initializing the SDK
Each module has its own initialize(...) method. For the map-sdk and map-ui-sdk, the initialization is related to UI views (i.e., MapView or MapUiView, respectively). Conversely, the core-sdk can be initialized independently of any UI views. There are two main ways in which the modules can be initialized. Either, each module can be initialized seprately, or, if you initialize a depdent module (e.g., map-ui-sdk), then it will automatically also initialize any modules that it is depedent on (i.e., map-sdk, core-sdk). Examples of this are shown below.
// Example initialization of coreApi
coreApi.setup().initialize(params, new CoreApi.CoreInitCallback() {
    @Override
    public void onSuccess() {
        // Core successfully initialized
    }

    @Override
    public void onStatusUpdate(SdkStatusUpdate sdkUpdate) {
        // Status updates (warnings or information about what is going on)
    }

    @Override
    public void onFailure(SdkError sdkError) {
        // Initialization failed
    }
});

// ...

// Example initialization of mapApi
// If coreApi is not yet initialized, this will internally do so.
// If coreApi is already inialized, the onCoreInitiated() callback will be immediate
mapApi.setup().initialize(params, new MapApi.MapInitCallback() {

    @Override
    public void onCoreInitiated() {
        // Core initialized
    }

    @Override
    public void onSuccess() {
        // Map successfully initialized
    }

    @Override
    public void onStatusUpdate(SdkStatusUpdate sdkUpdate) {
        // Status updates (warnings or information about what is going on)
    }

    @Override
    public void onFailure(SdkError sdkError) {
        // Initialization failed
    }
});

// ...

// Example initialization of mapUiApi
// If coreApi and/or mapApi are not yet initialized, this will internally do so.
// If coreApi and/or mapApi are already inialized, the corresponding callback method will be called immediately
mapUiApi.setup().initialize(params, new MapUiApi.MapUiInitCallback() {
                @Override
                public void onCoreInitialized() {
                     // Core initialized
                }

                @Override
                public void onMapInitialized() {
                    // Map initialized
                }

                @Override
                public void onSuccess() {
                   // MapUi initialized
                }

                @Override
                public void onStatusUpdate(SdkStatusUpdate sdkUpdate) {
                    // Status updates (warnings or information about what is going on)
                }

                @Override
                public void onFailure(SdkError sdkError) {
                    // Initialization failed
                }
            },
            new MapUiApi.LocationServicesCallback() {
                @Override
                public void onLocationServicesStarted() {
                    // Location services has started
                }

                @Override
                public void onFailure(SdkError sdkError) {
                    // Location services failed to start
                    // e.g., no permissions
                }
            });
Note
Please be very careful not to create multiple instances of each module.
Location Marketing SDK
If you are using Location Marketing SDK, please note that you should initialize it only after the core-sdk is initialized.
locMarketing = new LocMarketing(context, coreApi, new LocMarketing.LocMarketingListener() {
    @Override
    public void navigateToMap(String campaignId, List<HomeEntity> homeEntityList) {
        Logger.d("navigateToMap: ");
    }

    @Override
    public void openWebsite(String campaignId, String websiteURL) {
        Logger.d("openWebsite: ");
    }

    @Override
    public void showInInAppNotificationBar(Campaign campaign) {
        Logger.d("show in-app pop-up: ");
    }
});
Mapsted Alert SDK
If you are using alerts-sdk, please note that you should initialize it only after the core-sdk is initialized.
AlertsManager can be used to receive scheduled alerts and emergency alerts.
AlertsManager supports two callbacks:
OnAlertChangeListenerto get changes in active alerts at a location.- The other
UserAtLocationCallbackto detect when an active alert triggers.
AlertsManager alertsManager = AlertsManagerImpl.getInstance(context, coreApi);

AlertsParams alertsParams = new AlertsParams.Builder(this, getInAppNotificationApi())
                                            .setAppNavigationProvider(this).build();

alertsApi.setup().initialize(alertsParams)

// To receive emergency alerts, submit your firebase token. Then configure FirebaseMessagingService by extending EmergencyAlertsFirebaseMessagingService.
// remember to register the service in your manifest.
alertsManager.sendFirebaseTokenForEmergencyAlerts(context, firebaseToken);

// To receive scheduled alerts
alertsManager.registerListener(new AlertsOnChangeListener(propertyId) {
    @Override
    public void onChangeInOngoingAlerts(Set<ScheduledAlert> before, Set<ScheduledAlert> after) {
        //use the diff of these sets of alerts to get alerts that were added or removed.
    }
});

// To get alert notifications for property if the user is at the property
alertsManager.setUserAtLocationCallback((alert, autoDismiss) -> {
            //There is alert for the user while at this location. This notification callback event
            //happens based on the trigger setting of the scheduled alerts. For example, it could be
            //set when user enters the building or exits the building.
            //in this callback, you can use the scheduledAlert object to show a notification etc.
});
...
Unregister from the listeners during teardown process
//teardown
...
alertsManager.unregisterListener(onAlertChangeListener);
alertsManager.onDestroy();
Location Sharing SDK
If you are using Location Sharing SDK, please note that you should initialize it after the core-sdk is initialized.
 // Setup location share api instance instantiation, once CoreApi & MapUiApi are initialized
 LocationShareApi liveLocationShareAPI = new MapstedLocationShareApi(this.getApplicationContext(), coreApi, mapUiApi);
 liveLocationShareAPI.setup().initialize();

// Start location sharing
liveLocationShareAPI.events().shareLiveLocation(selectedPropertyId, position, liveLocationResponse -> {
    if (liveLocationResponse != null && liveLocationResponse.getSuccess()) {
        // location sharing started
    }
});

 // Stop location sharing
liveLocationShareAPI.events().deleteSharedLiveLocation(liveLocationResponse -> {
    // ...
});

 //Setting up location share callbacks
liveLocationShareAPI.addLiveLocationTriggerListener(status -> {
    //If status is true, location sharing is started.
    //If status is false, location sharing is stopped.
});

// Destroy instance in onDestroy()
liveLocationShareAPI.lifecycle().onDestroy();
Topbar Notification SDK
If you are using Topbar Notification SDK, you can initialize it once Core SDK is successfully initialized.
    //The MapstedTopbarNotificationApi is initialized by providing the following:
    //FragmentManager: Used to manage and display the notification fragment.
    //Default Container (FrameLayout): The container view where the notifications will be displayed.
    //MapApi: The API that interacts with map-related notifications.
    //The initialization sets up the notification fragment in the provided container and associates it with the map API to handle notification events seamlessly.

    // Import necessary classes
    import androidx.fragment.app.FragmentManager
    import android.widget.FrameLayout

    // Example initialization
    val fragmentManager: FragmentManager = supportFragmentManager // Use FragmentManager from the activity or fragment
    val notificationContainer: FrameLayout = binding.topNotificationsContainer // The container for notifications
    val mapApiInstance: MapApi = mapApi // An instance of your MapApi implementation

    // Create an instance of MapstedTopbarNotificationApi
    val topNotificationApi = MapstedTopbarNotificationApi(
        fragmentManager = fragmentManager,
        defaultContainer = notificationContainer,
        mapApi = mapApiInstance
    )
Adding Notifications - Use the showInTopNotificationBar method to display a notification in the top bar.
    // Example notification to add
    val notification = TopbarNotifications(
        id = "notification_id_1", // Unique ID for the notification
        title = "New Notification",
        message = "This is a notification message",
        notificationType = 1 // Custom type identifier
    )

    // Add the notification to the top bar
    topNotificationApi?.showInTopNotificationBar(notification)
Removing Notifications - You can remove a notification using its unique ID
    // Remove the notification by its unique ID
    topNotificationApi?.removeFromTopNotificationBar("notification_id_1")
Mapsted Prebuilt UI/UX Components
Follow the same steps to initialize Mapsted Prebuilt UI/UX Components as you did for Mapsted Map. You can use a variety of prebuilt UI/UX components (ui-components-sdk) within your own application, and you also have the ability to add UI/UX components into the MapView. Please see Prebuilt UI Components to learn more.
Choose this mode when you want to create your own application using some of Mapsted's prebuilt UI/UX components.
Mapsted App Template
Choose this option if you prefer to use Mapsted's out-of-the-box app template. This mode doesn’t require any additional customization on your part.
Please see Prebuilt App Templates for more details.
7. Managing Location Services
The location services functionality enables developers to manage location tracking within the app, providing flexibility to start or stop services as needed. By default, location services initialize automatically when the SDK loads.
Configuring Location Services
To prevent the app from automatically requesting location permissions, set the following parameter before SDK initialization:
    val params = CustomParams.newBuilder(this)
    // Add additional custom content here

    .setAutoRequestLocationPermissions(false)
    .build()
Starting Location Services
To manually start location services, use the following method:
    coreApi.setup().startLocationServices(this, object : CoreApi.LocationServicesCallback{
        override fun onSuccess() {
            //Location service started
        }

        override fun onFailure(sdkError: SdkError?) {
            //failed to start Location service
        }
    })
Stopping Location Services
To stop location services, call the following method:
    coreApi.setup().stopLocationServices(this, object : CoreApi.LocationServicesCallback{
        override fun onSuccess() {
            //Location service stop success
        }

        override fun onFailure(sdkError: SdkError?) {
            //failed to stop Location service
        }
    })
Checking Location Services Status
To verify if location services are currently active, use:
coreApi.setup().areLocationServicesRunning()
This returns a Boolean value indicating whether location services are active.
8. Location Simulator Testing
The location simulator feature of our mobile-sdk provides you the opportunity to force the blue-dot to slide along a predefined path. This can be extremely useful for feature development (e.g., if you want to develop your own UI for routing or geofence pop-ups). Note that this can also be useful for better visualizing what a user experience may be like when using your application.
When initializing the core-sdk, simply supply the CoreParams with a SimulatorPath. For reference, the SimulatorPath consists of:
public static class SimulatorPath {
    // Path the blue dot will slide along (can be multi-floor or multi-building)
    public List<MercatorZone> path = new ArrayList<>();

    // Speed at which it will slide
    // 1.0F will slide at a typical user walk-speed
    // For development purposes, you may want to increase this to test more rapidly (e.g., 2.0F or 4.0F)
    public float walkSpeedModifier = 1.0F;
}
When using the Square One Shopping Center sample property, the following methods can be used for generating some sample paths.
/**
 * Generates location simulator path along level one
 */
private List<MercatorZone> getLocationSimulatorPath_LevelOne_ToFido() {

    LatLng[] levelOneLatLngs = new LatLng[] {

            new LatLng(43.59270591410157,-79.64468396358342),
            new LatLng(43.59275554576186,-79.64405625196909),
            new LatLng(43.59293620465817,-79.64386985725366),
            new LatLng(43.59302554127498,-79.64237869953212),
            new LatLng(43.59312480402684,-79.64235677074178),
            new LatLng(43.5931704648377,-79.64221149250811),
            new LatLng(43.593152597568235,-79.6420333210891),
            new LatLng(43.59316116651411,-79.64169529771698),
            new LatLng(43.593177048529554,-79.64133621378046),
            new LatLng(43.59336167665214,-79.64134443707688),
            new LatLng(43.59344307166634,-79.6413142849905),
    };

    List<MercatorZone> simulatorPath = new ArrayList<>();
    Arrays.stream(levelOneLatLngs).forEach(latLng -> simulatorPath.add(new MercatorZone(504, 504, 941, MapCalc.toMercator(latLng))));

    return simulatorPath;
}

/**
 * Generates location simulator path along level one and level two to Foot Locker
 */
private List<MercatorZone> getLocationSimulatorPath_LevelOne_LevelTwo_ToFootLocker() {

    LatLng[] levelOneLatLngs = new LatLng[] {
            new LatLng(43.59270506141888,-79.64467918464558),
            new LatLng(43.59274299108304,-79.64407554834054),
            new LatLng(43.59284979290362,-79.6439460008228),
            new LatLng(43.59286875769334,-79.64355460194005),
            new LatLng(43.59291567056778,-79.64341265093671),
            new LatLng(43.59290777113583,-79.64330951843408),
    };

    LatLng[] levelTwoLatLngs = new LatLng[] {
            new LatLng(43.59290777113583,-79.64330951843408),
            new LatLng(43.59291305771916,-79.64321462730396),
            new LatLng(43.59354343449601,-79.64326847002535),
            new LatLng(43.59363085147197,-79.64315247246824),
            new LatLng(43.59367739812217,-79.6420787112964),
            new LatLng(43.59363085147197,-79.64207400869265),
    };

    List<MercatorZone> simulatorPath = new ArrayList<>();
    Arrays.stream(levelOneLatLngs).forEach(latLng -> simulatorPath.add(new MercatorZone(504, 504, 941, MapCalc.toMercator(latLng))));
    Arrays.stream(levelTwoLatLngs).forEach(latLng -> simulatorPath.add(new MercatorZone(504, 504, 942, MapCalc.toMercator(latLng))));

    return simulatorPath;
}
Finally, make sure to update your CoreParams as follows:
CoreParams.SimulatorPath paramsPath = new CoreParams.SimulatorPath();
paramsPath.path = getLocationSimulatorPath_LevelOne_ToFido(); // For example, from above
paramsPath.walkSpeedModifier = simulatorWalkSpeedModifier;

// Note that if you have an instance of CustomMapParams or CustomParams
// You can use those instead of creating a new instance of CoreParams.
coreParams.setSimulatorPath(paramsPath);

// Initialize as normal
coreApi.setup().initialize(coreParams, ...);
9. Fake Gps Testing
By mocking your location, you can test MapstedSDK to simulate being at the property. There are a number of apps that can mock gps data on your android device. Once installed, that app needs to be set as the Mock Location app in your device’s Settings. This setting is in devices Setting > Developer Option.
Here are the steps.
-
Install any gps mocking app in your device from Google Play store. Here is one we have verified to be working. FakeGPS on Google Play Store
-
Enable Developer Option in your device. Follow the instructions on this link to enable developer options. Once the developer option menu is enabled, open the
Developer optionmenu. FindSelect mock location app. Then select the fake gps app. This will set that app as the mock location provider. -
Open the Fake GPS app and set your location to the location you wish to test. (e.g., for our sample property,
Square One Shopping Center, you may use43.59305369537576, -79.64327301294524). -
Depending on fakegps app feature, you may be able to save this location so that you do not have to enter the coordinates again. It might also show up in location history in the app. The fakegps app may or may not contain this feature. The suggested FakeGps app has this convenience.
-
Open your test app (e.g., you can use the Mapsted Sample app)
-
If you need to simulate walking movement, you can shake/oscillate your device. When using mocked location, this simulated walking is limited to work for few meters only.
iOS
After obtaining your iOS licence, please follow the steps in this guide to complete the installation process and initialize the Mapsted iOS SDK.
1. Minimum Requirements
| Requirement | Version |
|---|---|
| Xcode | |
| Project target | iOS 13.0 or higher |
| Swift projects | Swift 5 |
| CocoaPods | 1.8.0 or higher |
2. Setup Permissions
In your project's Info.plist file, please add following usage descriptions:
-
Add
NSLocationAlwaysUsageDescription(Privacy - Location Always Usage Description),NSLocationAlwaysAndWhenInUseUsageDescription(Privacy - Location Always and When In Use Usage Description), andNSLocationWhenInUseUsageDescription(Privacy - Location When In Use Usage Description). This descriptions you provide as values for these keys will be shown to the user when request permission to use their location. -
Add
NSBluetoothAlwaysUsageDescription(Privacy - Bluetooth Always Usage Description). This decription will be shown to the user when requesting permission to access bluetooth services on their device. -
Add
NSMotionUsageDescription(Privacy - Motion Usage Description). This description will be shown to the user when requesting permission to access Motion & Fitness activity on their device.
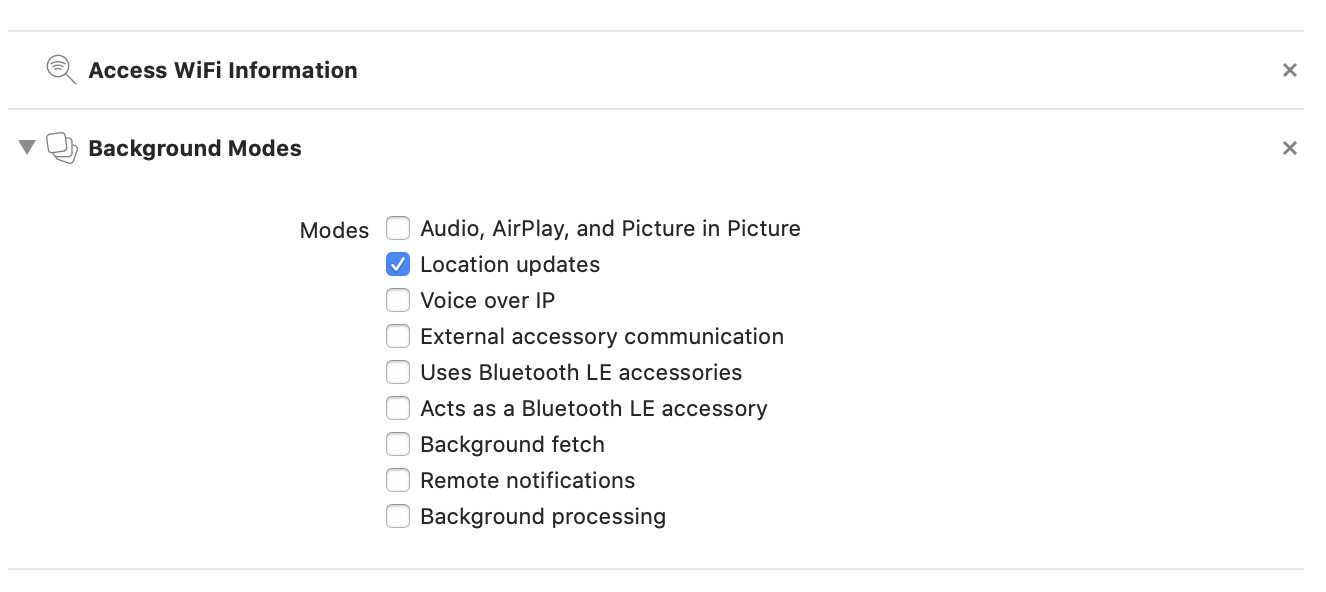
Location services are required to run in the background to support navigation. Additionally, to play the audio instructions while the navigation is on and application is in background, we need the background audio permissions. In Xcode, under Background Modes in App Capabilities, enable Location updates and Audo, Airplay and Picture in Picture. Also, add Access WiFi information as a capability.
3. Update Project Settings.
With your project open in Xcode, select your target. Go to the Build Settings tab and make sure Enable Bitcode is set to No.

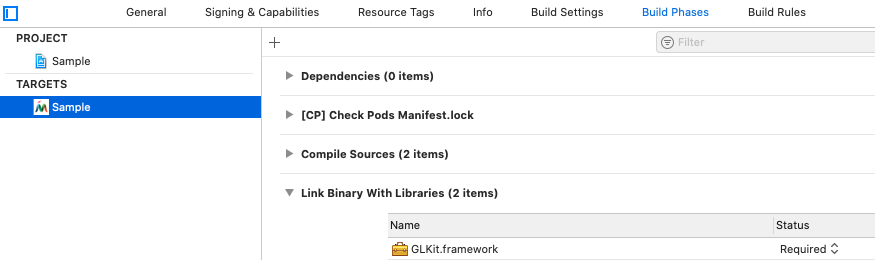
Our SDK requires that GLKit.framework be linked with your project. While this may not be a problem with our latest builds, older versions of our SDK may require you to explicitly add this to your target. To accomplish this, go the Build Phases tab with your target still selected, and make sure GLKit.framework is included under the section labeled Link Binary with Libraries. If it is not, click on the + button to add it.
4. Include Required Files
Add the Mapsted iOS licence file (ios_licence.key) to your project and place it in the app bundle, preferably under the Resources folder.
The colorful look in the map view requires some CSS code which is included in an asset file named mapstyle.zip. Add this file to your project and place it in the app bundle, preferably under the Resources folder.
5. Import the Mapsted SDK
Your application must use CocoaPods in order to install the Mapsted SDK. Rename Sample next to the target keyword to match the target name in your project.
platform :ios, '12.0'

source 'https://github.com/CocoaPods/Specs.git'

# Import the Mapsted pods
# Note that for simulator, please use podspec-simulator
# i.e., source 'https://github.com/Mapsted/podspec-simulator.git'
source 'https://github.com/Mapsted/podspec.git'

target 'Sample' do
use_frameworks!

# If you only need positioning, include this pod only!
pod 'mapsted-sdk-core', '~> 6.2.15'

# If you are displaying maps, include the following two pods
pod 'mapsted-sdk-core-map'
pod 'mapsted-sdk-map', '~> 6.2.15'

# If you want prebuilt map-ui (e.g., routing UI), include this pod
pod 'mapsted-sdk-map-ui', '~> 6.2.15'

# If you want prebuilt Mapsted UI/UX, include this pod
pod 'mapsted-sdk-ui-components', '~> 6.2.15'

# If you want to incorporate the Mapsted Location Marketing SDK, include this pod
pod 'mapsted-sdk-loc-marketing', '~> 6.2.15'

# If you want to incorporate the Mapsted Alerts SDK, include this pod
pod 'mapsted-sdk-alerts', '~> 6.2.15'

#If you are using map-sdk(mapsted-sdk-map) and building your own Location share UI on top of it, then you need to integrate the Location Share SDK as below.
#If you are using map-ui-sdk (mapsted-sdk-map-ui) then you don't need to add the below pod.
pod 'mapsted-sdk-location-share', '~> 6.2.15'

#If you are using map-sdk(mapsted-sdk-map) and want to add the top bar notification into the app, then you need to integerate the TopBar Notification SDK as below.
#If you are using map-ui-sdk (mapsted-sdk-map-ui) then you don't need to add the below pod.
pod 'mapsted-sdk-topbar-notification', '~> 6.2.15'

#If you want to use app template which has out-of-the-box application.
pod 'mapsted-sdk-app-template', '~> 6.2.15'
end
Install the pods and open the .xcworkspace file to see the project in Xcode.
$ pod update
$ open your-project.xcworkspace
6. Initialization of Mapsted SDK
The Mapsted SDK is very flexible and allows for multiple levels of integration. We will outline several different options for initializing the Mapsted SDK, based on your requirements and preferences, below.
Mapsted Map (No Prebuilt UI/UX)
Mapsted Map allows you to incorporate our map and/or positioning in a specific portion of your application, for example when a map button is clicked. Choose this mode when you want to use your own application and UI/UX.
In AppDelegate in didFinishLaunchingWithOptions, paste the following code to initialize the MapstedMap sdk. This will initialize the MapstedCore sdk as well. Set prefetchProperties to true if you want to pre-download all properties at app launch.
MapstedMapApi.shared.setUp(prefetchProperties: false, callback: self)
Setting the callback parameter enables you to receive success or failure callbacks from the SDK. Your callback should implement the 'CoreInitCallback` protocol.
extension AppDelegate : CoreInitCallback {

    func onSuccess() {
        //Handle success
    }

    func onFailure(errorCode: Int, errorMessage: String) {
        //Handle failure
    }
}
Mapsted Alerts
If you are using the Mapsted Alerts SDK, you can initialize it once Core SDK is successfully initialized
//Import the Alerts SDK first
import MapstedAlerts

//Initialize Alerts API
AlertsApi.initialize() { success, error in
        if let error = error {
            //handle Error
            print("Error: \(error.localizedDescription)")
        }
}

//You can check if LocMarketingApi is initialized using
let success = AlertsApi.hasInit()

//Once initialized, you can use its shared instance
let alertsManager = AlertsApi.shared
To receieve notifications when active alerts change for a specific property, you will need a delegate to the AlertsOnChangedListener protocol
let myPropertyId = 504;

//Add listener to get change events
alertsManager.addAlertChangeListener(propertyId: myPropertyId, listener: self)

//Your delegate needs to have implement the required methods
extension MyViewController : AlertsOnChangedListener {
    public func onChangeInOngoingAlerts(propertyId:Int, before: [AlertSearchable], after: [AlertSearchable]) {
        //Do something with the alerts
    }
}
To be notified when user is at a particular property, you need a delegate to the UserAtLocationListener protocol
//Add listener to get change events
alertsManager.addUserAtLocationListener(listener: self)

//Your delegate needs to have implement the required methods
extension MyViewController : UserAtLocationListener {
    public func onNotifyAlert(alert: AlertSearchable) {
        //Do something with the alert notification
    }
}
Location Marketing
If you are using the Mapsted Location Marketing SDK, you can initialize it once Core SDK is successfully initialized
//Import the Location Marketing SDK first
import LocationMarketing

//Initialize Location Marketing API
LocMarketingApi.initialize() { success, error in
        if let error = error {
            //handle Error
            print("Error: \(error.localizedDescription)")
        }
}

//You can check if LocMarketingApi is initialized using
let success = LocMarktingApi.hasInit()
Location Sharing
If you are using the Mapsted Location Sharing SDK, you can initialize it once Core SDK is successfully initialized
//Import the Location Sharing SDK first
import MapstedLocationShare

//Initialize/Start Location sharing
LocationShareApi.location.startLocationShareUpdates(propertyId: propertyId, position: position) { shareLiveLocResponse in

if let uShareLiveLocResponse = shareLiveLocResponse {
    if uShareLiveLocResponse.success {
        if let url = uShareLiveLocResponse.url {
            //Share url to the other user whom you want to allow to track your location.
            }
        }
    }
}

//Stop live location share:
LocationShareApi.location.stopLocationShareUpdates()

//To check if Share live location is enabled.
let liveLocationShareEnabled = LocationShareApi.location.isShareLiveLocationEnabled()

//Start observing live location share status changes
LocationShareApi.location.addShareLiveLocationChangeListener(listener: self)

//Stop observing live location share status changes
LocationShareApi.location.removeShareLiveLocationChangeListener(listener: self)
Topbar Notification SDK
If you are using Topbar Notification SDK, you can initialize it once Core SDK is successfully initialized.
import MapstedTopBarNotification
To register delegate for the notification listener manager.
MapstedNotificationListenerManager.shared.addDelegate(self)
To setup the notification view, please use below code
func setupNotificationView() {
    // Get the notification view controller from the NotificationUIManager
    if let notificationVC = NotificationUIManager.shared.getNotificationUIViewController() {
        // Add it as a child view controller
        addChild(notificationVC)
        // Set the frame of the notification view controller to match the bounds of the notification view
        notificationVC.view.frame = self.notificationView.bounds
        // Add the notification view controller's view as a subview
        self.notificationView.addSubview(notificationVC.view)
        // Notify the child view controller that it has been added to the parent
        notificationVC.didMove(toParent: self)
    }
}
Handle the delegate methods using below code.
extension YourViewController : MapstedNotificationListener{

    public func onTopBarNotificationEnabled(enabled: Bool) {
        // Implement logic to enable or disable the top bar notification view
        // Example: Show/hide the notification bar based on the enabled flag
    }

    public func onTopBarNotificationCountUpdated(count: Int, height: CGFloat, heightMode: MapstedTopBarNotification.HeightMode) {
                    // Update the container view height with the new notification height container
        // Adjust the table view /Container height based on the updated notification bar height
    }
}
Mapsted Prebuilt UI/UX Components
Follow the same steps to initialize Mapsted Prebuilt UI/UX Components as you did for Mapsted Map. Choose this mode when you want to create your own application using some of Mapsted's prebuilt UI/UX components.
Mapsted App Template
Choose this option if you prefer to use Mapsted's out-of-the-box app template. This mode doesn’t require any additional customization on your part.
Please see Prebuilt App Templates for more details.
7. Managing Location Services
The location services functionality enables developers to manage location tracking within the app, providing flexibility to start or stop services as needed. By default, location services initialize automatically when the SDK loads.
Configuring Location Services
To prevent the app from automatically requesting location permissions, set the following parameter before SDK initialization:
MNSettingUtils.shared.autoRequestLocationPermissions = false
Starting Location Services
To manually start location services, use the following method:
CoreApi.LocationManager.startLocationServices(delegate: <#LocationServicesCallback#>)
In your ViewController, implement the LocationServicesCallback protocol to handle start events:
    extension YourViewController: LocationServicesCallback {
        func onLocationServicesSuccess() {
            // Handle successful start of location services
        }
        func didFailWithError(_ error: Error!) {
            // Handle errors
        }
    }
Stopping Location Services
To stop location services, call the following method:
CoreApi.LocationManager.stopLocationServices(delegate: <#LocationServicesCallback#>)
Ensure LocationServicesCallback is implemented in your ViewController to handle stop events:
    extension YourViewController: LocationServicesCallback {
        func onLocationServicesSuccess() {
            // Handle successful stop of location services
        }
        func didFailWithError(_ error: Error!) {
            // Handle errors
        }
    }
Checking Location Services Status
To verify if location services are currently active, use:
let isStarted = CoreApi.LocationManager.isLocationServicesActive()
This returns a Boolean value indicating whether location services are active.
8. Location Simulation
Our Mapsted SDK provides extra features such as routing from your current location when you are at a supported property. To take advantage of these features even when you are not physically on site, you can simulate the location of your device via a number of possible approaches.
A quick search on the web with terms such as “fake gps” would bring up various suggestions including the risks and rewards involved. Here is one such search result: “4 Effective Methods to Fake GPS location on iPhone” (https://drfone.wondershare.com/virtual-location/fake-gps-ios.html)
Using Third Party Software
Due to Apple’s strict stance on user privacy, there are no straightforward solutions to fake gps on iOS devices. But there are workarounds that might work.
One example is “AnyTo” from iMyFone.net (https://www.imyfone.net/location-changer/)
Using Xcode
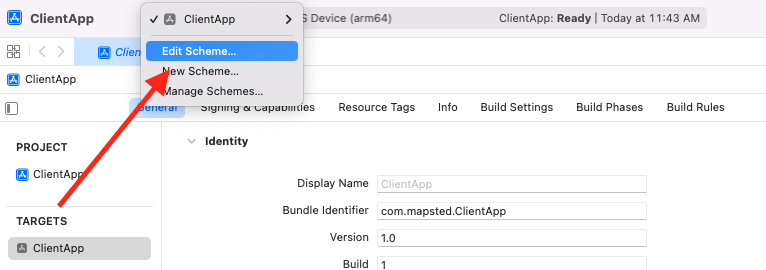
With an iOS App that you can build using our SDK, it is possible to simulate a location using Xcode. Here are the steps
-
Select your scheme and choose “Edit Scheme”
-
In the next window that appears, select “Run” from the left and “Options” on the right to reveal the option to “Allow Location Simulation”
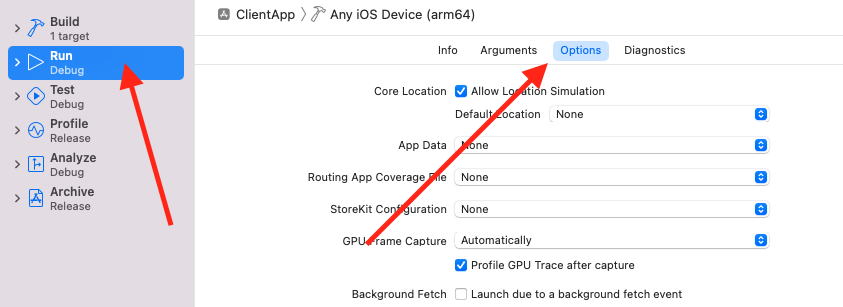
-
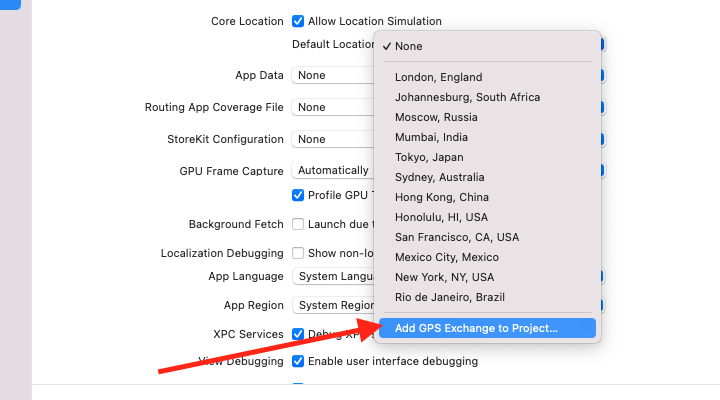
Make sure
Allow Location Simulationis selected and from the list next toDefault Locationyou can choose from the list available. If you want a more precise location, there is an entry at the bottom titledAdd GPS Exchange to Project …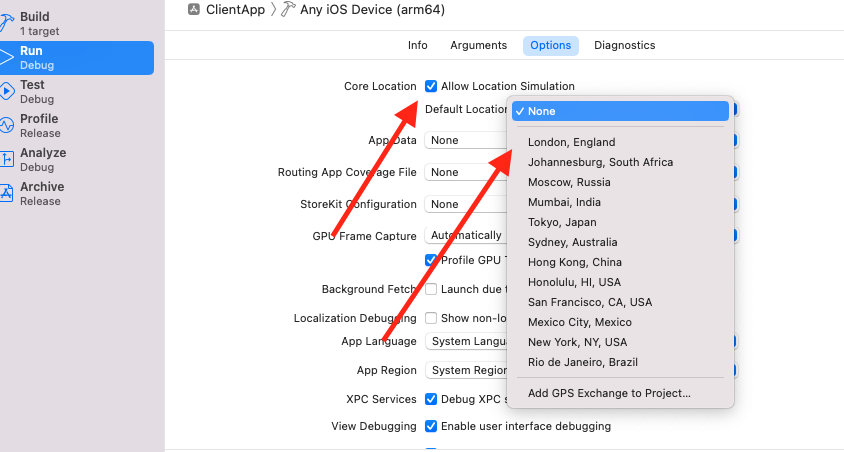
-
Selecting “Add GPS Exchange to Project …” will present a file picker which will allow you to choose a “gpx” (GPS Exchange Format) file.
You can generate one using websites such as https://gpx.studio which allows you to pan around a map and click on points to generate a file which contains those points. Once you are satisfied with your selection, you can download the generated file to your computer with extension “.gpx” and select it from the file picker.

How to Test Navigation Mode
Once you have set up for fake GPS location, you can follow these steps
-
Launch the app built with Mapsted SDK
-
In map view, use assisted positioning button to place marker more precisely if desired
-
Since you are on location, you can request routing from "My Location"
-
You can rotate phone to see vision code to get an idea of heading
-
You can shake phone vertically slightly to simulate steps in that direction
9. iOS Simulator
If you wish to the the Mapsted mobile-sdk on the simulator, simply modify the source URL in your podfile according to the table below.
Once you've updated the source URL please make sure to do a pod update.
| Platform | Podspec URL |
|---|---|
| Device | https://github.com/Mapsted/podspec.git |
| Simulator | https://github.com/Mapsted/podspec-simulator.git |
React Native
This guide will take you through the process of integrating the Mapsted React Native Library.
1. Install Library
npm install mapsted-react-native
2. iOS
- Your application must use CocoaPods in order to install the Mapsted Library. Please follow below instructions in podfile.
source 'https://cdn.cocoapods.org/'

# Note that for simulator, please use podspec-simulator
source 'https://github.com/Mapsted/podspec-simulator.git'
OR
# Note that for device, please use podspec
source 'https://github.com/Mapsted/podspec.git'
- Set use_frameworks! under your app target
use_frameworks!
-
Once you've updated the pod file please make sure to do a pod update.
-
Add license file in Resources folder
your_ios_license.key
3. Android
- Minimum Requirements
| Library | Version |
|---|---|
| Minimum Android SDK Version | 24 |
You must be running jdk 11 or higher. In Android Studio, open Files > Settings. Under Gradle options, Choose Gradle JDK to use jdk 11 or higher.
- Add license file in Assets folder('/app/src/main/assets')
your_android_license.key
Flutter
This guide will take you through the process of integrating the Mapsted Flutter Library.
1. Install Library
add mapsted_flutter as a dependency in your pubspec.yaml file.
dependencies:
  mapsted_flutter: ^0.0.7
Don't forget to flutter pub get.
2. Setting the mapsted plugin config
Run below command in your project directory in terminal
dart run mapsted_flutter:create
3. iOS
- Project/ios/Podfile Add source file on top.
source 'https://cdn.cocoapods.org/'

# To run in simulator add below source target
source 'https://github.com/Mapsted/podspec-simulator.git'

# To run in device add below source target
source 'https://github.com/Mapsted/podspec.git'
- Project/ios/Podfile set use frameworks in your app target
use_frameworks!
- Add license file in Resources folder
your_ios_license.key
4. Android
-
Set the
minSdkVersioninandroid/app/build.gradle: -
Minimum Requirements
| Library | Version |
|---|---|
| Minimum Android SDK Version | 24 |
You must be running jdk 11 or higher. In Android Studio, open Files > Settings. Under Gradle options, Choose Gradle JDK to use jdk 11 or higher.
- Add license file in Assets folder('/app/src/main/assets')
your_android_license.key
Ionic
This guide will take you through the process of integrating the Mapsted Ionic plugin.
1. Install Library
ionic cordova plugin add mapsted-cordova-plugin
npm install mapsted-awesome-cordova-plugin
2. iOS
- Your application must use CocoaPods in order to install the Mapsted Library. Please follow below instructions in podfile.
source 'https://cdn.cocoapods.org/'

# Note that for simulator, please use podspec-simulator
source 'https://github.com/Mapsted/podspec-simulator.git'
OR
# Note that for device, please use podspec
source 'https://github.com/Mapsted/podspec.git'
- Set use_frameworks! under your app target
use_frameworks!
-
Once you've updated the pod file please make sure to do a pod update.
-
Add license file in Resources folder
your_ios_license.key
3. Android
- Minimum Requirements
| Library | Version |
|---|---|
| Minimum Android SDK Version | 24 |
You must be running jdk 11 or higher. In Android Studio, open Files > Settings. Under Gradle options, Choose Gradle JDK to use jdk 11 or higher.
- Add license file in Assets folder('/app/src/main/assets')
your_android_license.key