
Ios getting started
After obtaining your iOS licence, please follow the steps in this guide to complete the installation process and initialize the Mapsted iOS SDK.
Upgrading from 6.2.x?
Version 26.7.1 raises the minimum iOS deployment target to 16.0 and requires Xcode 26.3 (the Swift 6 toolchain). Review the Migration Guide to v26.7.1 for the full list of breaking changes before you upgrade.
1. Minimum Requirements
| Requirement | Version |
|---|---|
| Xcode | 26.3 or higher (Swift 6 toolchain) |
| Project target | iOS 16.0 or higher |
| Swift projects | Swift 5 |
| CocoaPods | 1.8.0 or higher |
2. Setup Permissions
In your project's Info.plist file, please add following usage descriptions:
-
Add
NSLocationAlwaysUsageDescription(Privacy - Location Always Usage Description),NSLocationAlwaysAndWhenInUseUsageDescription(Privacy - Location Always and When In Use Usage Description), andNSLocationWhenInUseUsageDescription(Privacy - Location When In Use Usage Description). The descriptions you provide as values for these keys will be shown to the user when requesting permission to use their location. -
Add
NSBluetoothAlwaysUsageDescription(Privacy - Bluetooth Always Usage Description). This description will be shown to the user when requesting permission to access bluetooth services on their device. -
Add
NSMotionUsageDescription(Privacy - Motion Usage Description). This description will be shown to the user when requesting permission to access Motion & Fitness activity on their device.
Location services are required to run in the background to support navigation. Additionally, to play the audio instructions while the navigation is on and application is in background, we need the background audio permissions. In Xcode, under Background Modes in App Capabilities, enable Location updates and Audio, AirPlay and Picture in Picture. Also, add Access WiFi information as a capability.
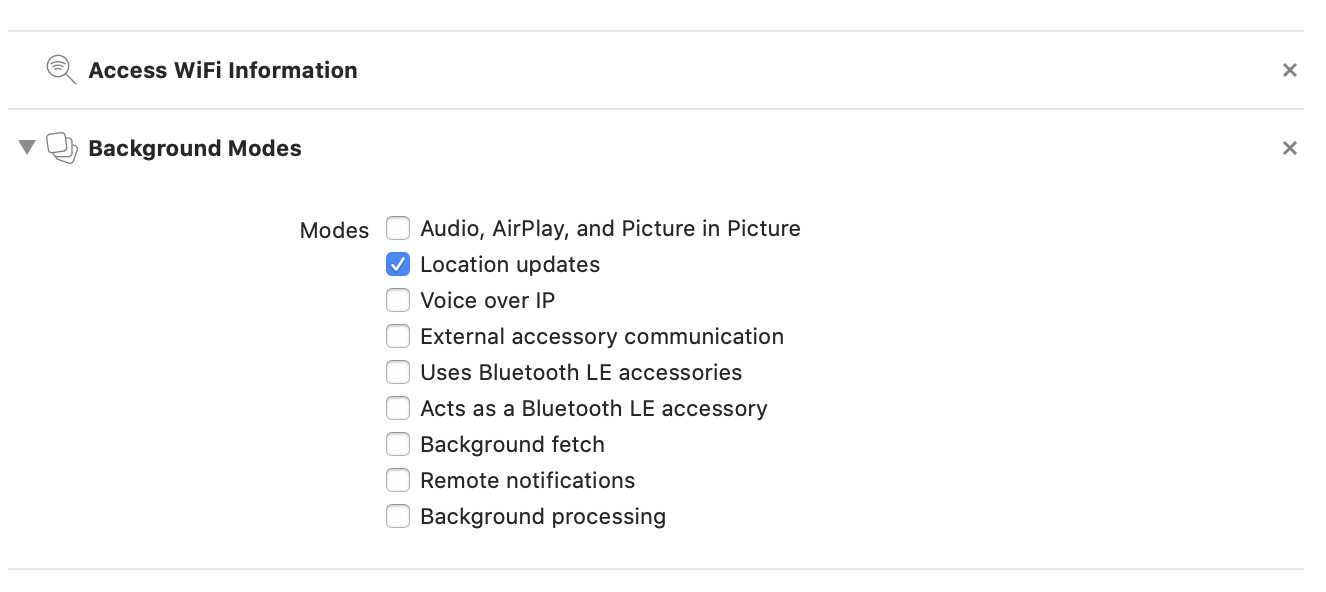
3. Update Project Settings.
With your project open in Xcode, select your target. Go to the Build Settings tab and make sure Enable Bitcode is set to No.

Our SDK requires that GLKit.framework be linked with your project. While this may not be a problem with our latest builds, older versions of our SDK may require you to explicitly add this to your target. To accomplish this, go the Build Phases tab with your target still selected, and make sure GLKit.framework is included under the section labeled Link Binary with Libraries. If it is not, click on the + button to add it.
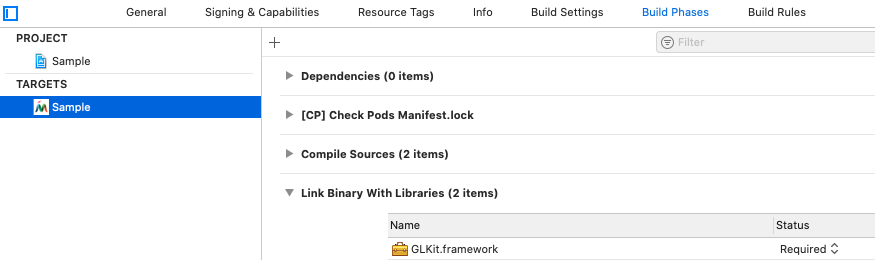
4. Include Required Files
Where to get these files: your Mapsted iOS licence file (ios_licence.key) and the map-style asset (mapstyle.zip) are issued to you by Mapsted for your account. If you do not already have them, request them from the Mapsted Maps Manager portal or from your Mapsted representative before continuing.
Add the Mapsted iOS licence file (ios_licence.key) to your project and place it in the app bundle, preferably under the Resources folder.
The colorful look in the map view requires some CSS code which is included in an asset file named mapstyle.zip. Add this file to your project and place it in the app bundle, preferably under the Resources folder.
5. Import the Mapsted SDK
The Mapsted SDK is distributed with CocoaPods. If you don't already have CocoaPods installed, install it and confirm the version (1.8.0 or higher):
$ sudo gem install cocoapods
$ pod --version
From your Xcode project's root folder (the folder containing your .xcodeproj), generate a Podfile with pod init, then replace its contents with the following. Rename Sample next to the target keyword to match your app's target name. On Apple Silicon Macs, if pod install fails, retry with arch -x86_64 pod install.
platform :ios, '16.0'

source 'https://cdn.cocoapods.org/'

# Import the Mapsted pods (universal XCFrameworks — one source works for device and simulator)
source 'https://github.com/MapstedHQ/podspec.git'

target 'Sample' do
use_frameworks!

# If you only need positioning, include this pod only!
pod 'mapsted-sdk-core', '~> 26.10.3'

# If you are displaying maps, include the following two pods
pod 'mapsted-sdk-core-map'
pod 'mapsted-sdk-map', '~> 26.10.3'

# If you want prebuilt map-ui (e.g., routing UI), include this pod
pod 'mapsted-sdk-map-ui', '~> 26.10.3'

# If you want prebuilt Mapsted UI/UX, include this pod
pod 'mapsted-sdk-ui-components', '~> 26.10.3'

# If you want to incorporate the Mapsted Location Marketing SDK, include this pod
pod 'mapsted-sdk-loc-marketing', '~> 26.10.3'

# If you want to incorporate the Mapsted Alerts SDK, include this pod
pod 'mapsted-sdk-alerts', '~> 26.10.3'

#If you are using map-sdk(mapsted-sdk-map) and building your own Location share UI on top of it, then you need to integrate the Location Share SDK as below.
#If you are using map-ui-sdk (mapsted-sdk-map-ui) then you don't need to add the below pod.
pod 'mapsted-sdk-location-share', '~> 26.10.3'

#If you are using map-sdk(mapsted-sdk-map) and want to add the top bar notification into the app, then you need to integrate the TopBar Notification SDK as below.
#If you are using map-ui-sdk (mapsted-sdk-map-ui) then you don't need to add the below pod.
pod 'mapsted-sdk-topbar-notification', '~> 26.10.3'

#If you want to use app template which has out-of-the-box application.
pod 'mapsted-sdk-app-template', '~> 26.10.3'
end
Install the pods, then always open the generated .xcworkspace file (not the .xcodeproj) in Xcode from now on. Use pod install for your first integration; use pod update only later, when upgrading to a newer SDK version.
$ pod install
$ open your-project.xcworkspace
Alternative: Swift Package Manager
Prefer Swift Package Manager? The Mapsted SDK is also distributed as a Swift package — you do not need both, use SwiftPM or CocoaPods.
In Xcode, choose File → Add Package Dependencies… and enter the package URL:
https://github.com/MapstedHQ/mapsted-ios-sdk-spm
Set the dependency rule to Up to Next Major Version starting at 26.10.3, then add only the products your app needs (each product automatically pulls in its dependencies):
| Add this product | For… | You then import |
|---|---|---|
| MapstedMapUi | Maps + prebuilt map UI (most apps) | MapstedMapUi |
| MapstedCore | Indoor positioning only | MapstedCore |
| MapstedMap | Render maps (no prebuilt UI) | MapstedMap |
| MapstedComponentsUI | Mapsted UI components | MapstedComponentsUI |
| LocationMarketing | Location-marketing features | LocationMarketing |
| MapstedAlerts | Alerts | MapstedAlerts |
| AppTemplate | The full prebuilt app template | AppTemplate |
Each module is a universal XCFramework (device and simulator in one artifact), so there is no separate simulator configuration. The import and initialization code is identical to the CocoaPods flow (see step 6 below).
Troubleshooting setup
- "No such module 'MapstedCore'" (or any Mapsted module): you opened the
.xcodeproj— close it and open the generated.xcworkspaceinstead. pod installcan't find the Mapsted pods: confirm thesourcelines in yourPodfileare present and that you have access to the Mapsted pod-spec repository.- App builds but the map is blank / unstyled: confirm
ios_licence.keyandmapstyle.zipare added to the app bundle (step 4). - Initialization never succeeds: confirm the Info.plist permission keys from step 2, and check whether
onFailure(errorCode:)is being called (e.g. a licence error). - Apple Silicon
pod installerrors: retry witharch -x86_64 pod install.
6. Initialization of Mapsted SDK
The Mapsted SDK is very flexible and allows for multiple levels of integration. We will outline several different options for initializing the Mapsted SDK, based on your requirements and preferences, below.
Mapsted Map (No Prebuilt UI/UX)
Mapsted Map allows you to incorporate our map and/or positioning in a specific portion of your application, for example when a map button is clicked. Choose this mode when you want to use your own application and UI/UX.
In AppDelegate in didFinishLaunchingWithOptions, paste the following code to initialize the MapstedMap sdk. This will initialize the MapstedCore sdk as well. Set prefetchProperties to true if you want to pre-download all properties at app launch.
import MapstedMap
import MapstedCore

// Call this from AppDelegate.didFinishLaunchingWithOptions
MapstedMapApi.shared.setUp(prefetchProperties: false, callback: self)
Setting the callback parameter enables you to receive success or failure callbacks from the SDK. Your callback should implement the CoreInitCallback protocol.
extension AppDelegate : CoreInitCallback {

    func onSuccess() {
        //Handle success
    }

    func onFailure(errorCode: EnumSdkError) {
        //Handle failure
    }

    func onStatusUpdate(update: EnumSdkUpdate) {
        //Handle status update
    }

    func onStatusMessage(messageType: StatusMessageType) {
        //Handle status message
    }
}
How do you know it worked? When your onSuccess() callback fires, the Mapsted SDK has initialized successfully — add a print("Mapsted SDK initialized") there (or present your map) to confirm before building further. If onFailure(errorCode:) fires instead, inspect the errorCode value.
Mapsted Alerts
If you are using the Mapsted Alerts SDK, you can initialize it once Core SDK is successfully initialized
//Import the Alerts SDK first
import MapstedAlerts

//Initialize Alerts API
AlertsApi.initialize() { success, error in
        if let error = error {
            //handle Error
            print("Error: \(error.localizedDescription)")
        }
}

//You can check if LocMarketingApi is initialized using
let success = AlertsApi.hasInit()

//Once initialized, you can use its shared instance
let alertsManager = AlertsApi.shared
To receive notifications when active alerts change for a specific property, you will need a delegate to the AlertsOnChangedListener protocol
let myPropertyId = 504;

//Add listener to get change events
alertsManager.addAlertChangeListener(propertyId: myPropertyId, listener: self)

//Your delegate needs to have implement the required methods
extension MyViewController : AlertsOnChangedListener {
    public func onChangeInOngoingAlerts(propertyId:Int, before: [AlertSearchable], after: [AlertSearchable]) {
        //Do something with the alerts
    }
}
To be notified when user is at a particular property, you need a delegate to the UserAtLocationListener protocol
//Add listener to get change events
alertsManager.addUserAtLocationListener(listener: self)

//Your delegate needs to have implement the required methods
extension MyViewController : UserAtLocationListener {
    public func onNotifyAlert(alert: AlertSearchable) {
        //Do something with the alert notification
    }
}
Location Marketing
If you are using the Mapsted Location Marketing SDK, you can initialize it once Core SDK is successfully initialized
//Import the Location Marketing SDK first
import LocationMarketing

//Initialize Location Marketing API
LocMarketingApi.initialize() { success, error in
        if let error = error {
            //handle Error
            print("Error: \(error.localizedDescription)")
        }
}

//You can check if LocMarketingApi is initialized using
let success = LocMarketingApi.hasInit()
Location Sharing
If you are using the Mapsted Location Sharing SDK, you can initialize it once Core SDK is successfully initialized
//Import the Location Sharing SDK first
import MapstedLocationShare

//Initialize/Start Location sharing
LocationShareApi.location.startLocationShareUpdates(propertyId: propertyId, position: position) { shareLiveLocResponse in

if let uShareLiveLocResponse = shareLiveLocResponse {
    if uShareLiveLocResponse.success {
        if let url = uShareLiveLocResponse.url {
            //Share url to the other user whom you want to allow to track your location.
            }
        }
    }
}

//Stop live location share:
LocationShareApi.location.stopLocationShareUpdates()

//To check if Share live location is enabled.
let liveLocationShareEnabled = LocationShareApi.location.isShareLiveLocationEnabled()

//Start observing live location share status changes
LocationShareApi.location.addShareLiveLocationChangeListener(listener: self)

//Stop observing live location share status changes
LocationShareApi.location.removeShareLiveLocationChangeListener(listener: self)
Topbar Notification SDK
If you are using Topbar Notification SDK, you can initialize it once Core SDK is successfully initialized.
import MapstedTopBarNotification
To register delegate for the notification listener manager.
MapstedNotificationListenerManager.shared.addDelegate(self)
To setup the notification view, please use below code
func setupNotificationView() {
    // Get the notification view controller from the NotificationUIManager
    if let notificationVC = NotificationUIManager.shared.getNotificationUIViewController() {
        // Add it as a child view controller
        addChild(notificationVC)
        // Set the frame of the notification view controller to match the bounds of the notification view
        notificationVC.view.frame = self.notificationView.bounds
        // Add the notification view controller's view as a subview
        self.notificationView.addSubview(notificationVC.view)
        // Notify the child view controller that it has been added to the parent
        notificationVC.didMove(toParent: self)
    }
}
Handle the delegate methods using below code.
extension YourViewController : MapstedNotificationListener{

    public func onTopBarNotificationEnabled(enabled: Bool) {
        // Implement logic to enable or disable the top bar notification view
        // Example: Show/hide the notification bar based on the enabled flag
    }

    public func onTopBarNotificationCountUpdated(count: Int, height: CGFloat, heightMode: MapstedTopBarNotification.HeightMode) {
                    // Update the container view height with the new notification height container
        // Adjust the table view /Container height based on the updated notification bar height
    }
}
Mapsted Prebuilt UI/UX Components
Follow the same steps to initialize Mapsted Prebuilt UI/UX Components as you did for Mapsted Map. Choose this mode when you want to create your own application using some of Mapsted's prebuilt UI/UX components.
Mapsted App Template
Choose this option if you prefer to use Mapsted's out-of-the-box app template. This mode doesn’t require any additional customization on your part.
Please see Prebuilt App Templates for more details.
7. Managing Location Services
The location services functionality enables developers to manage location tracking within the app, providing flexibility to start or stop services as needed. By default, location services initialize automatically when the SDK loads.
Configuring Location Services
To prevent the app from automatically requesting location permissions, set the following parameter before SDK initialization:
MNSettingUtils.shared.autoRequestLocationPermissions = false
Starting Location Services
To manually start location services, use the following method:
CoreApi.LocationManager.startLocationServices(delegate: <#LocationServicesCallback#>)
In your ViewController, implement the LocationServicesCallback protocol to handle start events:
    extension YourViewController: LocationServicesCallback {
        func onLocationServicesSuccess() {
            // Handle successful start of location services
        }
        func didFailWithError(_ error: Error!) {
            // Handle errors
        }
    }
Stopping Location Services
To stop location services, call the following method:
CoreApi.LocationManager.stopLocationServices(delegate: <#LocationServicesCallback#>)
Ensure LocationServicesCallback is implemented in your ViewController to handle stop events:
    extension YourViewController: LocationServicesCallback {
        func onLocationServicesSuccess() {
            // Handle successful stop of location services
        }
        func didFailWithError(_ error: Error!) {
            // Handle errors
        }
    }
Checking Location Services Status
To verify if location services are currently active, use:
let isStarted = CoreApi.LocationManager.isLocationServicesActive()
This returns a Boolean value indicating whether location services are active.
8. Location Simulation
Our Mapsted SDK provides extra features such as routing from your current location when you are at a supported property. To take advantage of these features even when you are not physically on site, you can simulate the location of your device via a number of possible approaches.
A quick search on the web with terms such as “fake gps” would bring up various suggestions including the risks and rewards involved. Here is one such search result: “4 Effective Methods to Fake GPS location on iPhone” (https://drfone.wondershare.com/virtual-location/fake-gps-ios.html)
Using Third Party Software
Due to Apple’s strict stance on user privacy, there are no straightforward solutions to fake gps on iOS devices. But there are workarounds that might work.
One example is “AnyTo” from iMyFone.net (https://www.imyfone.net/location-changer/)
Using Xcode
With an iOS App that you can build using our SDK, it is possible to simulate a location using Xcode. Here are the steps
-
Select your scheme and choose “Edit Scheme”
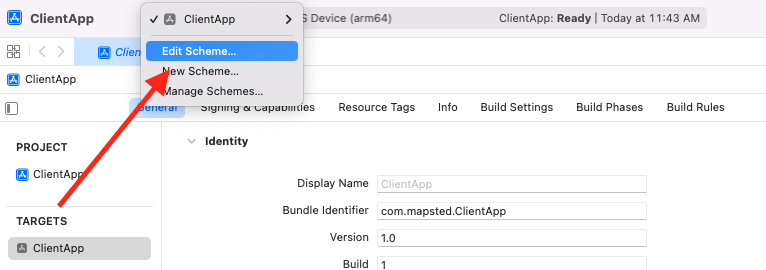
-
In the next window that appears, select “Run” from the left and “Options” on the right to reveal the option to “Allow Location Simulation”
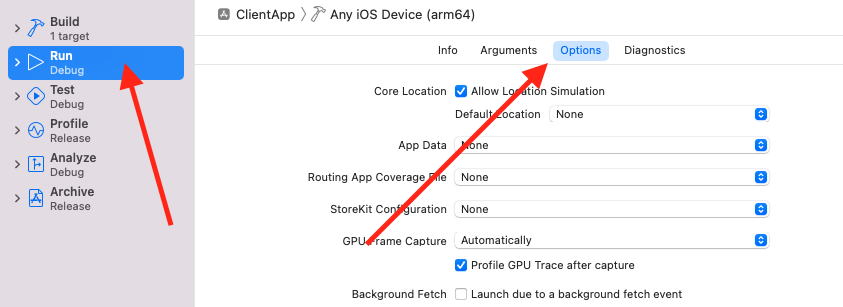
-
Make sure
Allow Location Simulationis selected and from the list next toDefault Locationyou can choose from the list available. If you want a more precise location, there is an entry at the bottom titledAdd GPS Exchange to Project …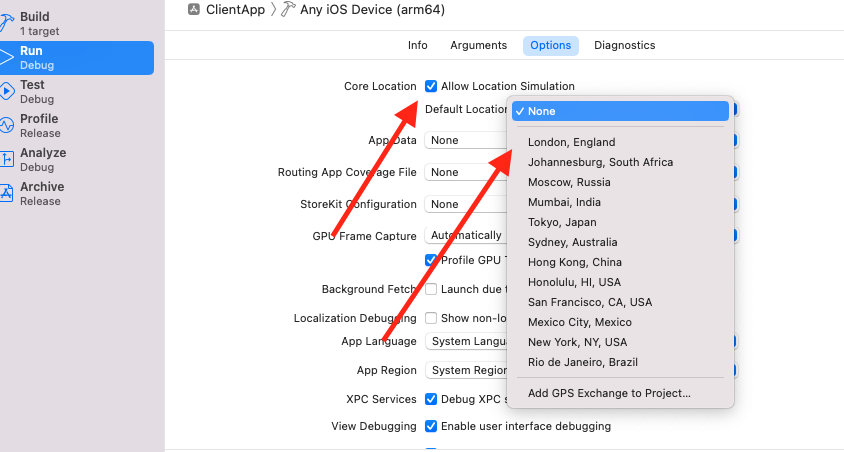
-
Selecting “Add GPS Exchange to Project …” will present a file picker which will allow you to choose a “gpx” (GPS Exchange Format) file.
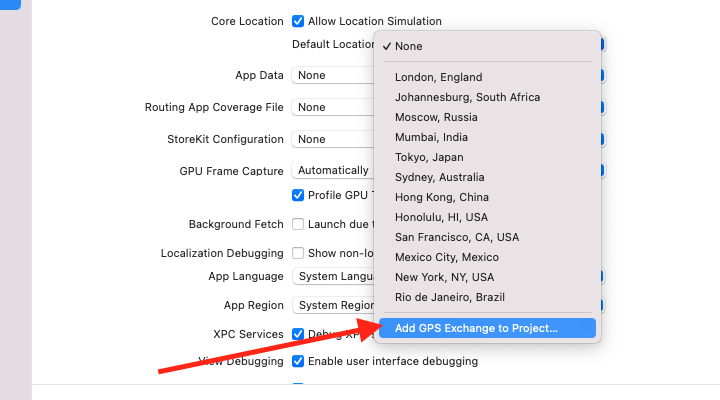
You can generate one using websites such as https://gpx.studio which allows you to pan around a map and click on points to generate a file which contains those points. Once you are satisfied with your selection, you can download the generated file to your computer with extension “.gpx” and select it from the file picker.

How to Test Navigation Mode
Once you have set up for fake GPS location, you can follow these steps
-
Launch the app built with Mapsted SDK
-
In map view, use assisted positioning button to place marker more precisely if desired
-
Since you are on location, you can request routing from "My Location"
-
You can rotate phone to see vision code to get an idea of heading
-
You can shake phone vertically slightly to simulate steps in that direction
9. iOS Simulator
The Mapsted mobile-SDK is distributed as universal XCFrameworks that contain both device (ios-arm64) and simulator (ios-arm64_x86_64-simulator) slices. The single https://github.com/MapstedHQ/podspec.git source works for both — no source change is needed to build and run on the iOS Simulator.